I recently shot video and sold DVDs of a dance recital, and I thought I’d share some of the lessons learned from the experience. My hope is that this post helps anyone who might be getting into this particular type of videography.
This was my first time dealing with this particular type of job. Usually the type of work I do is paid for as a “services rendered” type of deal (such as a wedding). In this case though, while I was technically hired to do the videography work by the dance studio, any income would come from DVD sales. This was completely new to me, but ultimately it worked out rather well.
So here are the lessons learned from shooting video of a dance recital:
Lesson 1 – Shoot all of the performances!
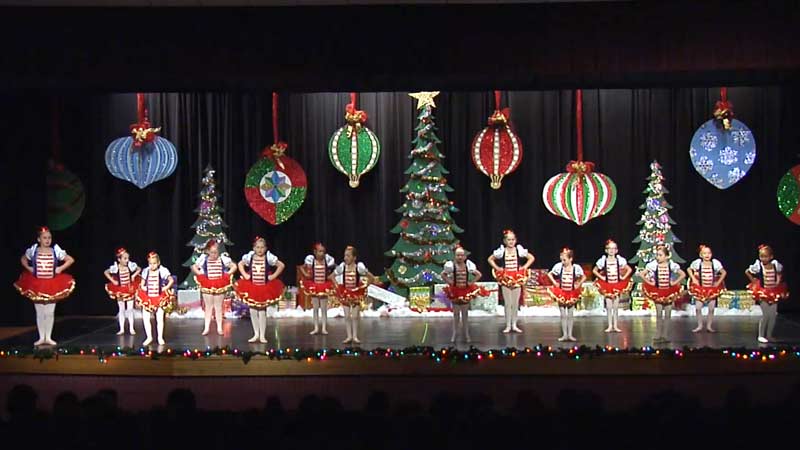
If there is more than one performance of the show, definitely record all of them! In this case there were two shows, plus a rehearsal. I was given access to the rehearsal, which was great. I was able to calmly dial in all my settings, test camera angles, practice camera movements and get an overall feel for what to expect during the actual performance. If you have access to any type of rehearsal, absolutely take it! For the show itself, there were two performances on two nights and I recorded both of them. I had planned on shooting both shows just for the sake of having a lot of footage to work with, but the real blessing in disguise here was the fact that some of these performances involved some very young kids. And generally if very young kids are involved, that almost always means that someone is going to end up crying. Sure enough, on both nights (during the same performance!) there were some kids with some pretty bad stage fright. A different kid on each night, in fact. One of the kids actually bailed and left the stage during the first night’s performance, so not much could be done to salvage that footage (she didn’t appear at all on night two). On night two a different kid was crying, but stuck it out throughout the performance. She was fine the night before, so I had plenty of footage of her without any crying. I was able to use footage from both nights to carefully edit the performance to make it appear as if she was happy throughout. Without having recorded both nights, I never would have had that option.
Lesson 2 – Use more than one camera (preferably three)
I shot the first performance with two cameras mounted on tripods all the way in the back of the auditorium and quickly realized that I would have been better off with three. My plan was to use one stationary camera with a permanent wide angle (more on that in a bit) and one more camera to zoom with and follow the action. What I discovered after shooting the first night was that I really needed a wide shot, a medium shot, and a super close-up shot. So on the 2nd night, I had my wife man a third camera that was extremely close to the stage. The purpose of this camera was to grab as many close-ups of each of the dancers as possible. I used the 2nd camera as a “medium shot” which I used to zoom in only as far as seeing the performer’s full body (not just their face). For the most part though, this camera’s job was to get all the performers in one nice, tight shot. I had the stationary camera set up once again as a full wide shot, which simply shot the entire stage. I figured at the very least, I could always just fall back to that camera. This proved to be true.
Here’s a diagram showing my setup. You can see I had two cameras all the way in the back and one very close to the stage.
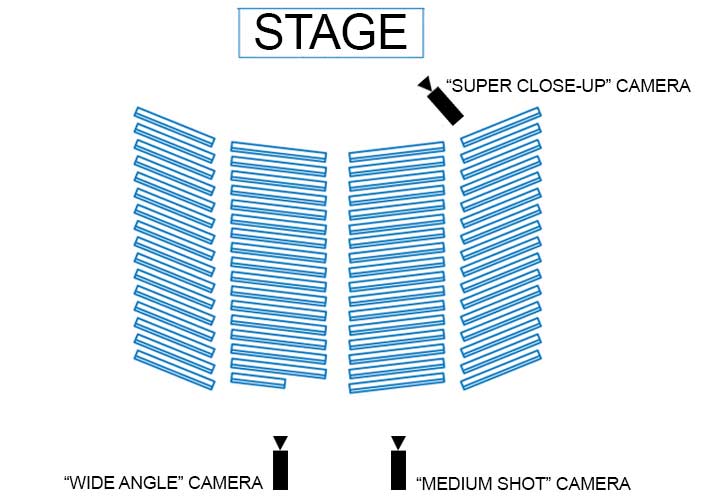
This is the setup I used for shooting a dance recital. Three cameras, one close-up, one medium and one wide.
Lesson 3 – Get a tall tripod!
That stationary camera I mentioned earlier? I had it mounted on an old Bogen 3036 tripod, which extends to over six feet via a geared center column. This particular tripod is no longer available and has since been replaced by the Manfrotto 475B Pro Geared Tripod. I’d also recommend grabbing the Manfrotto 502 Video Head. Having a tripod that goes this high can really be a lifesaver. My “medium shot” camera could only be as tall as me (since I was operating the camera), so invariably someone would walk directly in front of me, ruining my shot. Having the tall, wide shot as a backup was great. Having that third “close-up only” camera was even better. I didn’t use the wide shot all that much in the final edit, but when I did use it I was very glad it was there as an option.
Lesson 4 – Get at least a few close-ups of every dancer
I figured going into this gig that it would be important to get close-up shots of every single performer in the recital. This proved to be absolutely true. Every parent that ends up buying a DVD is really buying it to see their kid perform, and to have a lasting memory that can be played anytime they like. If the DVD doesn’t include at least a few nice close-up shots of their kid, you are going to end up with a very unhappy customer. This was the main reason I enlisted my wife to man the “super close-up” camera on night two. Her instructions were literally to just shoot as many close-up shots of each dancer in every single act of the recital. In the end, I was very happy to have these close-up shots during the editing process. I only had one issue with any of the parents in regards to close-up shots, but I was able to resolve it. Remember the crying kid I mentioned earlier? I only had the “super close-up” camera on night two (the night she was crying) so I had to rely on primarily footage from night one if I wanted anything with her in it. That meant that any footage from night two was carefully cut so that as the “super close-up” camera panned towards her, I’d cut away to footage from the previous night. This worked great for the crying kid, but not so much for the kid standing right next to her. The parents of that kid emailed me and asked if I could provide them with a DVD that showed just one camera angle so they could see more close-ups of their kid. I wasn’t able to provide that for them, but I was able to upload all three camera angles from night two on to YouTube (via an unlisted link). This made them happy. Something to consider if you run into anything similar.
Lesson 5 – Capture good ambient audio
I knew going in that I’d be receiving a CD full of all the music that was used in each act of the recital. I also knew that I’d really need to capture good audio of the audience before, after, and sometimes during each performance. I used a Sennheiser ME66/K6 Shotgun Microphone to capture ambient audio and I was happy with the results. One thing I noticed when reviewing the footage from the first night was that there was a lot of sound emanating from the stage, so on night two I added two more microphones. First, I put the shotgun mic on the “super-close” camera. This allowed me to get great audio from both the audience as well as the stage. Next, I put a Sennheiser wireless mic on the stage itself (off the side, out of the way). I was surprised at how much these additional audio options added to the overall quality of the final product. The sound of tiny feet running across the stage just before an act started, or the sound of the shoes during a tap dancing routine, it all added to the feeling of “being there” when watching the finished product. So I’d definitely recommend capturing audio from close to the stage if you can manage it.
Lesson 6 – Manual focus!
I know it seems crazy to suggest manual focus when shooting a live event, but hear me out. For both the stationary wide shot camera and the medium shot camera I went with manual focus (the super close-up camera was on auto focus). I dialed in the focus settings before the show started and never touched the focus ring again. I did this because the stationary camera was never going to move, which meant the focus was never going to change. The medium shot camera was never intended to zoom all the way in, so the focus on this camera remained the same throughout the shoot as well. Video cameras have a really hard time maintaining focus in situations where the lighting is constantly changing (you’ve probably noticed) so keeping those two cameras in manual focus made the most sense to me. It worked out great. The super close-up camera did struggle with focusing from time to time (since it was on auto), but it didn’t much matter. The footage from that camera was used as needed, so cutting out any out of focus shots wasn’t a problem.
Lesson 7 – Offer more than one way to pay for the DVDs
The way I arranged to have orders placed was to mail 100 order forms to the dance studio, which they would then collect from the parents and hand to me on the night of the performance. I also offered a simple PayPal shopping cart option via this website. The PayPal option was especially useful after the “in person” orders were no longer an option. I had quite a few orders come in via my website weeks after the initial orders had all been placed and shipped. I charged $30 for “in-studio pickup” and $35 to ship the DVDs.
All in all I enjoyed this experience. I made a good bit of money from the DVD sales and I’ve been asked to be the videographer for any future recitals. Sweet!
If you are interested in the process I used for editing my footage, I put together a tutorial on multicam editing in Adobe Premiere over on my YouTube Channel.
Below is a quick montage of the dance recital.
Thanks for reading. If you have any questions or comments, feel free to leave them below.


