
NOTE: This post was updated in May, 2026.
This guide was written for those wanting an easy solution for capturing videotapes that will provide them with a relatively small file that works on modern devices. If you are attempting uncompressed archival and/or restoration of your tapes, VirtualDub is the better solution. Here’s a video showing how to use it.
If you are interested in trying OBS to capture lossless, 4:2:2 video files, have a look at this post.
If you’d rather watch a video tutorial of this post, you can do so below:
OBS is an incredibly versatile (and free) tool, and it can even be used to digitize VHS tapes with a piece of hardware (and a VCR, of course). Here’s how it’s done!
What You’ll Need
- A functioning VCR
- RCA Cables and (if applicable) an S-Video cable (depends on your VCR)
- A USB converter. I used this one from Amazon, which is around $40 NOTE: This tutorial is written assuming you are using this converter.
- OBS downloaded and installed (OBS is free)
Install the Drivers
If you purchased the Startech.com device that I recommended, download the latest drivers from here (use the “Drivers & Downloads” tab). Once downloaded, extract the zip and run the Setup file from within the “Windows” folder. The drivers will be installed.
Plug in the Adapter
After you’ve connected the cables from the VCR to the adapter, go ahead and plug the adapter into an available USB port on your computer. To verify that the adapter has been correctly installed, open your device manager by right clicking the Windows button and choosing “Device Manager” as shown below.

Open the “Sound, video and game controllers” section and make sure that “USB 2828x Audio Device” and “USB 2828x Device” are shown, as shown below.

Download and Install OBS
Download and install OBS – https://obsproject.com/
Configure OBS
When you first launch OBS after installing it, it will ask if you’d like to run the auto-configuration wizard. Click “No” (we’ll be going through all the settings separately).
Change Canvas and Output Settings
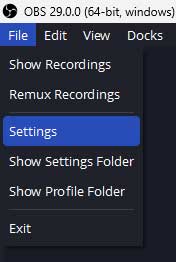
First you’ll want to set up your canvas and output settings. To open the settings, click on the “File” menu and select “Settings” as shown below.
In the Settings menu, click on the “Video” tab.
- For NTSC, change the “Base (Canvas) Resolution” to 720×480. If you are in the United States, use this setting. The NTSC standard was used in most of the Americas (except Argentina, Brazil, Paraguay, and Uruguay), Liberia, Myanmar, South Korea, Taiwan, Philippines, Japan, and some Pacific Islands nations and territories.
- For PAL, change the “Base (Canvas) Resolution” to 720×576. The PAL region is a television publication territory that covers most of Asia, Africa, Europe, South America and Oceania.
NOTE: You’ll need to highlight the current resolution and type your Base (Canvas) Resolution in, as it’s not available in the dropdown.
If you’ll be digitizing your tapes for use on a modern device (like a computer or a phone) use one of these for the “Output (Scaled) Resolution” setting:
- For NTSC, type in 720×540.
- For PAL, type in 768×576.
The reason for this is that your VHS tapes use a resolution that will not look correct when played back on a typical computer or phone screen (it will look a bit stretched). By changing the output resolution, you’ll be using a square pixel aspect ratio, which will look correct on more modern devices.
I’m assuming you’ll be recording these files for playback on a computer or mobile device, but if your intent is to burn the files to a DVD for use in a DVD player, you can use 720×480 as the output for NTSC or 720×576 for PAL.
For the “Downscale Filter” setting you can keep it at Bicubic (Sharpened scaling, 16 samples).
For the “Common FPS Values” select “59.97” (for NTSC sources). Choose “50 PAL” for PAL sources (you’ll be doubling the native frame rate for better deinterlacing results. More on that later in the tutorial).
NOTE: If you are capturing your files for use in a DVD player, choose “29.97” as the FPS for NTSC and “25” as the FPS for PAL. Don’t press OK yet.
The settings I just described for NTSC are shown below:

Change the Output Settings
Next, you’ll set up the output settings. In the same menu you were just in (File – Settings), click on the “Output” tab. Here are the settings to use in this window:
- For the “Output Mode” (at the very top of the screen) select “Advanced”.
- Select the “Recording” tab.
- For “Type” select “Standard”.
- For “Recording Path” select where you’d like to have your file saved.
- I checked the box for “Generate File Name without Space” but it’s not a requirement.
- For “Recording Format” select “MPEG-4 (.mp4)” from the dropdown.
- For “Video Encoder” the options may vary depending on your system. For that reason I’ll use “x264” as the encoder since by default everyone has that as an option.
- For “Audio Encoder” choose “FFmpeg AAC”
- For “Audio Track” select “1” (it’ll be a stereo track).
- Deselect “Rescale Output” if it’s selected.
- Leave “Custom Muxer Settings” empty.
- Don’t use the “Automatic File Splitting” option.
- For “Rate Control” (in the “Encoder Settings” section) select “CBR”.
- For “Bitrate” type in 3500 Kbps.
- For “Keyframe Interval” leave it at 0.
- For CPU Usage Preset I used “medium” (Faster presets will use less CPU at the cost of quality computations. Slower presets will use more computations for quality, but will use much more CPU. If you notice any stuttering in your recordings, try a higher setting such as “superfast”).
- For “Profile” select “None”.
- For “Tune” select “Film.” Don’t press OK yet.
- If you have an option for “x264 Options” leave it blank.
The Recording settings I just described are shown below:

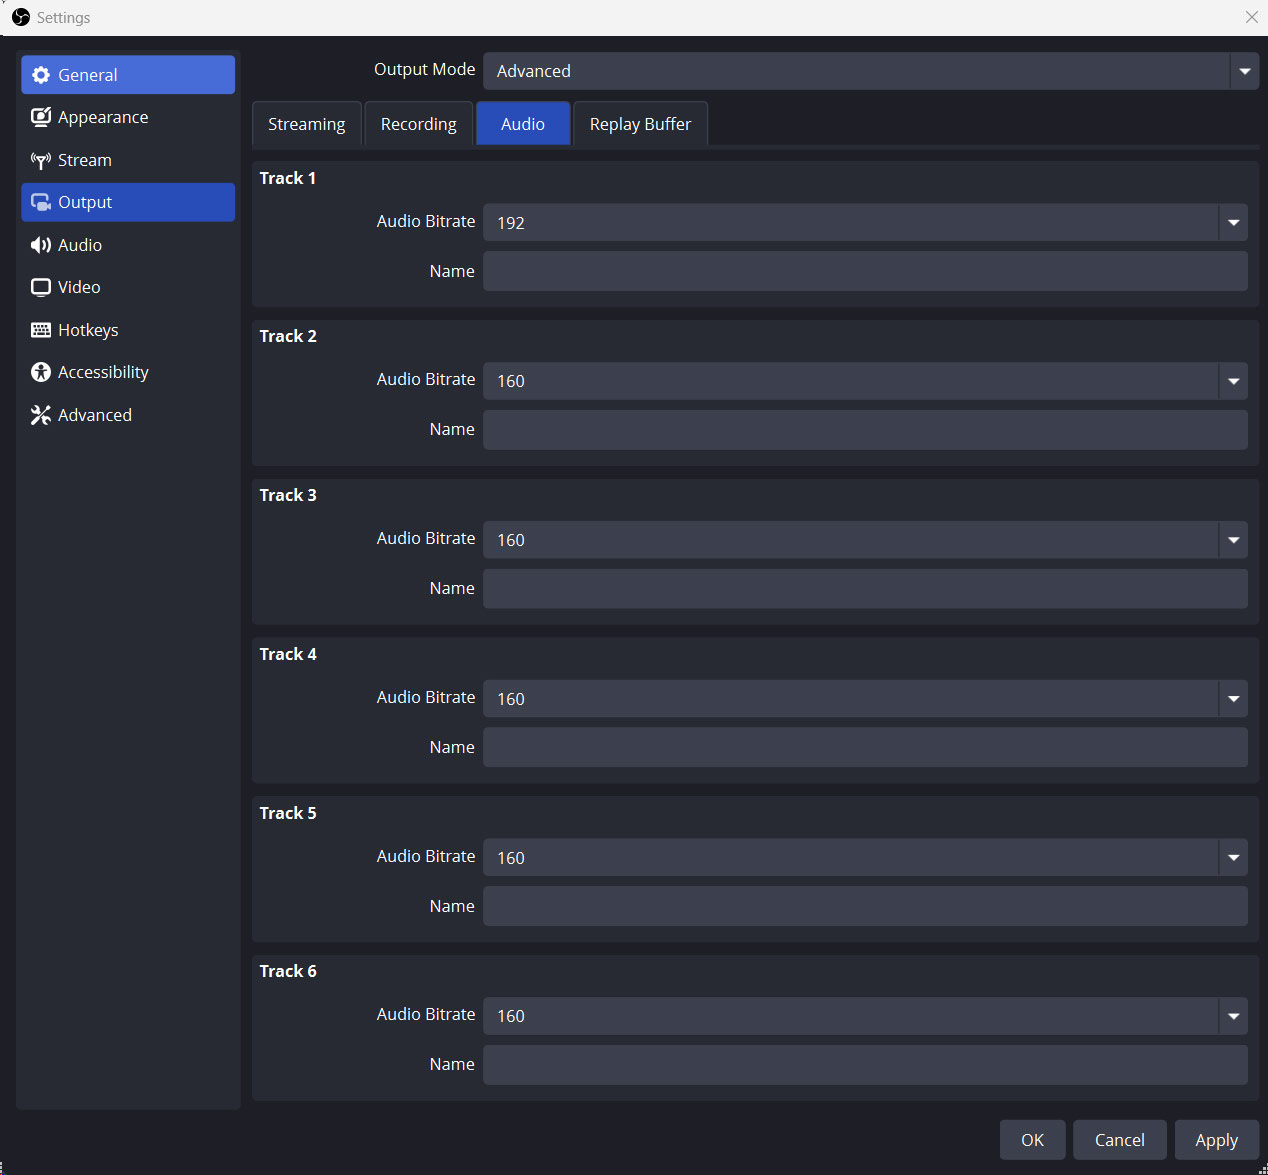
Change the Audio Settings
Next, select the “Audio” tab (along the top row, next to the “Recording” tab). You only have one track of audio, so for Track 1 select “192” from the dropdown (as shown below). Don’t press OK yet.
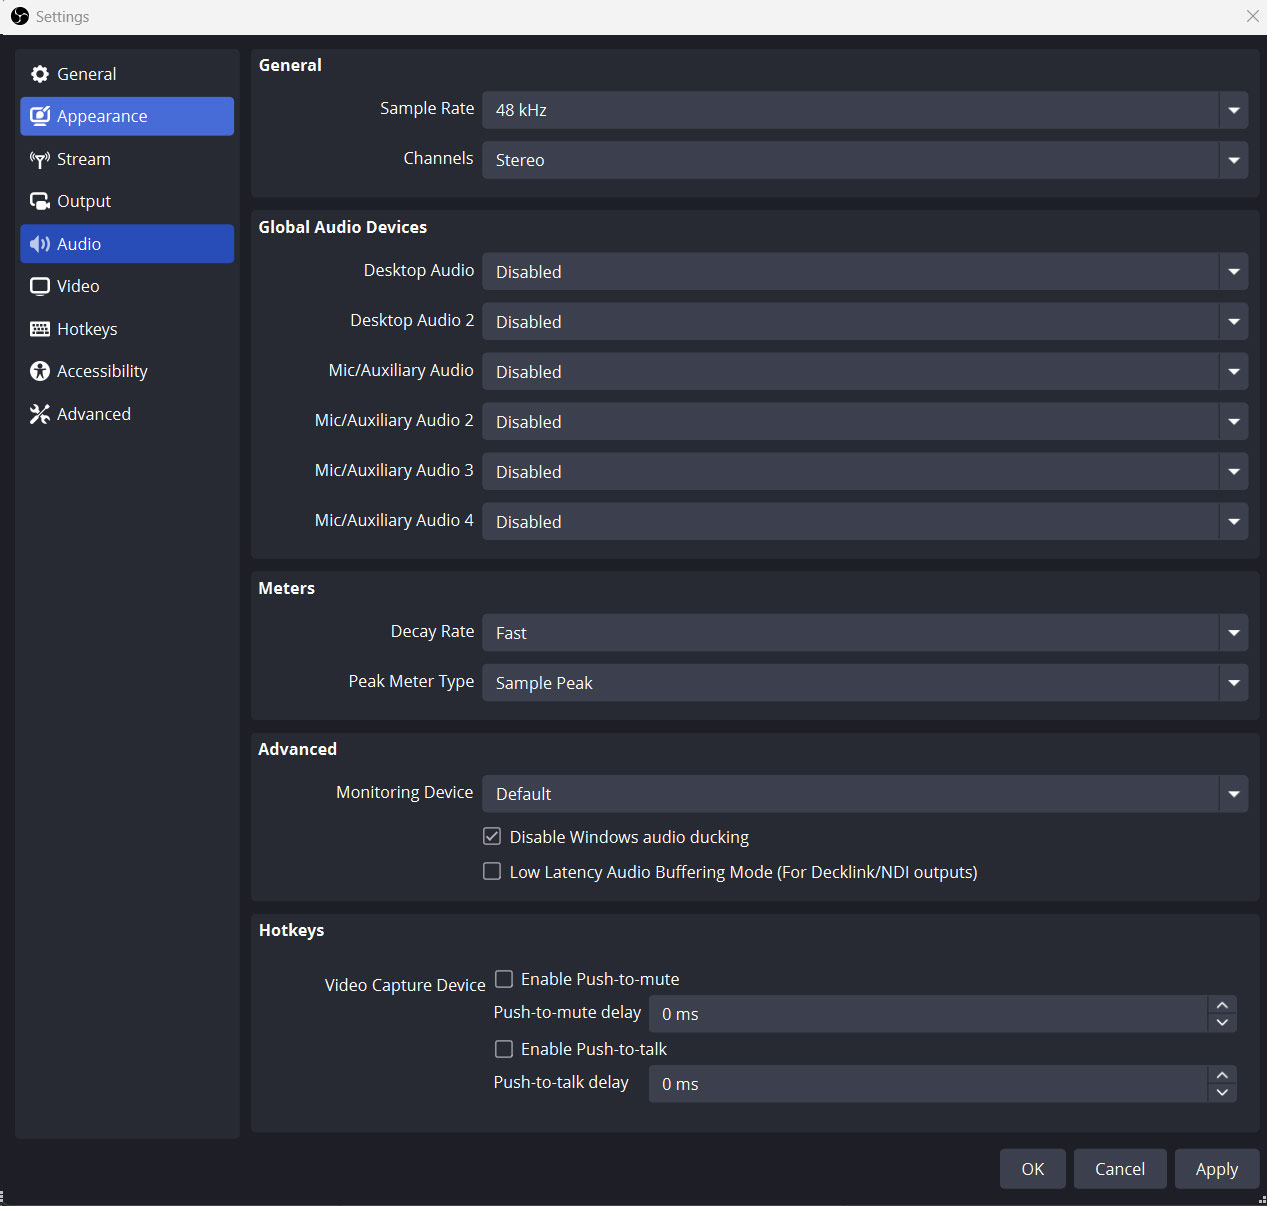
Disable All Existing Audio Inputs
Click the “Audio” tab (on the left) and use the dropdown next to all of your listed audio sources and choose “Disabled” as shown below. Don’t press OK yet.
Change Advanced Settings
The last step in the settings menu is to go into the “Advanced” section (the last one listed on the bottom left). Go to the “Video” section at the top and change the “Color Space” to “601.” The reason for this is that your standard definition video source was originally recorded in a 601 color space (709 is for HD content and sRGB is for screen captures). The “Color Range” should be set to “Limited.” Press OK.

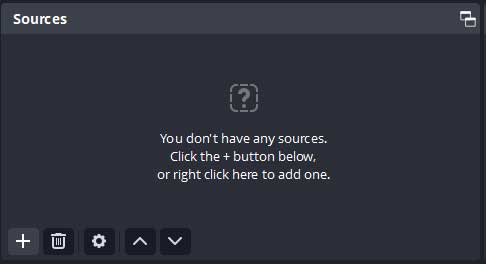
Add Video Source
You’ll need to add your video and audio sources next, which can be done using the “Sources” panel (bottom left of the OBS interface) shown below:
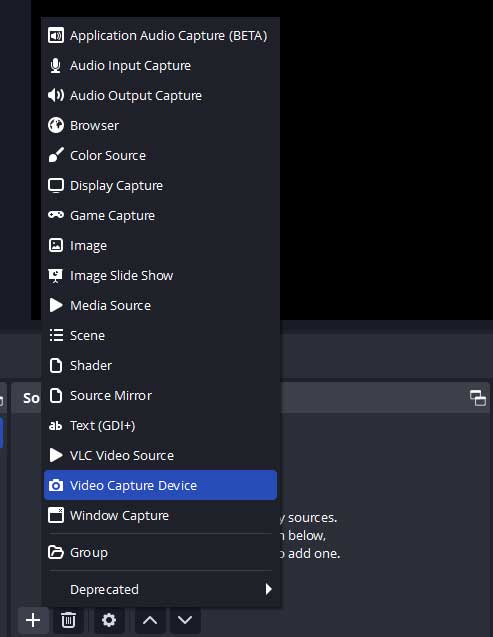
Hit the little “+” icon in the lower left of the “Sources” window and for your video input, select “Video Capture Device”, as shown below.
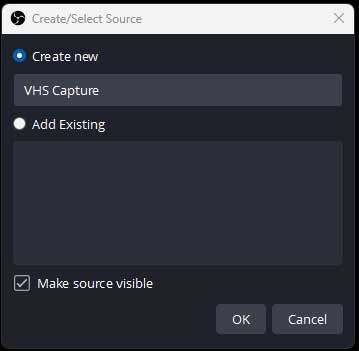
The window shown below will appear. I renamed mine to “VHS Capture.” Be sure that “Make source visible” is selected, then hit the “OK” button when you are ready to configure the video.
The settings menu will open once you hit the “OK” button.
Configure Your Video
If you are using the Startech.com device that I recommended, make sure that the “USB 2828x Device” is selected from the dropdown, then click the “Configure Video” button to select your video standard (Configure Video button shown below). NOTE: If you are using a device other than the Startech.com one that I recommend, the “Configure Video” button may or may not do anything.

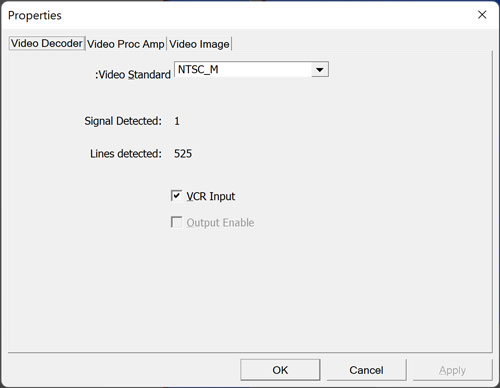
If you are digitizing from an NTSC source, make sure the “Video Standard” dropdown shows “NTSC_M” and select the “VCR Input” as shown below (NOTE: not all USB devices will have the “VCR Input” option):
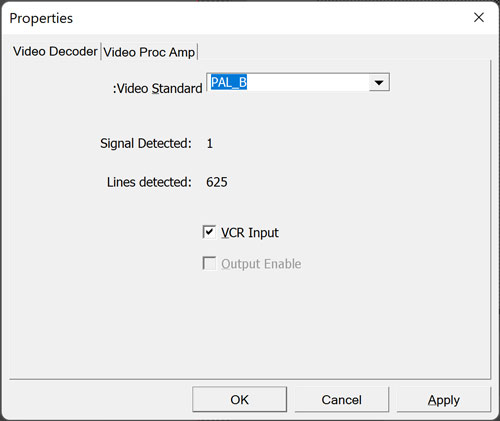
If you are digitizing from a PAL Source, there are several flavors of PAL to choose from. This chart may help you to find yours. In the image below, I’ve chosen “PAL_B” as the video standard Also select the “VCR Input” check box (NOTE: not all USB devices will have the “VCR Input” option).
Once you’ve selected your Video Standard, press the “OK” button.
To select your input type (Composite or S-Video), press the “Configure Crossbar” button and use the “Input” dropdown to make your selection, as shown below. Press “OK” when done.

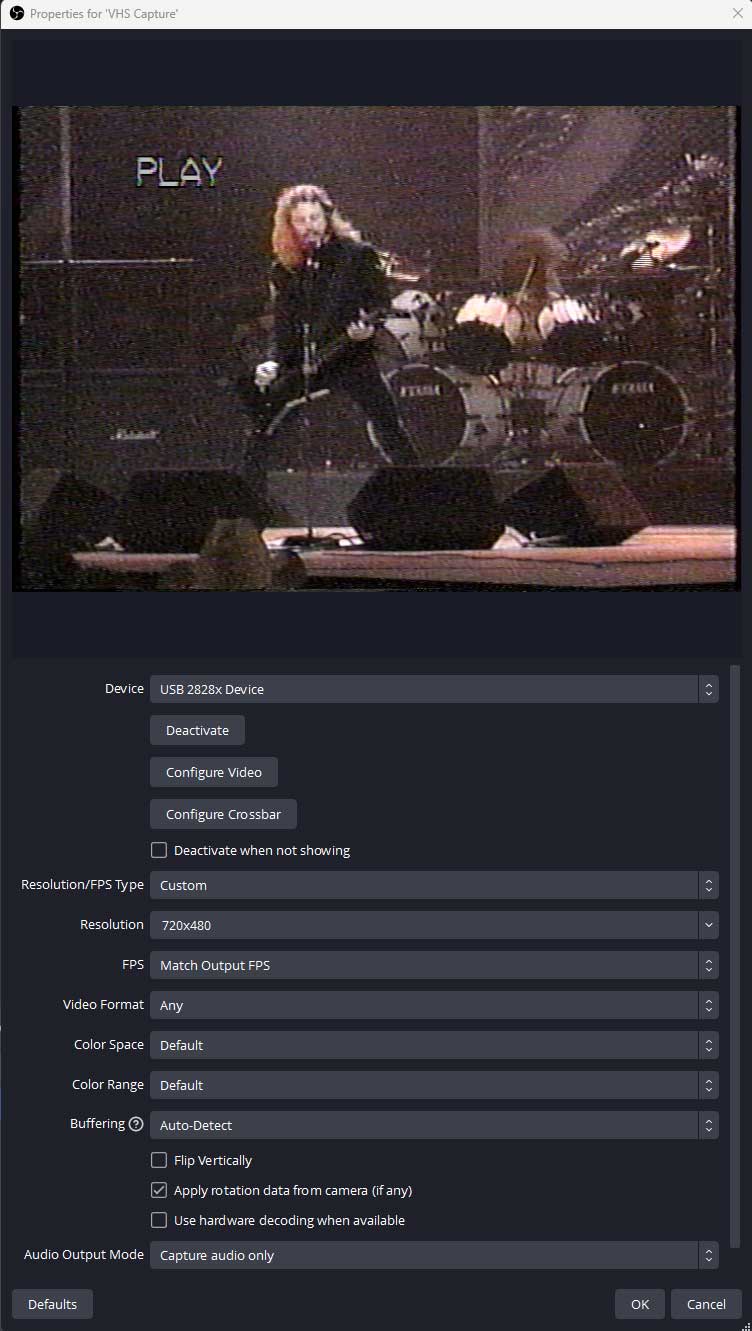
For the remainder of the “VHS Capture” options, be sure to use the following settings:
- Device – USB 2828x Device
- Resolution/FPS Type – Custom
- Resolution – 720×480 (for NTSC), 720×576 (for PAL)
- FPS – Highest FPS
- Video Format – Any
- Color Space – Default (601 is the default but you don’t need to select it)
- Color Range – Default
- Buffering – Auto-Detect
- Audio Output Mode – Capture audio only
- Deselect “Use custom audio device”
The settings I just described (for NTSC) are shown in the image below. Press the “OK” button once your settings are configured.
At this point you should be seeing the 720×480 sized video playing in your OBS interface as shown below:

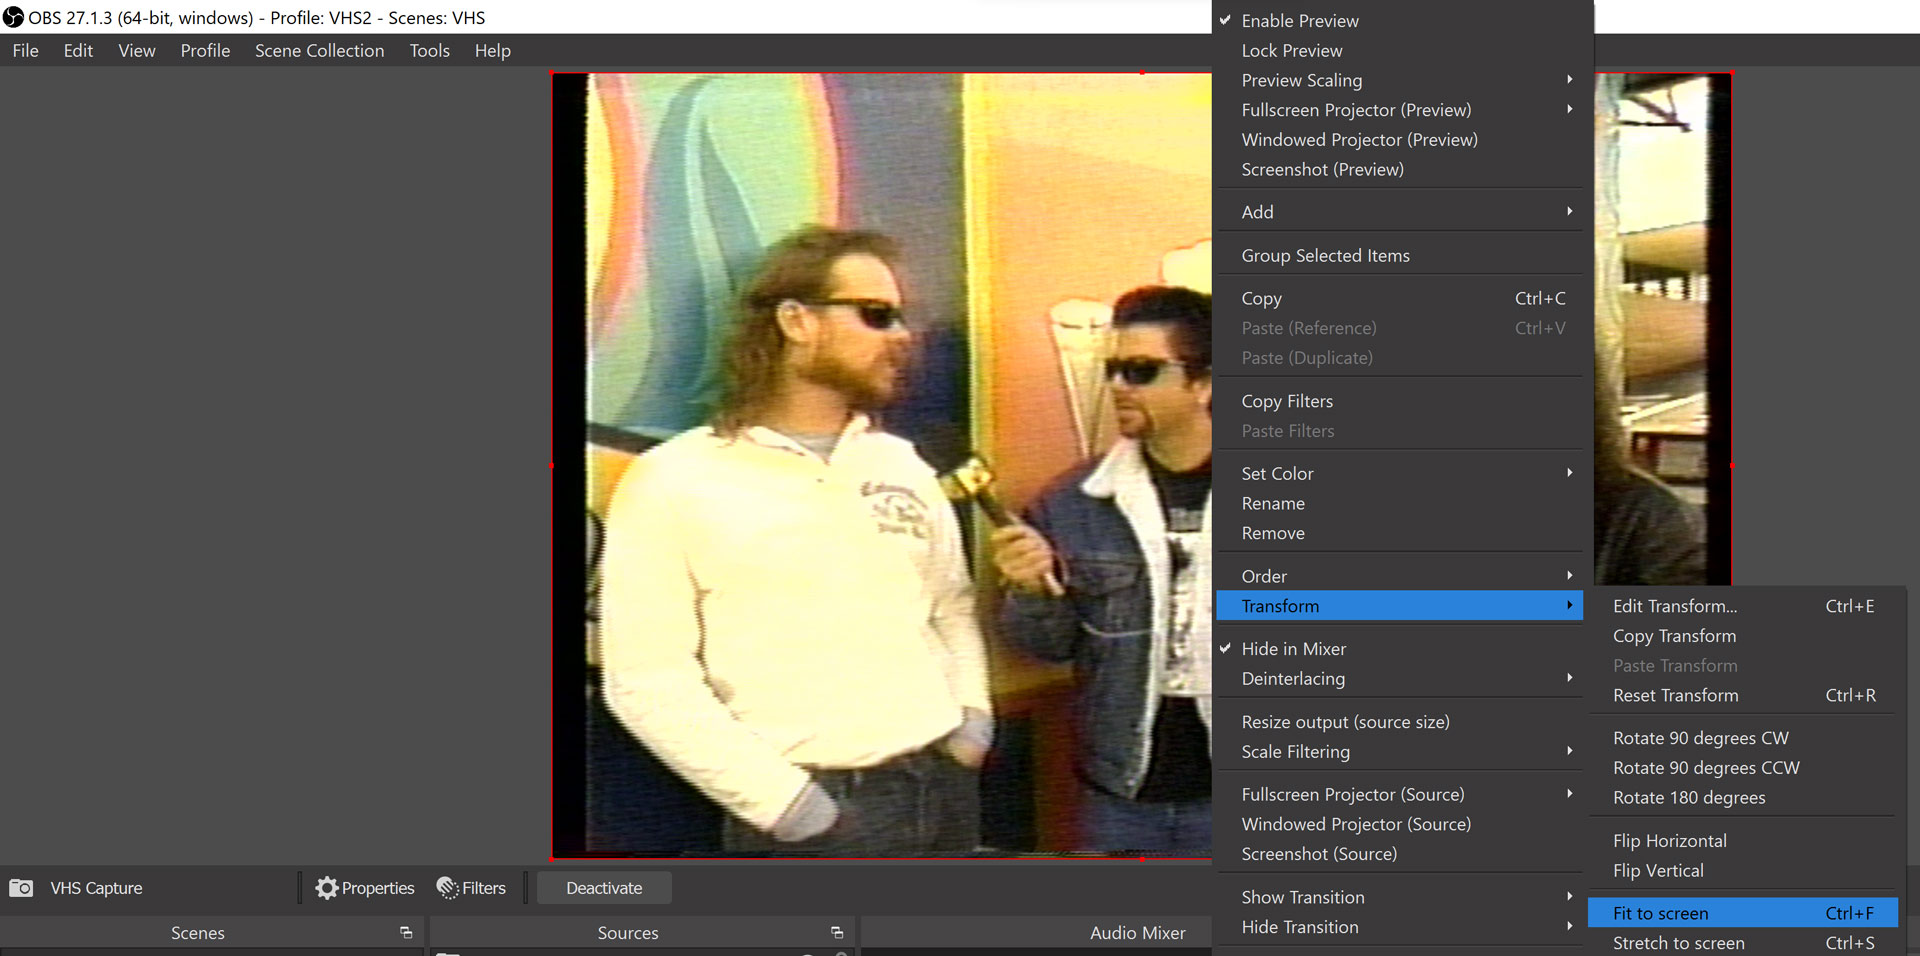
If, for some reason, your source does not appear scaled correctly to your canvas, it’s an easy fix. Right click on the preview window and find the “Transform” option, then select the “Fit to Screen” option (shown below):
NOTE: If the black bars on the edge of the screen bother you (that’s the “overscan” area) you can scale the output to remove them. First, right click on the preview window and find the “preview scaling” option (shown below):
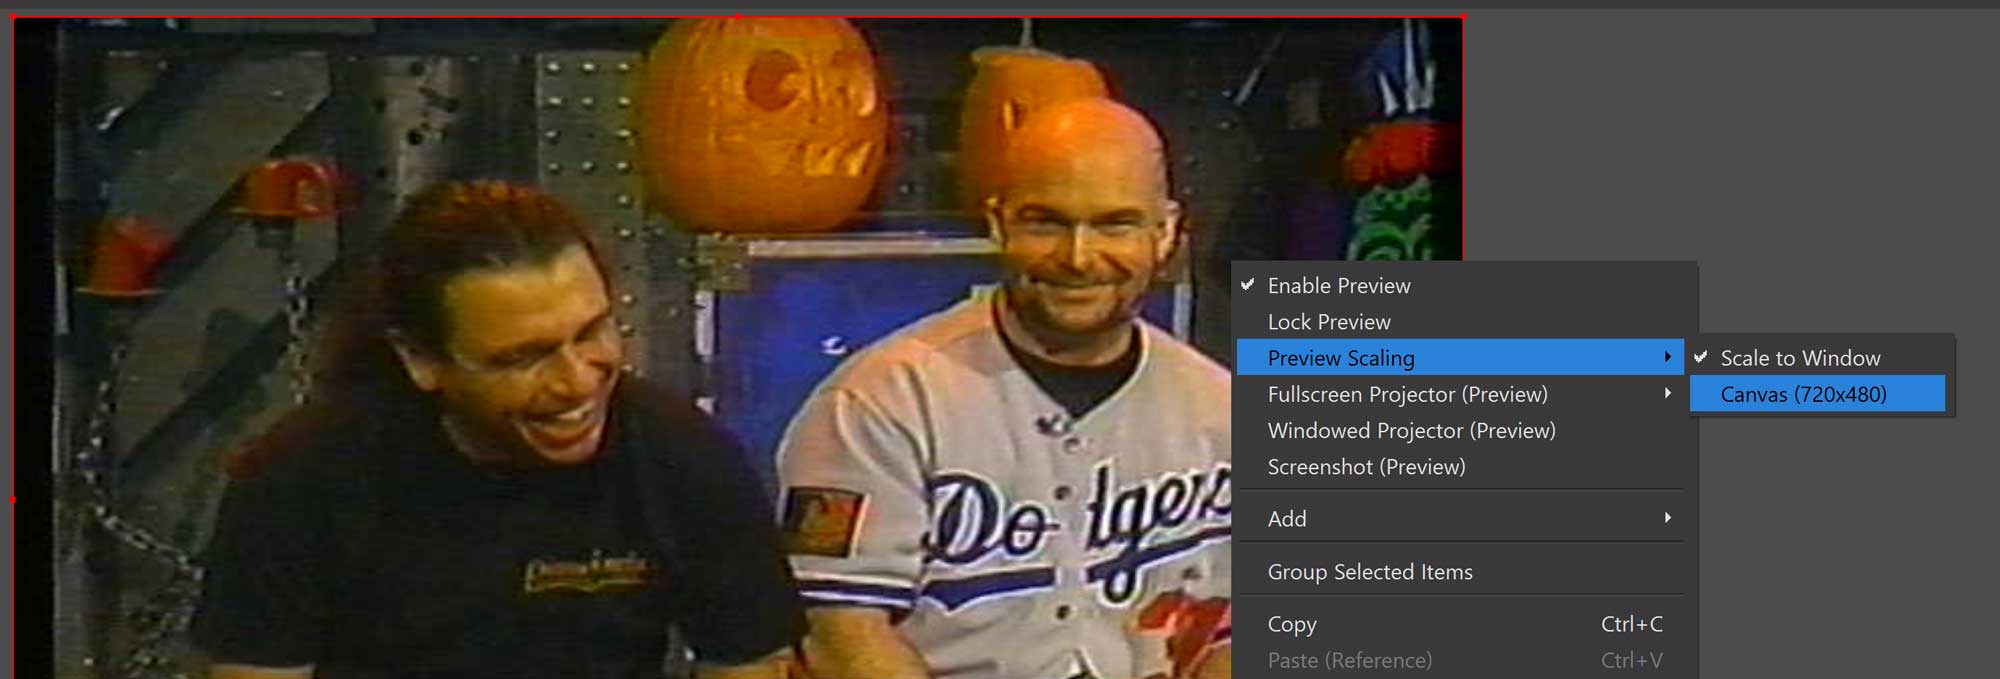
Change the “Preview Scaling” option to “Canvas (720×480).” Doing this will allow you to more easily scale the output, as shown below (notice how much space there is around the preview window and the software’s interface):
Next, click on the preview window so the outer edges turn red. Now hold the shift key on your keyboard and click any one of the four corners of the preview window, then drag to scale it up until the black bars disappear. Holding the shift key is absolutely necessary as it will maintain the aspect ratio.

Right click “Preview Scaling” again and change it back to “Scale to Window” – you may need to do this a few times to verify that the black bars are totally hidden.
Add Audio Source
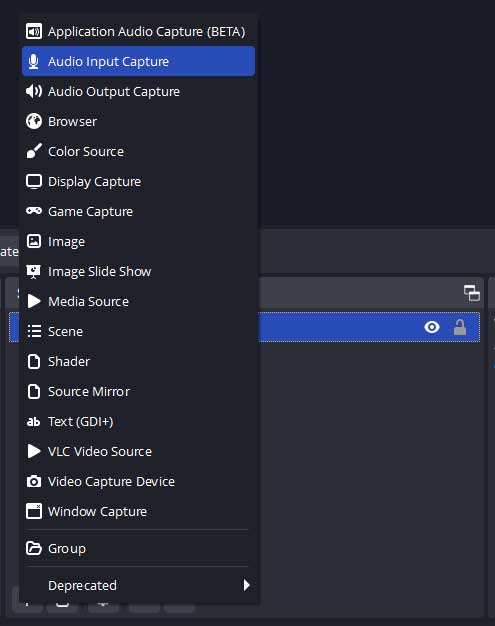
Now you’ll need to add your audio source. In the same window that you used to add your video source, hit the little “+” icon again to access the same menu that you used to add the video source. This time, select “Audio Input Capture”.
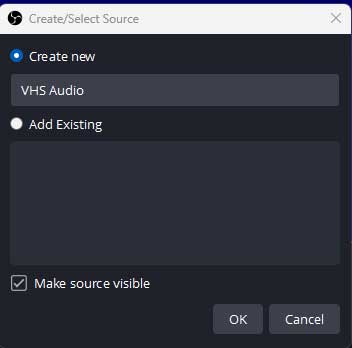
I named mine “VHS Audio” (shown below).
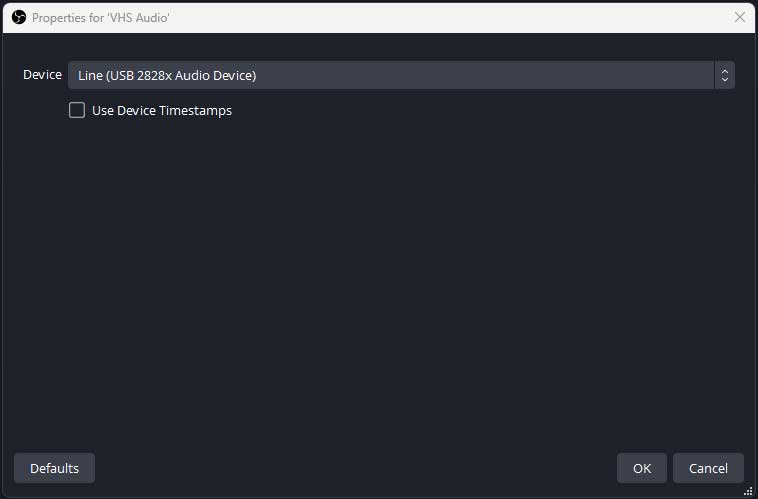
The settings menu will open once you hit the “OK” button. For “Device” select “Line (USB 2828x Audio Device)” as shown below, then press “OK”:
Now that your video and audio sources are set up, you’ll want to change one more video setting. Right click on your “VHS Capture” source (in the “Sources” window) and hover over “Deinterlacing.” Select “Yadif 2x” and “Top Field First.” Without this setting, you’ll see jagged lines in your recorded video whenever there’s any significant movement. The setting is shown below
NOTE – you don’t need to use this setting if you are digitizing with the intent to play your files on a DVD player:

Configure the Audio Mixer
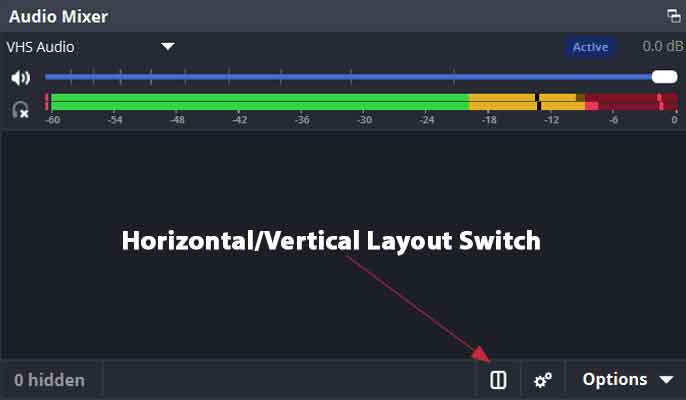
Next, you’ll need to verify that the audio in the “Audio Mixer” window is properly configured. Any sources besides “VHS Audio” should be muted by sliding the volume slider all the way to the left. The “VHS Audio” slider should have levels showing when you have your VCR playing. Any other sources should not show any levels (especially “Desktop Audio”). I’m using the “Horizontal Layout” in the screenshot of the Audio Mixer. You can easily swap between horizontal or vertical using the button pointed out below.
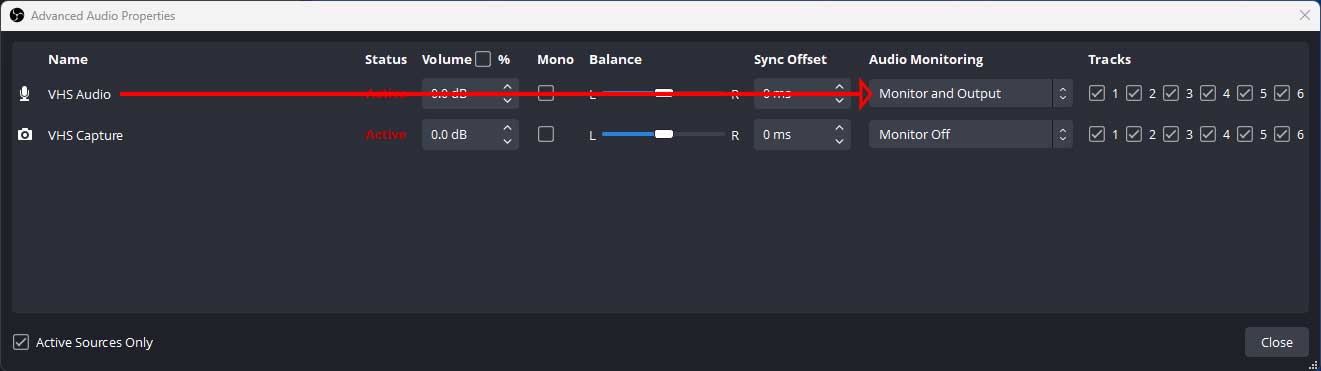
By default you won’t hear anything when your tape starts to play, but you can monitor the input if you want. To do so, click the little gear icon on your “VHS Audio” source (in the Audio Mixer). Select “Advanced Audio Properties” from the resulting menu, as shown below:

From within the “Advanced Audio Properties” window, find your “VHS Audio” source and select “Monitor and Output.” You’ll immediately hear the audio from your VHS tape.
Start to Record!
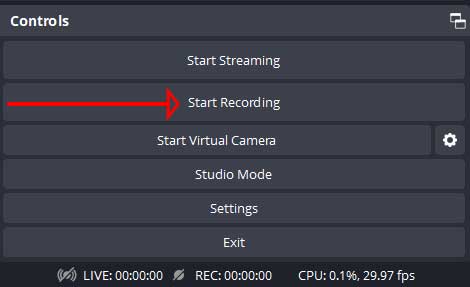
Everything is now configured, so you can start to record. To do so, hit the “Start Recording” button, found in the lower right in the OBS interface, shown below:
As you are recording, you’ll see a running tally of how much media you’ve recorded so far (bottom right of the OBS interface). You can also pause and ultimately stop your recording (the “Start Recording” button will change to “Stop Recording” once you push it). The pause button is just to the right of the “Stop Recording” button, as shown below:

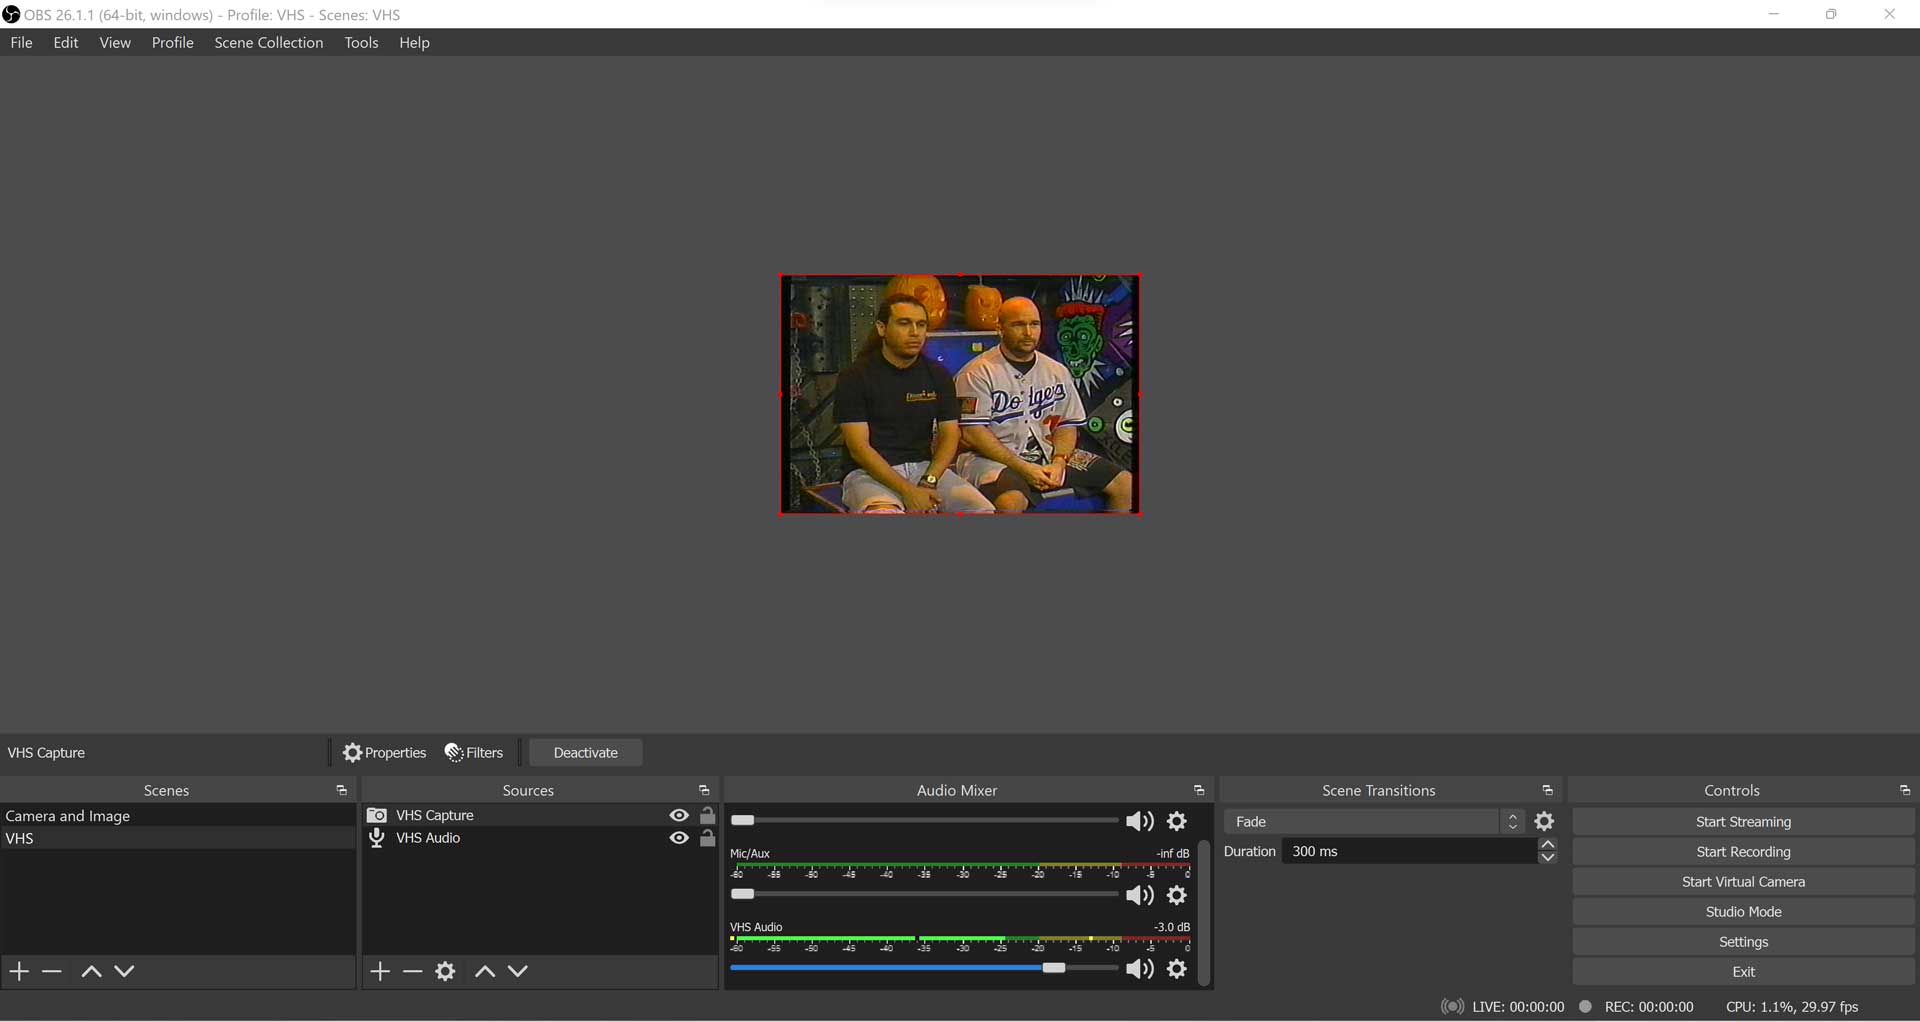
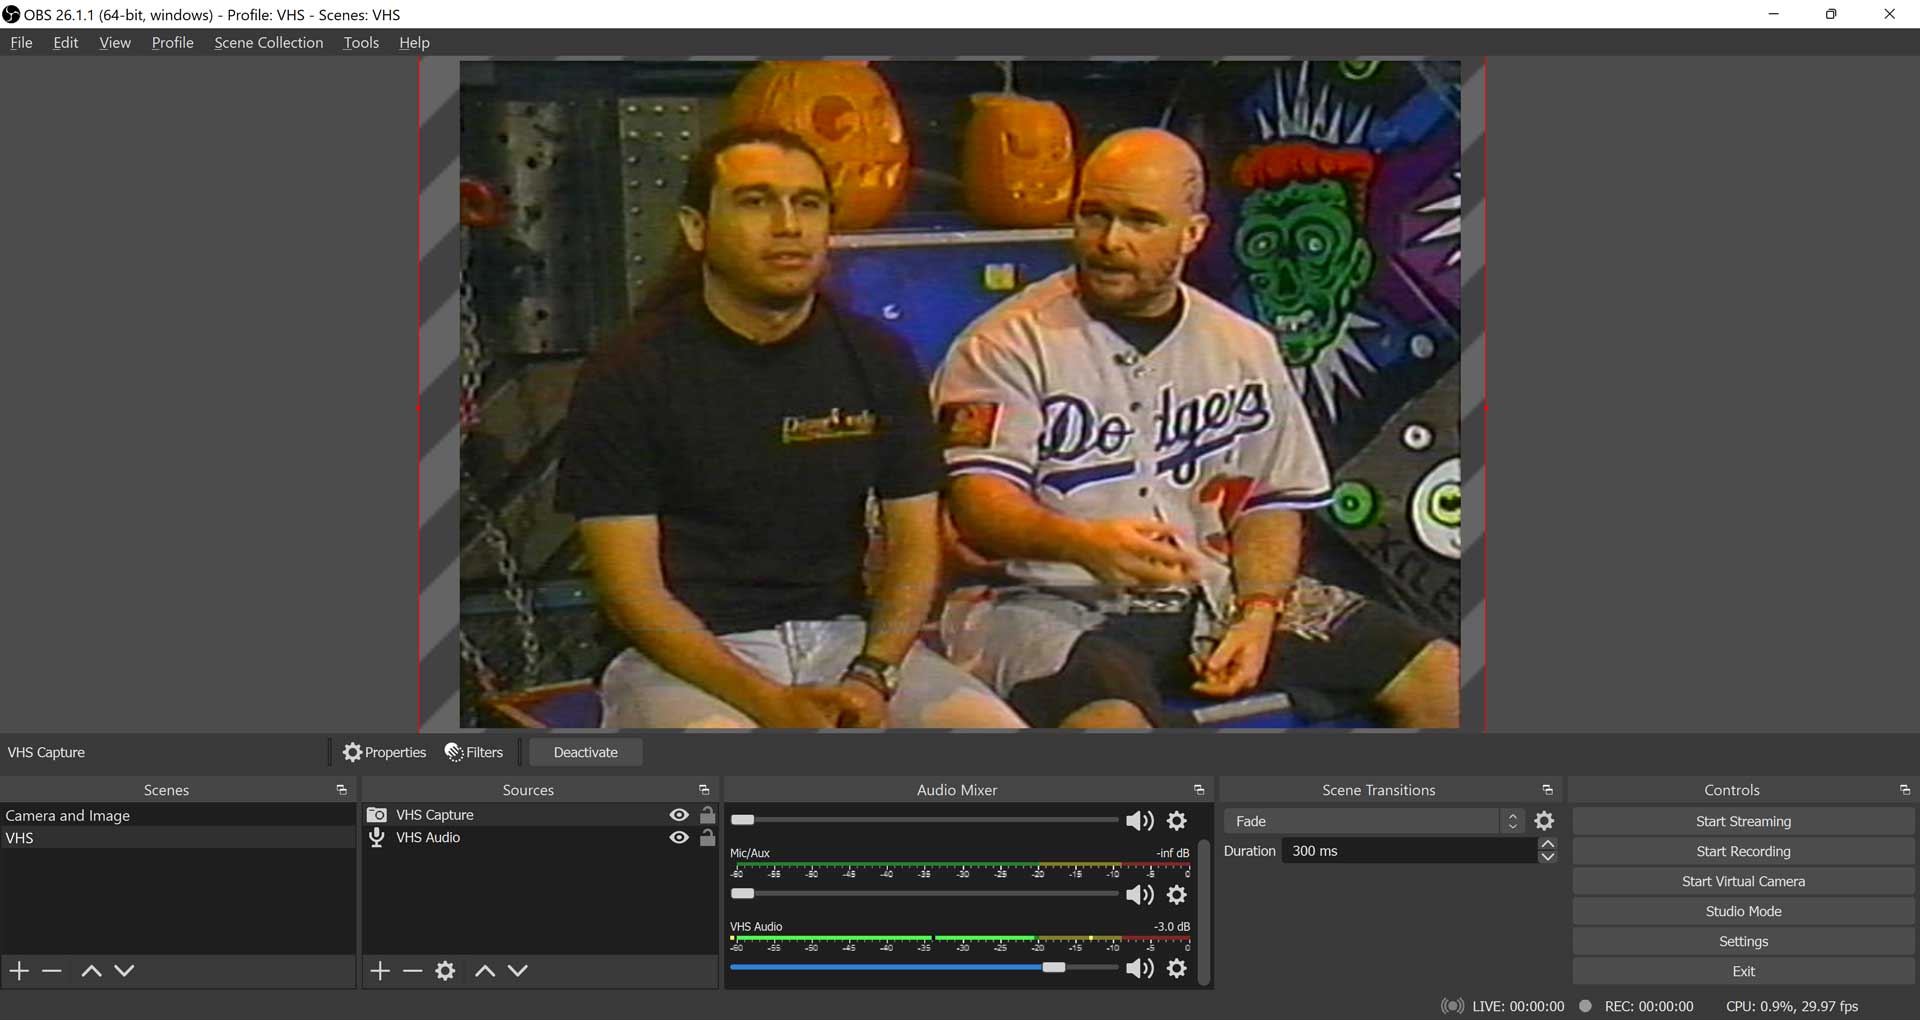
Here’s a full screen shot of what your OBS interface should look like after running through this tutorial (you might not have as many audio sources as me but otherwise it should look the same).

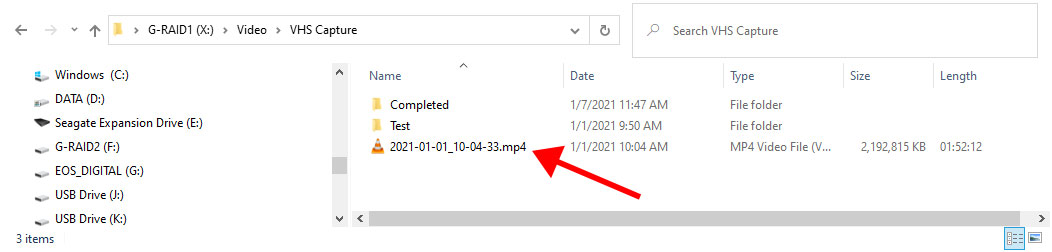
When you are done recording, you’ll probably want to rename the resulting mp4 file since OBS just names it something arbitrary based on the date of the recording. To rename the file, browse to the “Recording Path” that you selected when you were setting up your output settings. In case you forgot where that setting was, it’s shown below. Browse to that location and you’ll find your file.

Shown below is the file that was created by OBS for me. You can see that it’s currently not named anything that’ll mean much to me a year from now, so I’ll want to rename it. A quick shortcut for renaming a file in Windows is to highlight it, then hit the “F2” key on the keyboard.
That’s it! If you have any questions, feel free to ask. Please try to include which capture device you are using (if it’s not the same one I suggest in this post) as most issues seem to come down to OBS compatibility with various capture devices.


