
NOTE: This post shows you how to capture analog video tape to extremely large, archival, lossless AVI or QuickTime files using OBS and the Diamond Multimedia VC500 capture device. If you are looking to capture to smaller mp4 files, please have a look at this post instead.
This post was updated on January 28, 2026 after I discovered that Startech.com are no longer selling the capture device that I had previously recommended. I’m now recommending the Diamond Multimedia VC500.
OBS is an incredibly versatile (and free) tool, and it can even be used to digitize videotapes. If you are looking for a relatively simple way to archive your videotapes in a lossless, 4:2:2 format, this tutorial will show you how to do it! This tutorial assumes you are using Windows.
What You’ll Need
- A functioning VCR
- RCA Cables and (if applicable) an S-Video cable (depends on your VCR)
- The Diamond Multimedia VC500 – https://amzn.to/48JFQ4y
- OBS downloaded and installed (OBS is free)
Plug in the VC500
Plug the VC500 into an available USB port on your computer. You should see a blue light turn on on the VC500.
Install the Software and Drivers
For Windows 11 systems, download the latest drivers and software for the VC500 from Diamond Multimedia’s website. You’ll want the VC500 Complete Install 2026 file. This will download a file named “VC500.zip.” Unzip the file to a directory of your choosing. I put mine here – C:\Video Tools\VC500. (NOTE: There are a few variations of the VC500, so be sure to have a look at this page on Diamond Multimedia’s website to verify which device you are using and if different drivers are required).
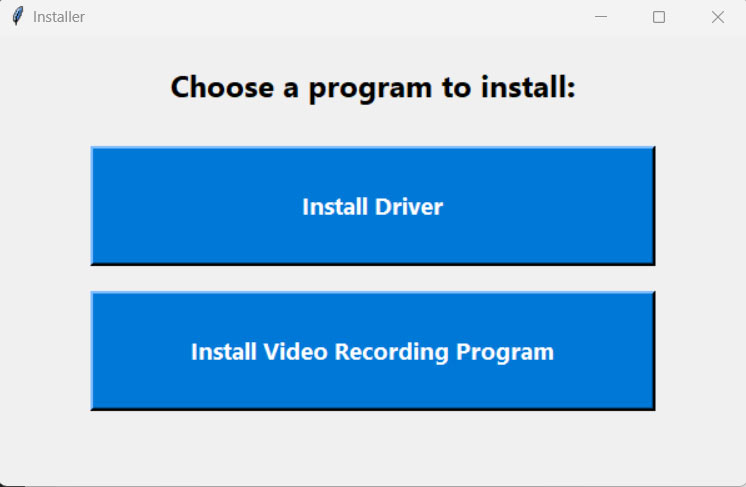
After extracting the files, double click on the “Setup.exe” file and select “Install Driver” (shown below).
Download the additional required software (and Windows 10 drivers if necessary) – Whether you are in Windows 10 or 11, you’ll need the ‘EZ Grabber” software in order to work around an audio glitch that occurs with this capture device. To install it, you can use the supplied CD or you can download the VC500 Complete Package (Old CD) from Diamond Multimedia’s website. Unzip the “VC500W10PD_Complete_install.zip” file to a directory of your choosing. I put mine here – “C:\Video Tools\VC500W10PD_Complete_install.” This includes the Windows 10 driver if you are running Windows 10. Keep this folder open, you’ll be returning to it shortly on both Windows 10 and 11.
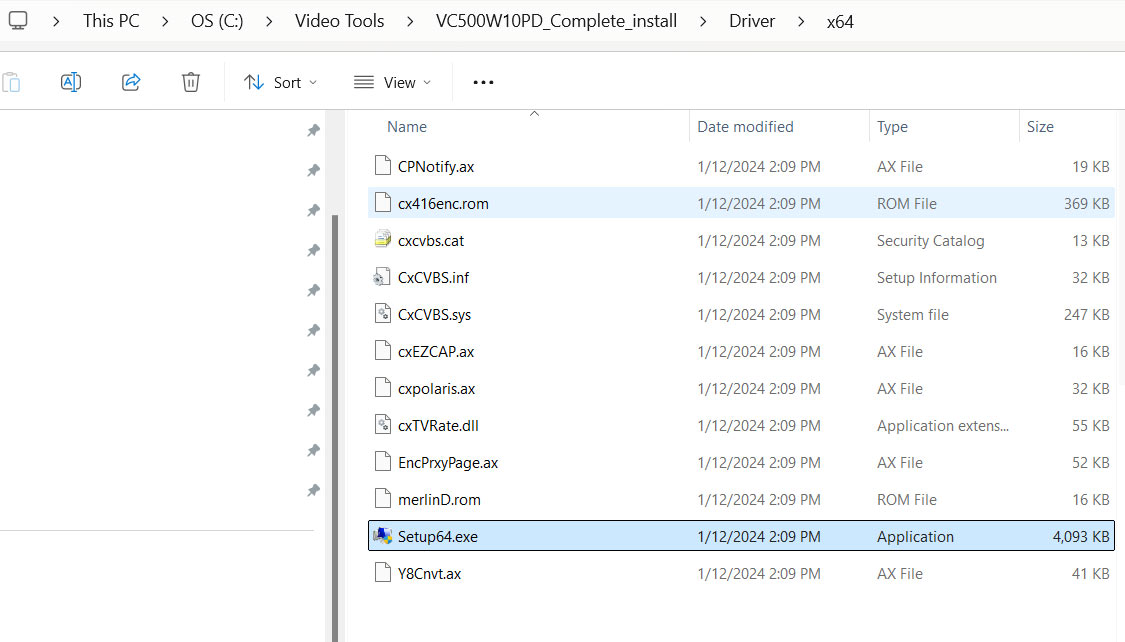
To install the correct driver for 64 bit Windows 10 systems, you’ll need to browse to a particular folder. In my case, that folder is “C:\Video Tools\VC500W10PD_Complete_install\Driver\x64” – double click on the “Setup64.exe” file to install the drivers. THIS IS FOR WINDOWS 10 ONLY. If you already installed the drivers as explained in the previous step, don’t install them again.
Verify Driver Install
On Windows 10/11, verify that the VC500 has been correctly installed by opening device manager. Right click the Windows button and choose “Device Manager” as shown below.

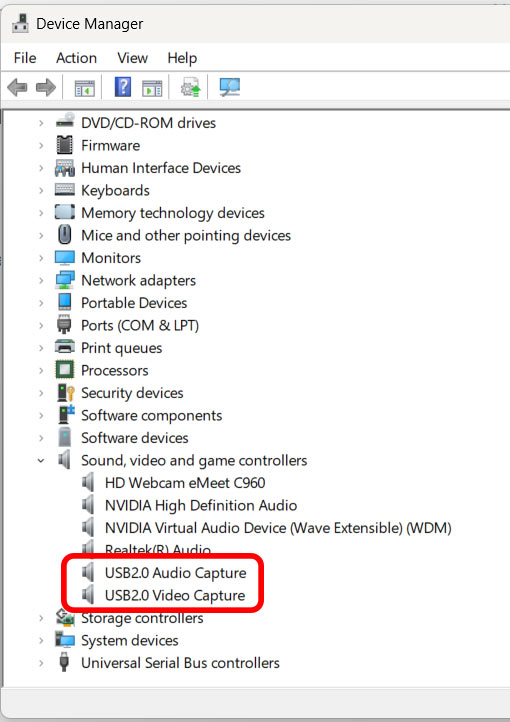
Open the “Sound, video and game controllers” section and make sure that “USB 2.0 Video Capture” as well as “USB 2.0 Audio Capture” are installed, as shown below.
Install the “EZ Grabber” Software
Browse to the “VC500W10PD_Complete_install” directory again, and this time double click on the “VC500.exe” file. On the resulting installation splash screen, click on the “EZ Grabber” button to install the EZ Grabber software. You won’t actually use this software to capture anything, but you sometimes need to open and close it in order for audio to work in OBS (weird, I know. I don’t know why this happens but I’ve replicated the issue/fix on multiple machines).

Connect the cables From the Video Player to the Capture Device
Connect your S-Video (or RCA) video cables and RCA audio cables from your video player to the VC500 inputs.
Configure Windows Audio
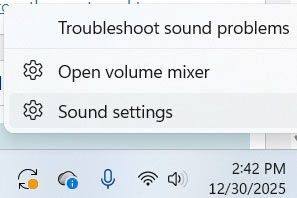
On Windows, right click on the little speaker icon in the lower right corner of your screen and select “Sound Settings.”
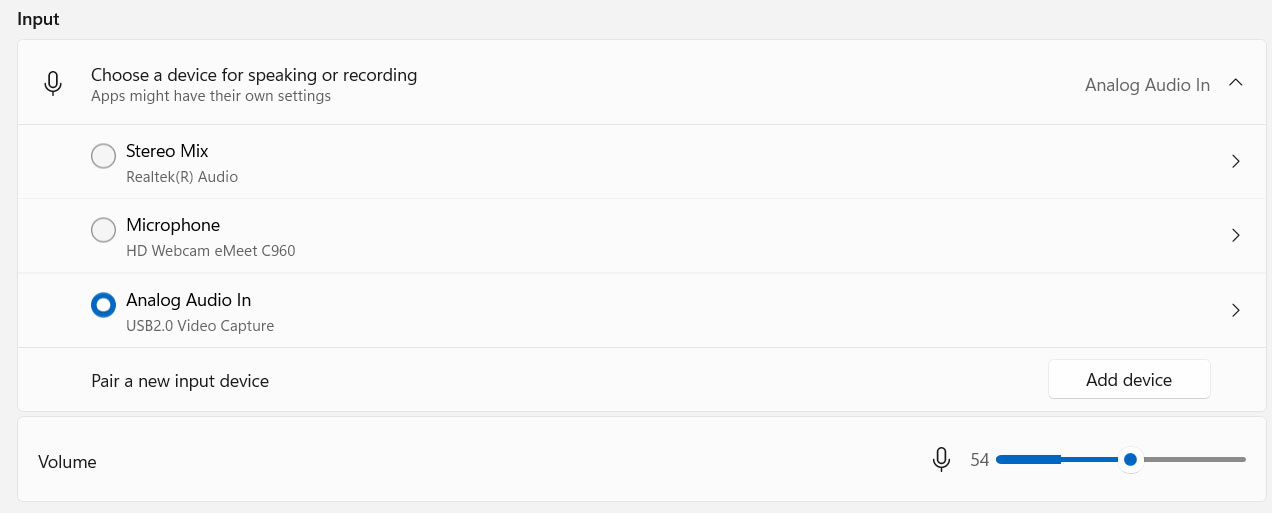
Scroll down to the “Input” section and enable “Analog Audio In” (should say USB2.0 Video Capture”). If you press play on your playback device, you should see levels moving. If you don’t see levels moving, hit the “Windows” key, type in “EZ” and the “EZ Grabber” software will appear. Open it, and you should now see the audio levels moving. Right click on the capture window in EZ Grabber and choose “Exit.” Windows audio input settings shown below:
Download and Install OBS
Download and install OBS – https://obsproject.com/
When you first launch OBS after installing it, it will ask if you’d like to run the auto-configuration wizard. Click “No” (we’ll be going through all the settings separately).
Configure OBS
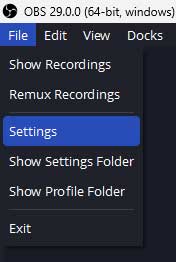
First thing you’ll want to do now is set up your canvas and output settings. To open the settings, click on the “File” menu and select “Settings” as shown below.
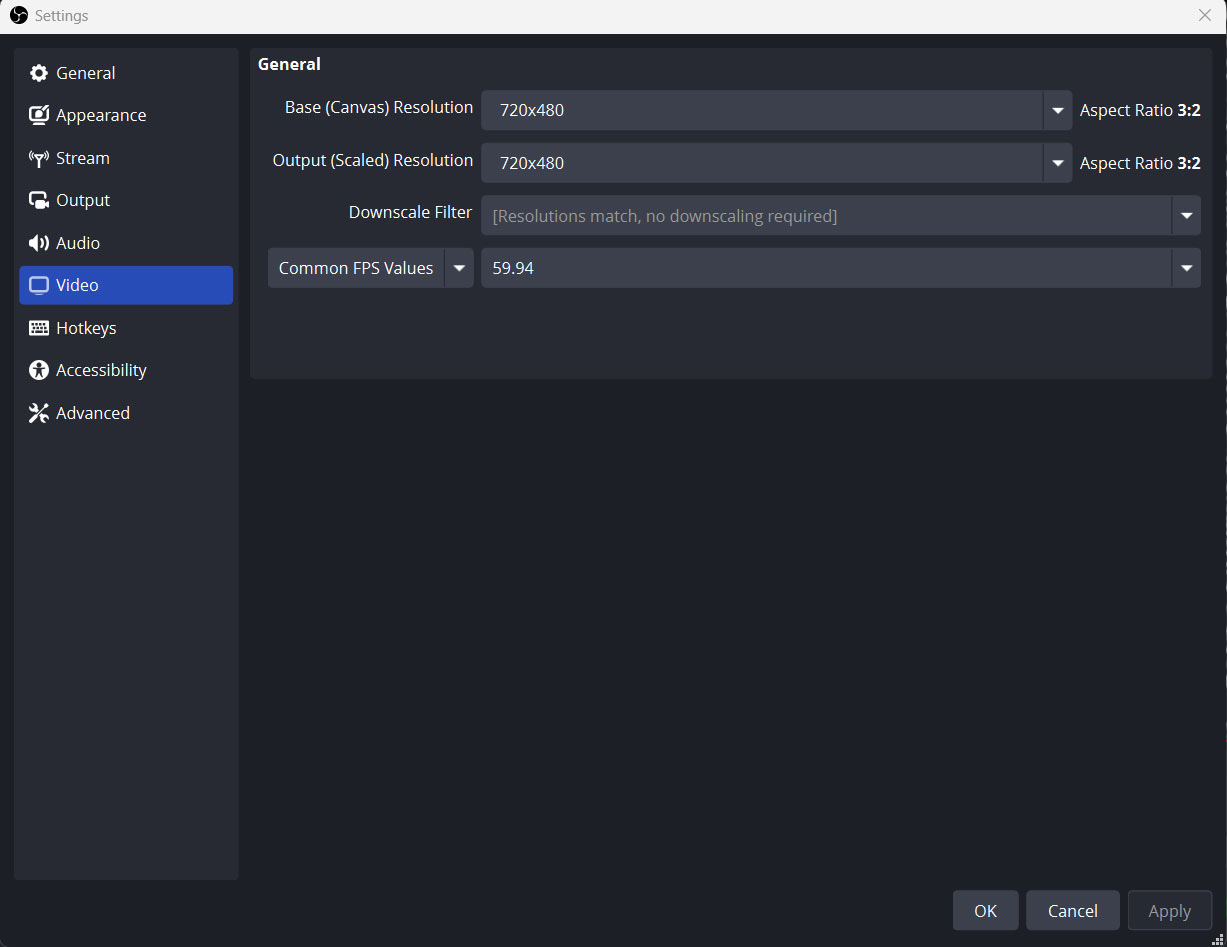
In the Settings menu, click on the “Video” tab.
- For NTSC, change the “Base (Canvas) Resolution” to 720×480. If you are in the United States, use this setting. The NTSC standard was used in most of the Americas (except Argentina, Brazil, Paraguay, and Uruguay), Liberia, Myanmar, South Korea, Taiwan, Philippines, Japan, and some Pacific Islands nations and territories.
- For PAL, change the “Base (Canvas) Resolution” to 720×576. The PAL region is a television publication territory that covers most of Asia, Africa, Europe, South America and Oceania.
NOTE: You’ll need to highlight the current resolution and type your Base (Canvas) Resolution in, as it’s not available in the dropdown.
- For NTSC, type in 720×480.
- For PAL, type in 720×576.
For the “Downscale Filter” setting you can keep it at Bicubic (Sharpened scaling, 16 samples).
For the “Common FPS Values” select “59.94” (for NTSC sources). Choose “50 PAL” for PAL sources (frame rates are doubled because of deinterlacing – more info below). Don’t press OK yet.
The settings I just described for NTSC are shown below:
Changing the Output Settings for AVI Capture
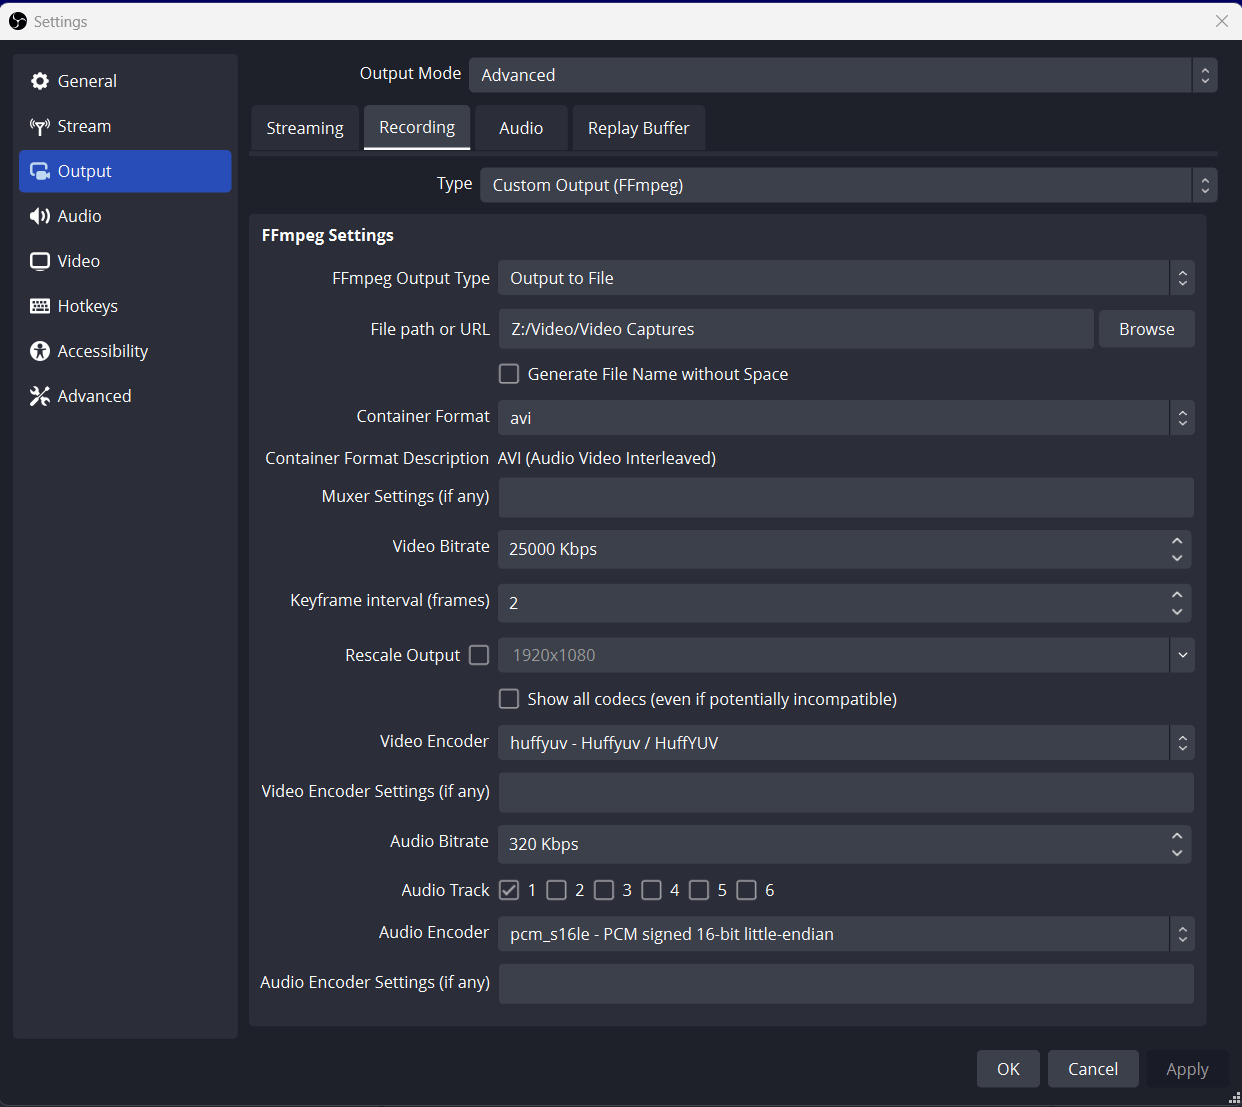
If you plan to capture to an AVI file, use these settings. In the same menu you were just in (File > Settings), click on the “Output” tab. Here are the settings to use in this window for lossless AVI capture:
- For the “Output Mode” (at the very top of the screen) select “Advanced”.
- Select the “Recording” tab.
- For “Type” select “Custom Output (FFmpeg)”.
- For “Recording Path” select where you’d like to have your file saved.
- I checked the box for “Generate File Name without Space” but it’s not a requirement.
- For “Recording Format” select “avi” from the dropdown (it might not be obvious, but that list is scrollable and the selections are alphabetical).
- For “Muxer Settings (if any)” leave it blank.
- For “Video Bitrate” type in 25000 Kbps.
- For “Keyframe interval (frames) type in “2”.
- Deselect “Rescale Output” if it’s selected.
- For “Video Encoder” choose “huffyuv – Huffyuv/HuffyUV” – HuffyUV will create a lossless avi file that’s 4:2:2. If you have any issues with Huffy, you can try “utvideo – UT Video” instead. If you need to install the UT Video codec, it can be downloaded here – https://www.videohelp.com/software/Ut-Video-Codec-Suite)
- For “Video Encoder Settings (if any)” leave it blank.
- For “Audio Bitrate” type in 320 Kbps.
- For “Audio Track” check the box for “1” (it’ll be stereo).
- For “Audio Encoder” select “pcm_s16le – PCM signed 16-bit little-endian”
- For “Audio Encoder Settings (if any) leave it blank. Don’t press OK yet.
The Recording settings I just described are shown below:
Changing the Output Settings for QuickTime Capture
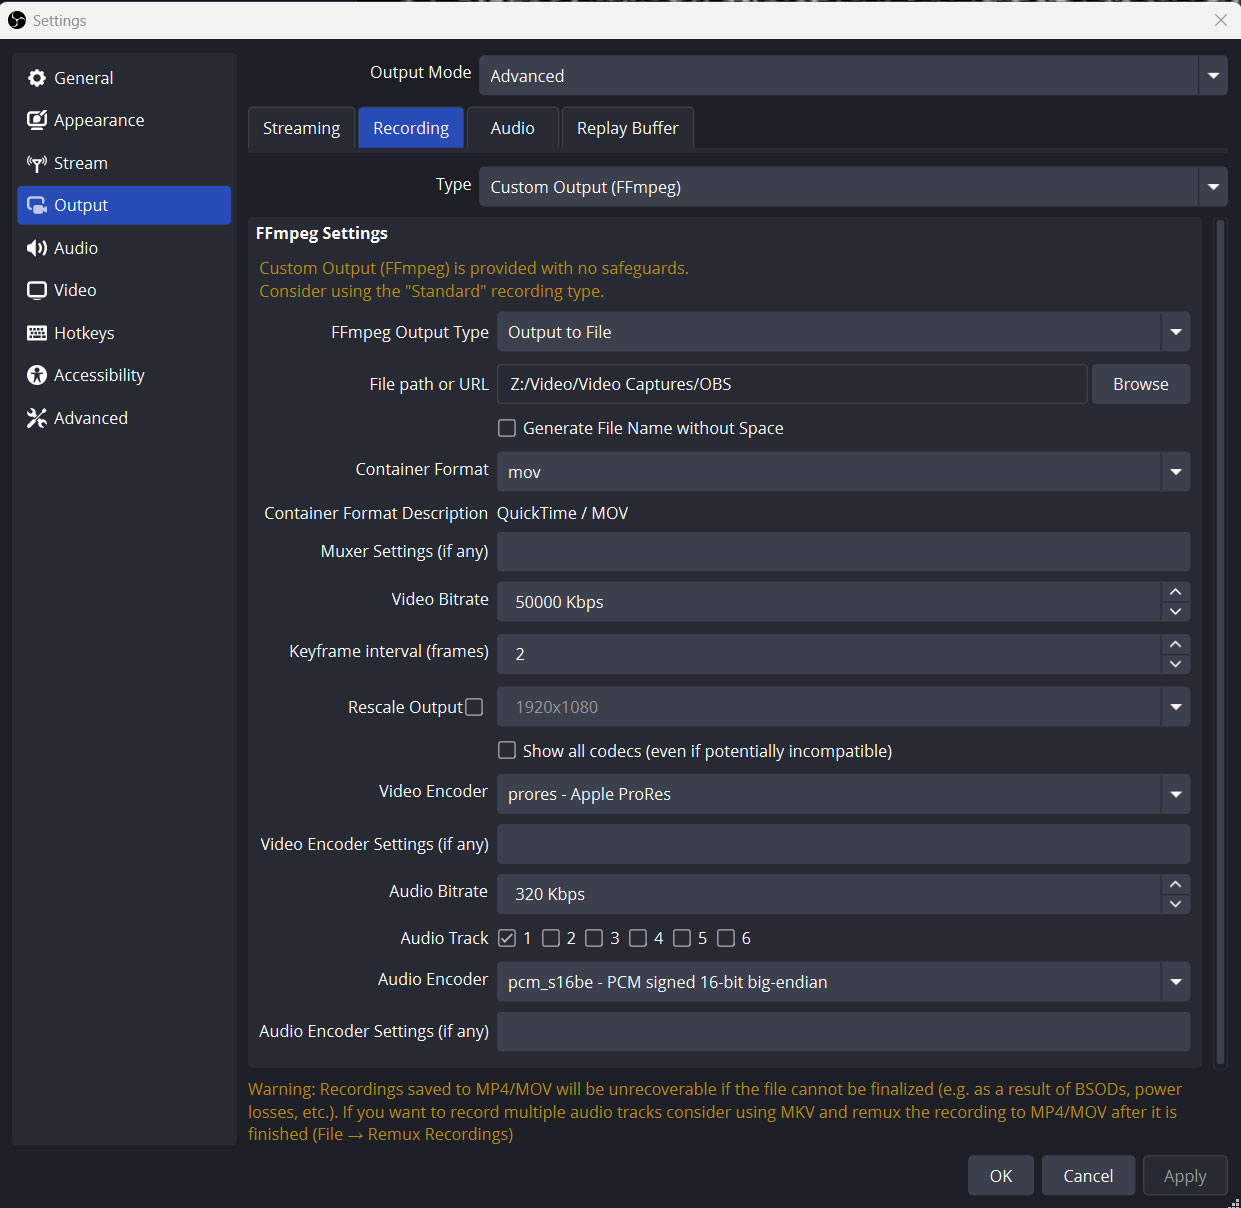
If you plan to capture to a QuickTime file, use these settings. In the same menu you were just in (File > Settings), click on the “Output” tab. Here are the settings to use in this window for lossless QuickTime capture:
- For the “Output Mode” (at the very top of the screen) select “Advanced”.
- Select the “Recording” tab.
- For “Type” select “Custom Output (FFmpeg)”.
- For “Recording Path” select where you’d like to have your file saved.
- I checked the box for “Generate File Name without Space” but it’s not a requirement.
- For “Recording Format” select “mov” from the dropdown.
- For “Muxer Settings (if any)” leave it blank.
- For “Video Bitrate” type in 50000 (you can actually type in anything you want here, the prores encoder sets its own bitrate).
- For “Keyframe Interval (frames)” type in 2.
- Deselect “Rescale Output” if it’s selected.
- For “Video Encoder” choose “prores”.
- For “Video Encoder Settings (if any)” leave it blank.
- For “Audio Bitrate” type in 320.
- For “Audio Track” check the box for “1” (it’ll be stereo).
- For “Audio Encoder” select “pcm_16be – PCM signed 16-bit big-endian”.
- For “Audio Encoder Settings (if any)” leave it blank.
- Don’t press OK yet.
The Recording settings I just described are shown below:
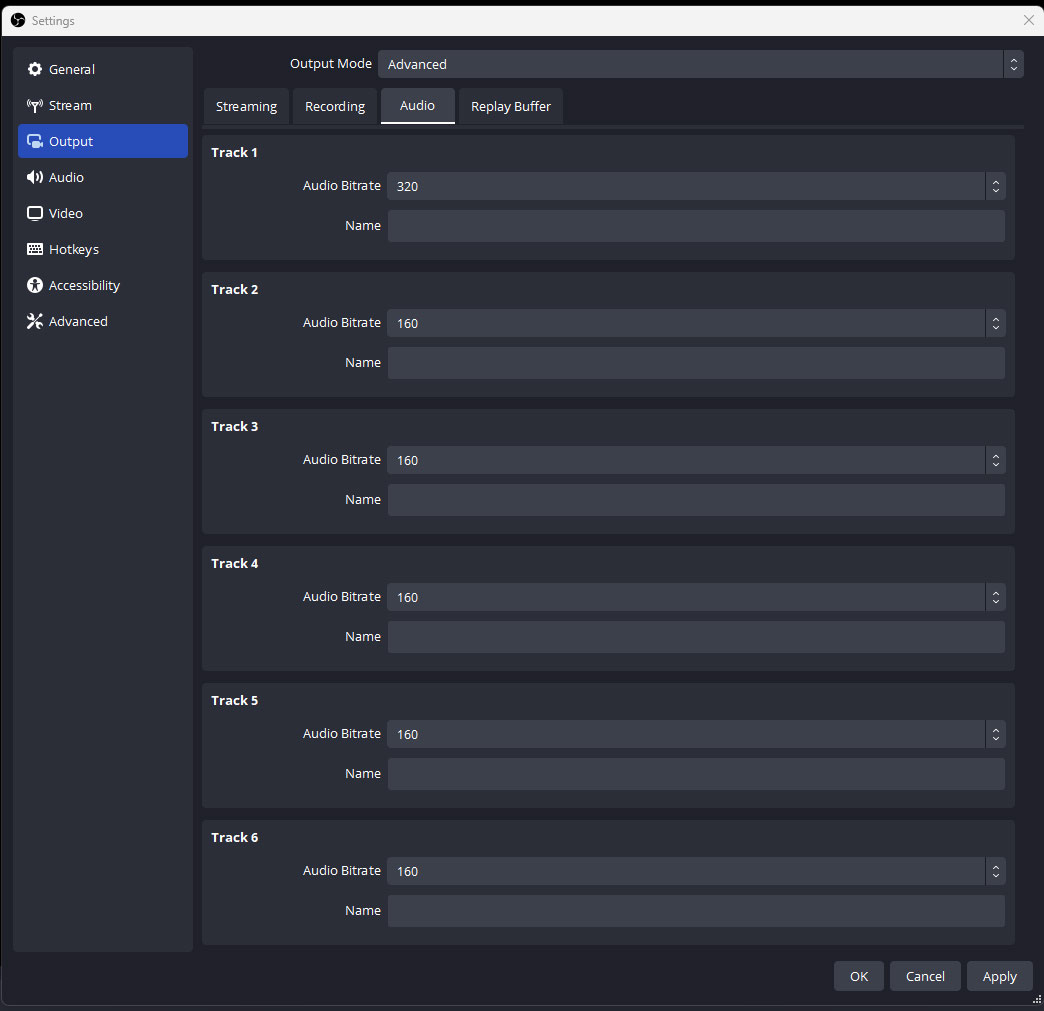
Change the Audio Settings
Next, select the “Audio” tab. You only have one track of audio, so for Track 1 select “320” from the dropdown (as shown below). Don’t press OK yet.
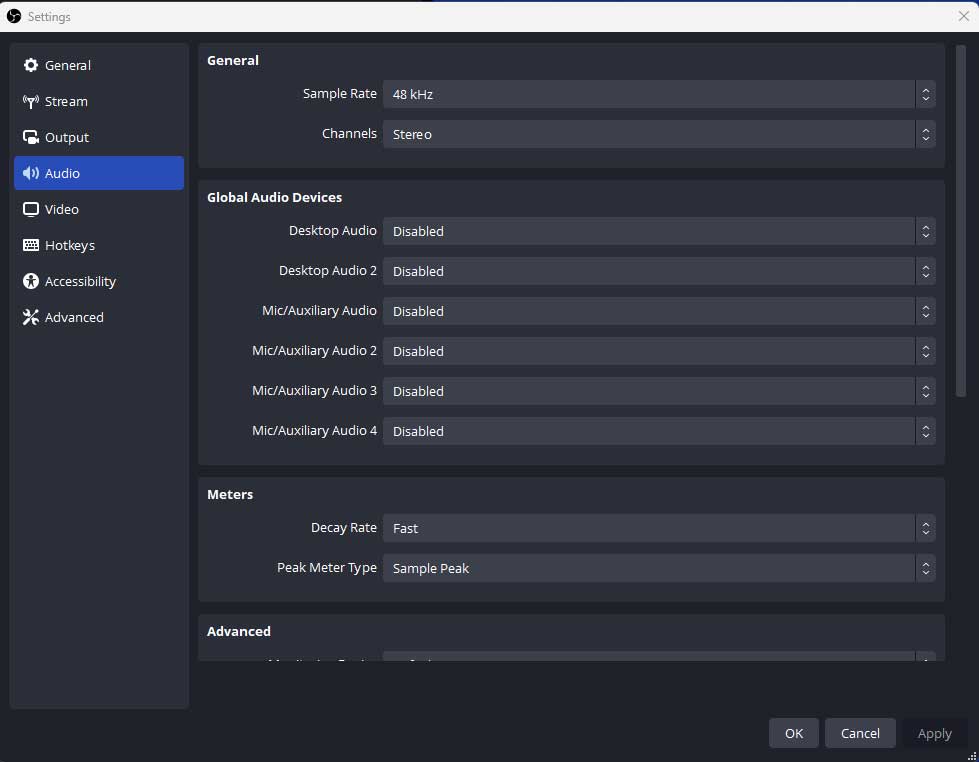
Disable All Existing Audio Inputs
Click the “Audio” tab (on the left) and use the dropdown next to all of your listed audio sources and choose “Disabled” as shown below. Don’t press OK yet.
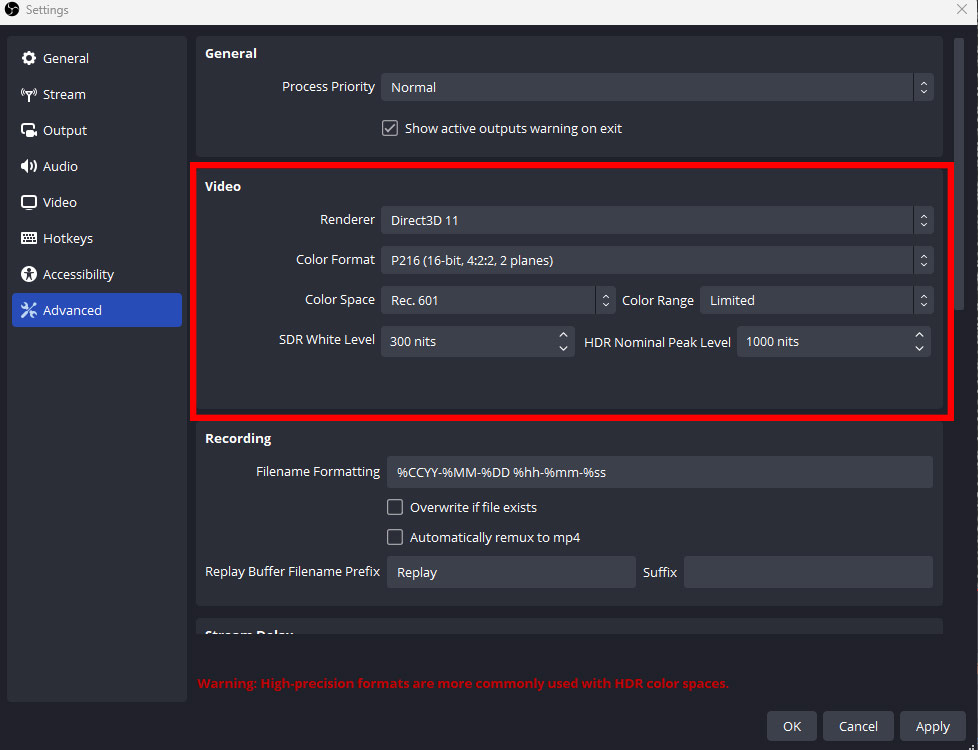
Change Advanced Settings
The last step in the settings menu is to go into the “Advanced” section (the last one listed on the bottom left). Go to the “Video” section at the top and change the “Color Format” to “P216 (16-bit 4:2:2 2 planes), the “Color Space” to “601.”, and the “Color Range” to “Limited.” The reason for this is that your standard definition video source was originally recorded in a 601 color space (709 is for HD content and sRGB is for screen captures). Press OK.
Add Video and Audio Sources
You’ll need to add your video and audio sources next, which can be done using the “Sources” panel (bottom left of the OBS interface) shown below:
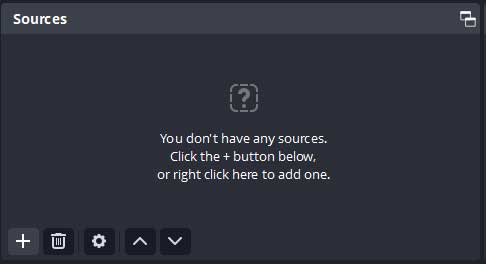
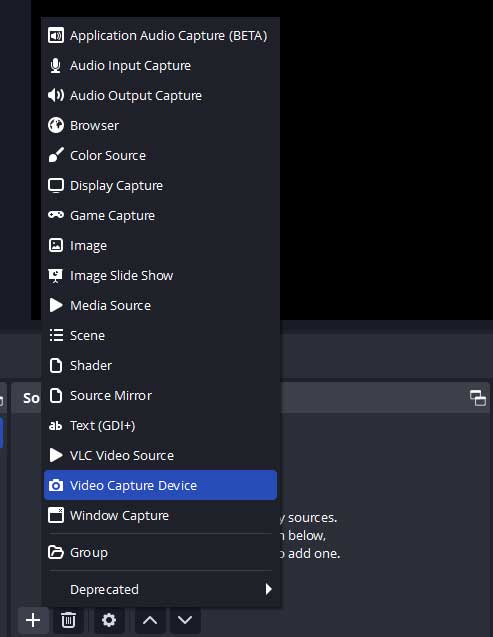
Hit the little “+” icon in the lower left of the “Sources” window and for your video input, select “Video Capture Device”, as shown below.
The window shown below will appear. I renamed mine to “VHS Capture.” Be sure that “Make source visible” is selected, then hit the “OK” button when you are ready to configure the video.
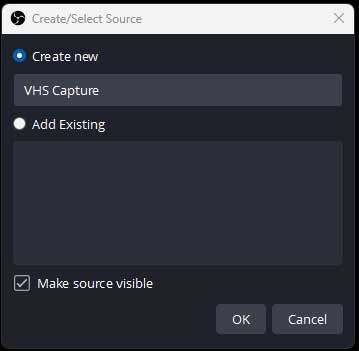
The settings menu will open once you hit the “OK” button.
Configure Your Video
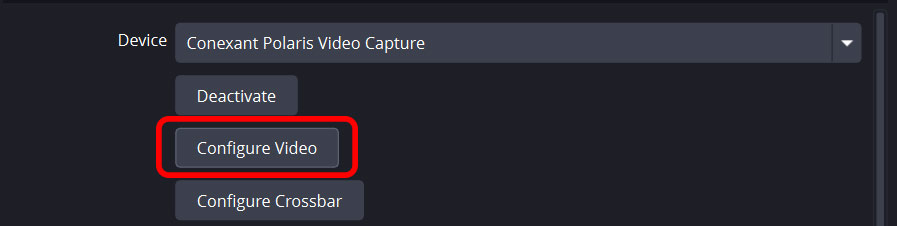
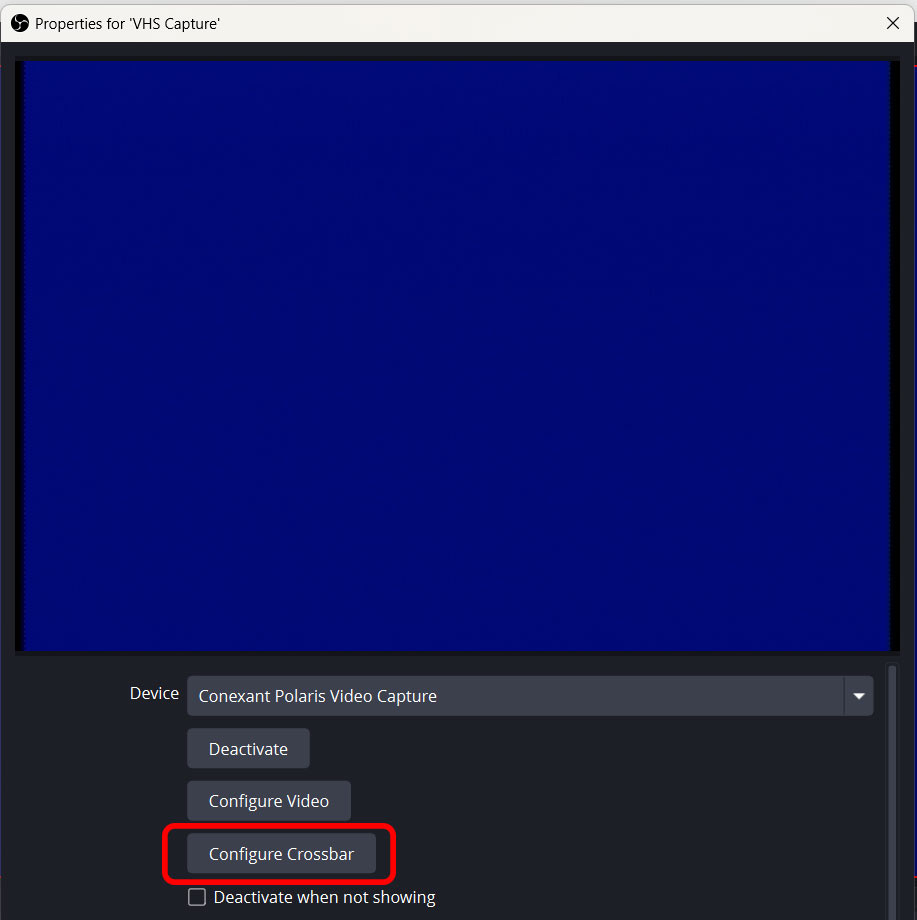
Make sure that “Conexant Polaris Video Capture” is selected as the Device (from the dropdown menu), then click the “Configure Video” button to select your video standard (Configure Video button highlighted below)
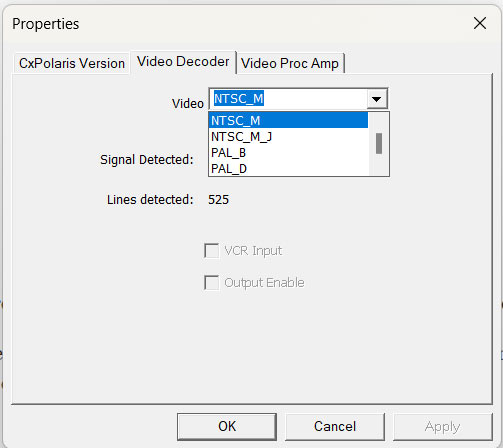
This button allows you to select your Video Format (Video Decoder – 2nd tab), so select from one of the options depending on your region. I selected NTSC_M because I’m in the United States.
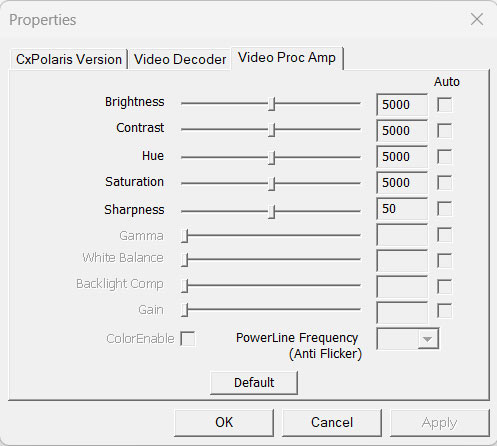
The third tab (Video Proc Amp) allows you to make adjustments to the various input levels (Brightness, Contrast, etc.). Press “OK” when everything is set here.
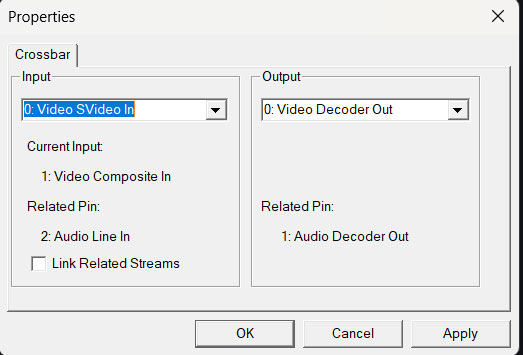
Next, press the “Configure Crossbar” button. This is where you can select your video input (Composite or S-Video). Press OK once the settings are dialed in.
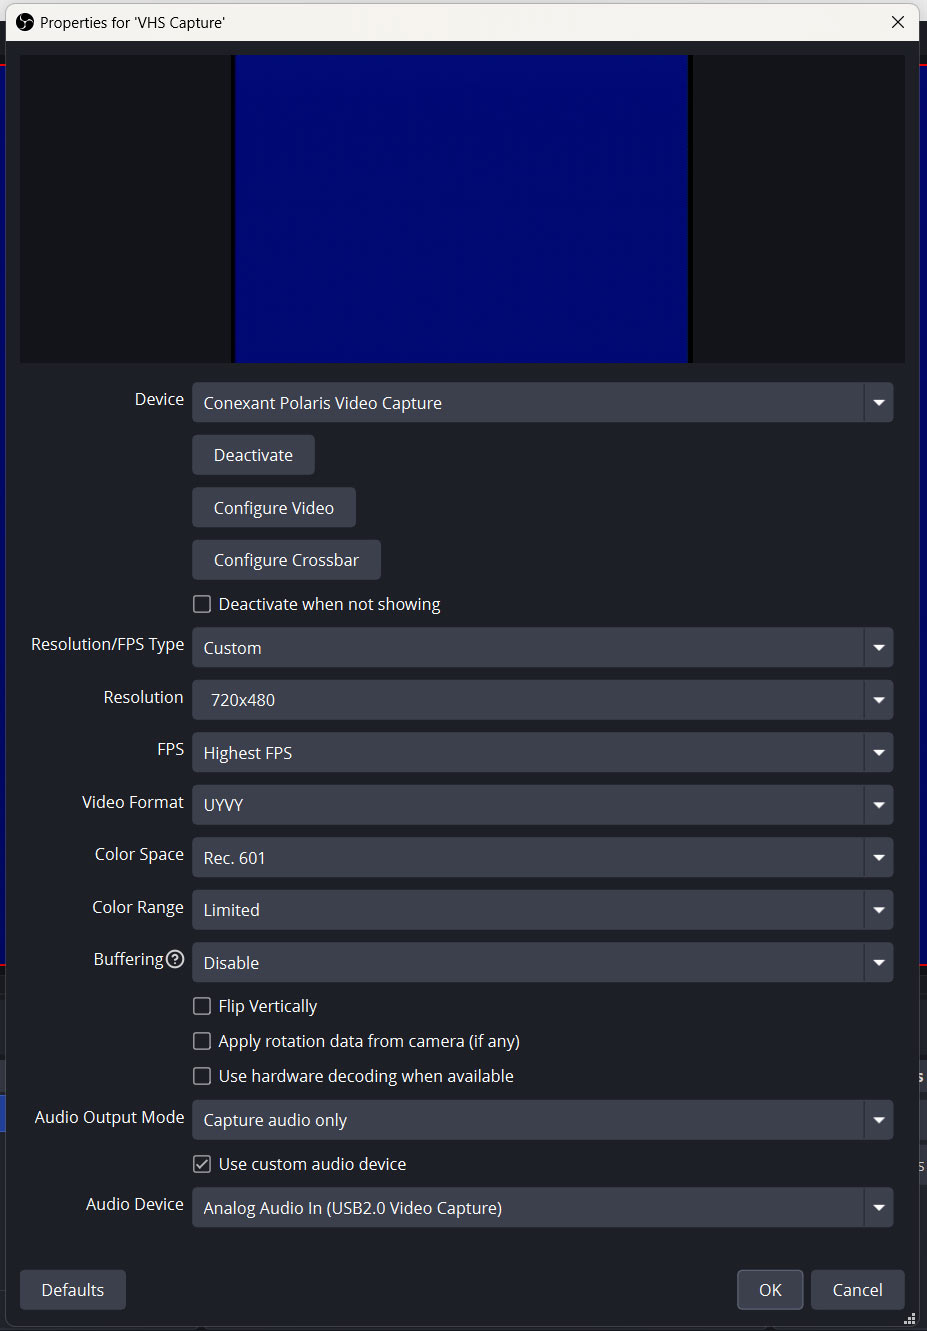
For the remainder of the “VHS Capture” options, be sure to use the following settings:
- Device – Conexant Polaris Video Capture
- Resolution/FPS Type – Custom
- Resolution – 720×480 (for NTSC), 720×576 (for PAL)
- FPS – Highest FPS (this will match the FPS recording settings that were set in the OBS Recording settings, which were 59.94 for NTSC or 50 for PAL)
- Video Format – UYVY
- Color Space – Rec. 601
- Color Range – Limited
- Buffering – Disable
- Uncheck “Flip Vertically”, “Apply rotation data from camera (if any), and “Use hardware decoding when available”
- Audio Output Mode – Capture audio only
- Check the box for “Use custom audio device”
- Audio Device – Analog Audio In (USB2.0 Video Capture)
The settings I just described (for NTSC) are shown in the image below. Press the “OK” button once your settings are configured.
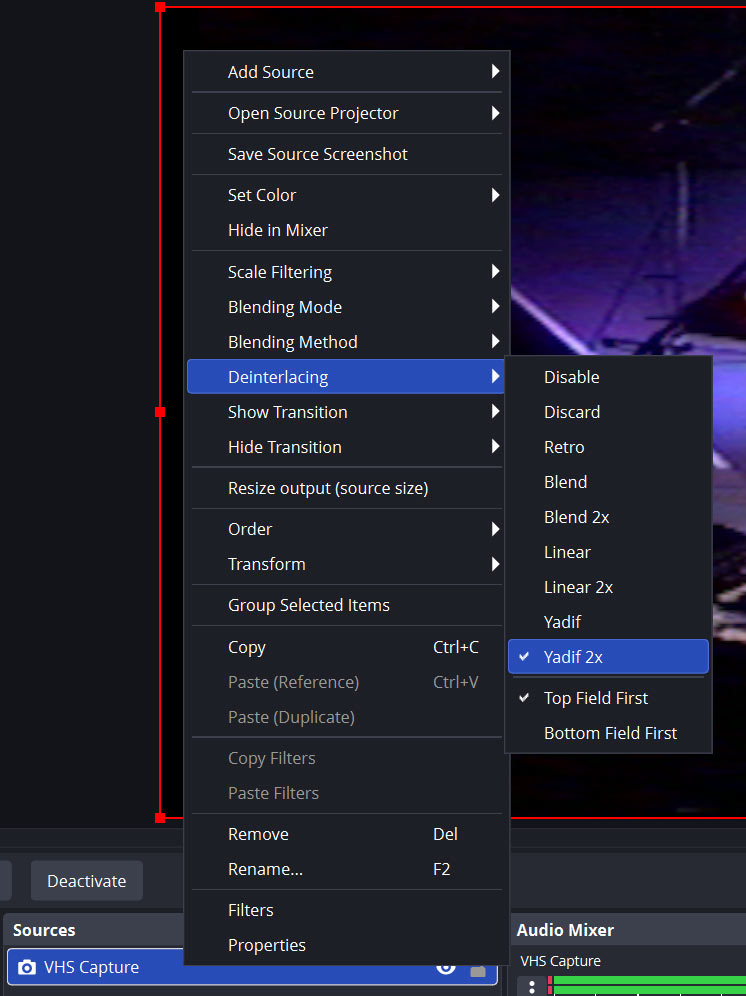
Add a Deinterlacing Filter
OBS doesn’t actually properly capture fields, so you’ll run into problems if you don’t add a deinterlacing filter during the capture process. Basically, if you don’t deinterlace within OBS and attempt to use other software for deinterlacing (like StaxRip) the results will be unpredictable at best. If you want to properly capture each field per frame, I’d recommend using VirtualDub2 instead of OBS. I created a video tutorial on how to do that here – https://youtu.be/66F4l0dqdX8.
To add a deinterlacing filter, right click on your “VHS Capture” video source and look for the “Deinterlacing” option. It’s best to do this while your video is playing so you can determine the field order. I use “Yadif 2x” which creates an individual frame for each field (which is why the particular FPS settings were chosen earlier). Watch your video playback when you select the deinterlacing filter to make sure that it’s not suddenly showing jittery playback. If it is, select a different field order (Top Field First is shown below).
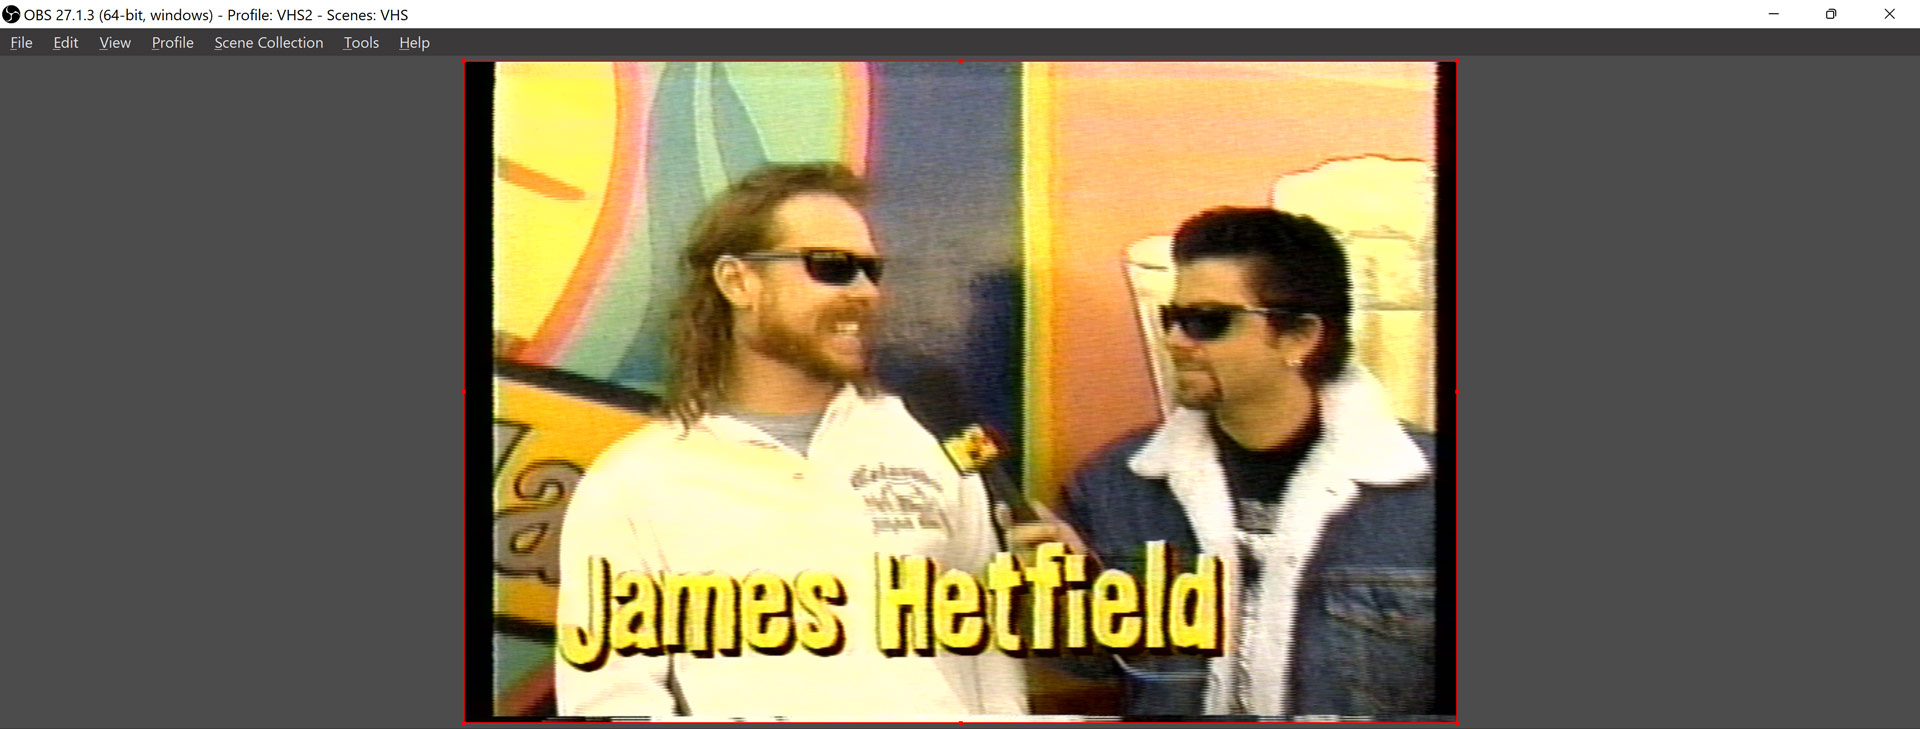
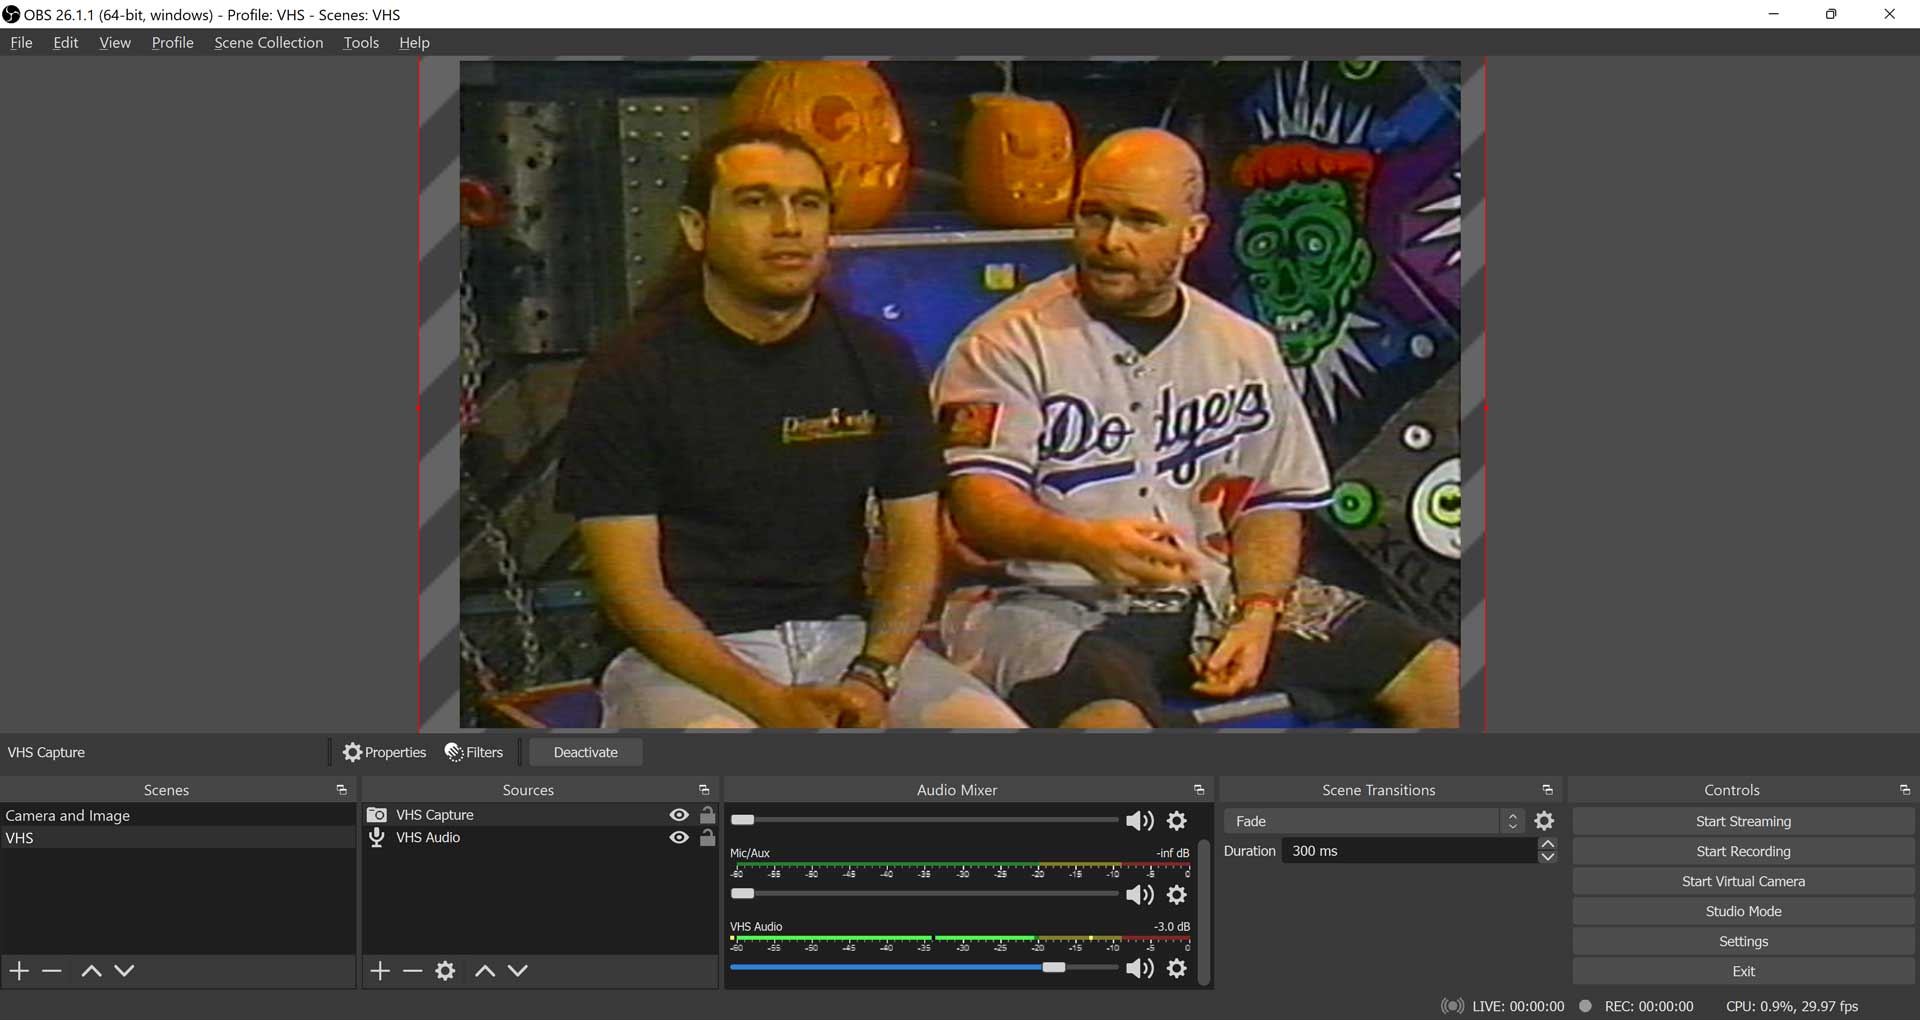
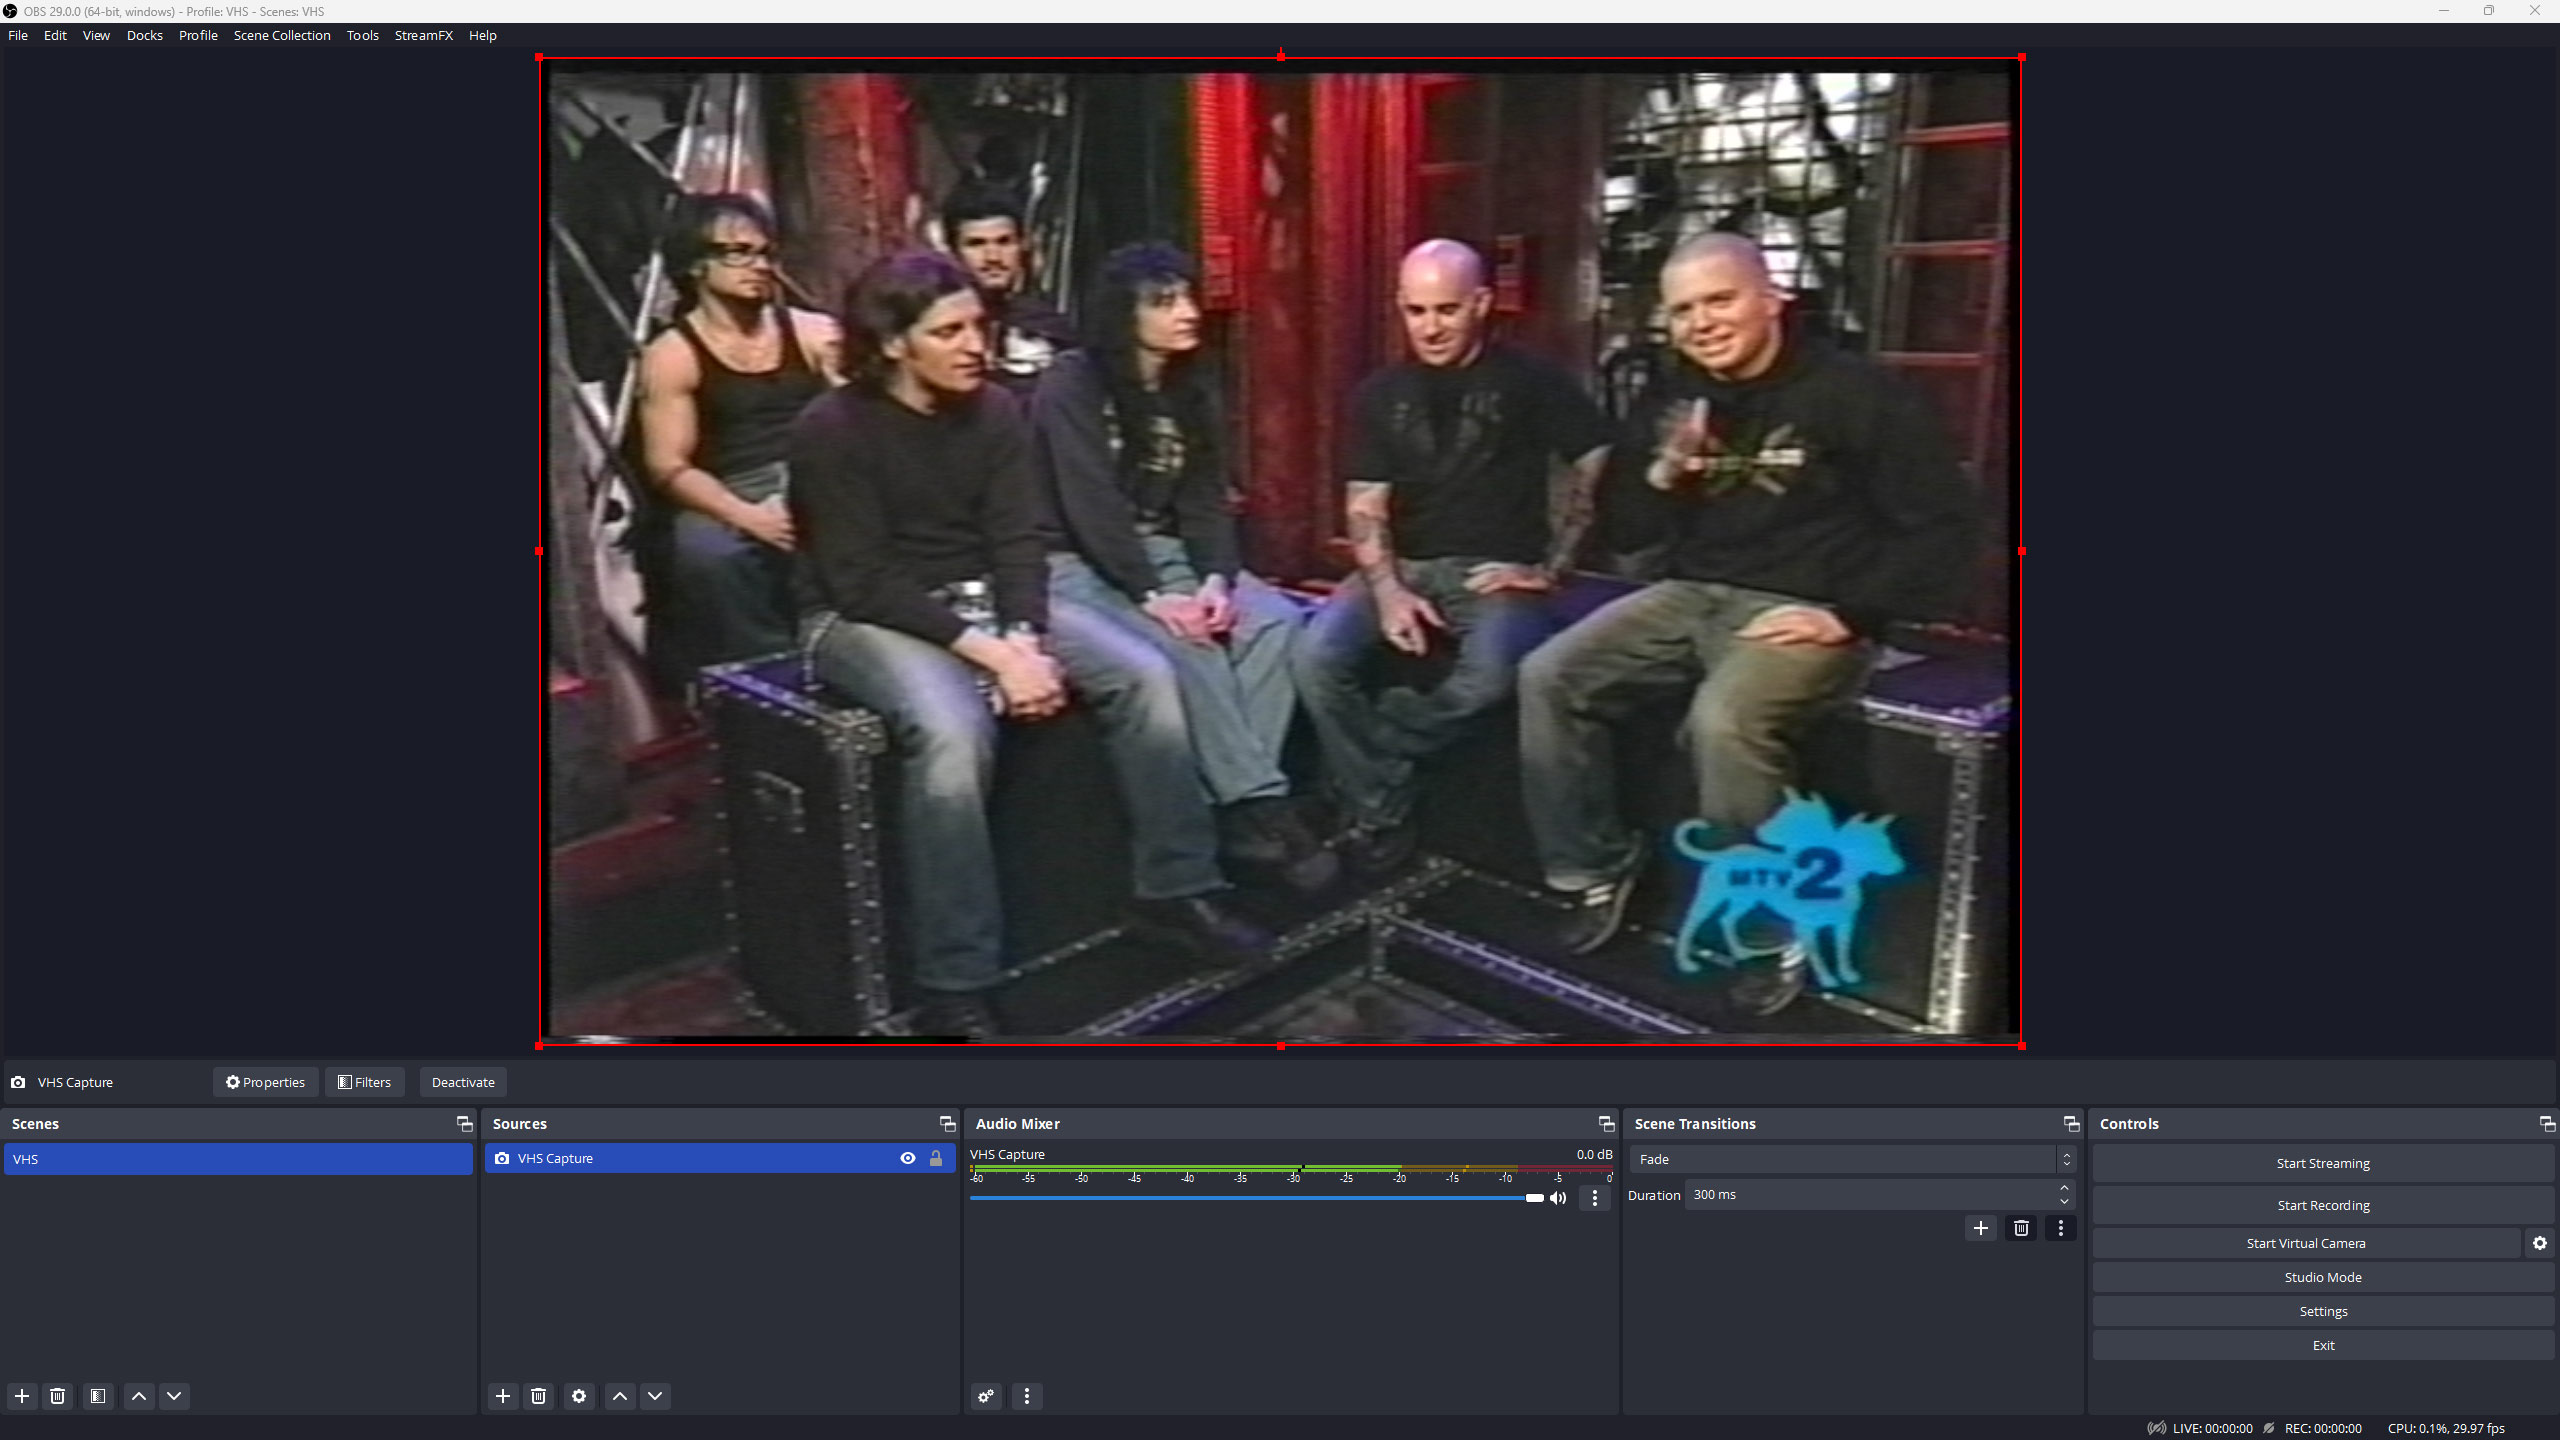
At this point, once you hit the play button on your VCR, you should be seeing the 720×480 sized video playing in your OBS interface as shown below:
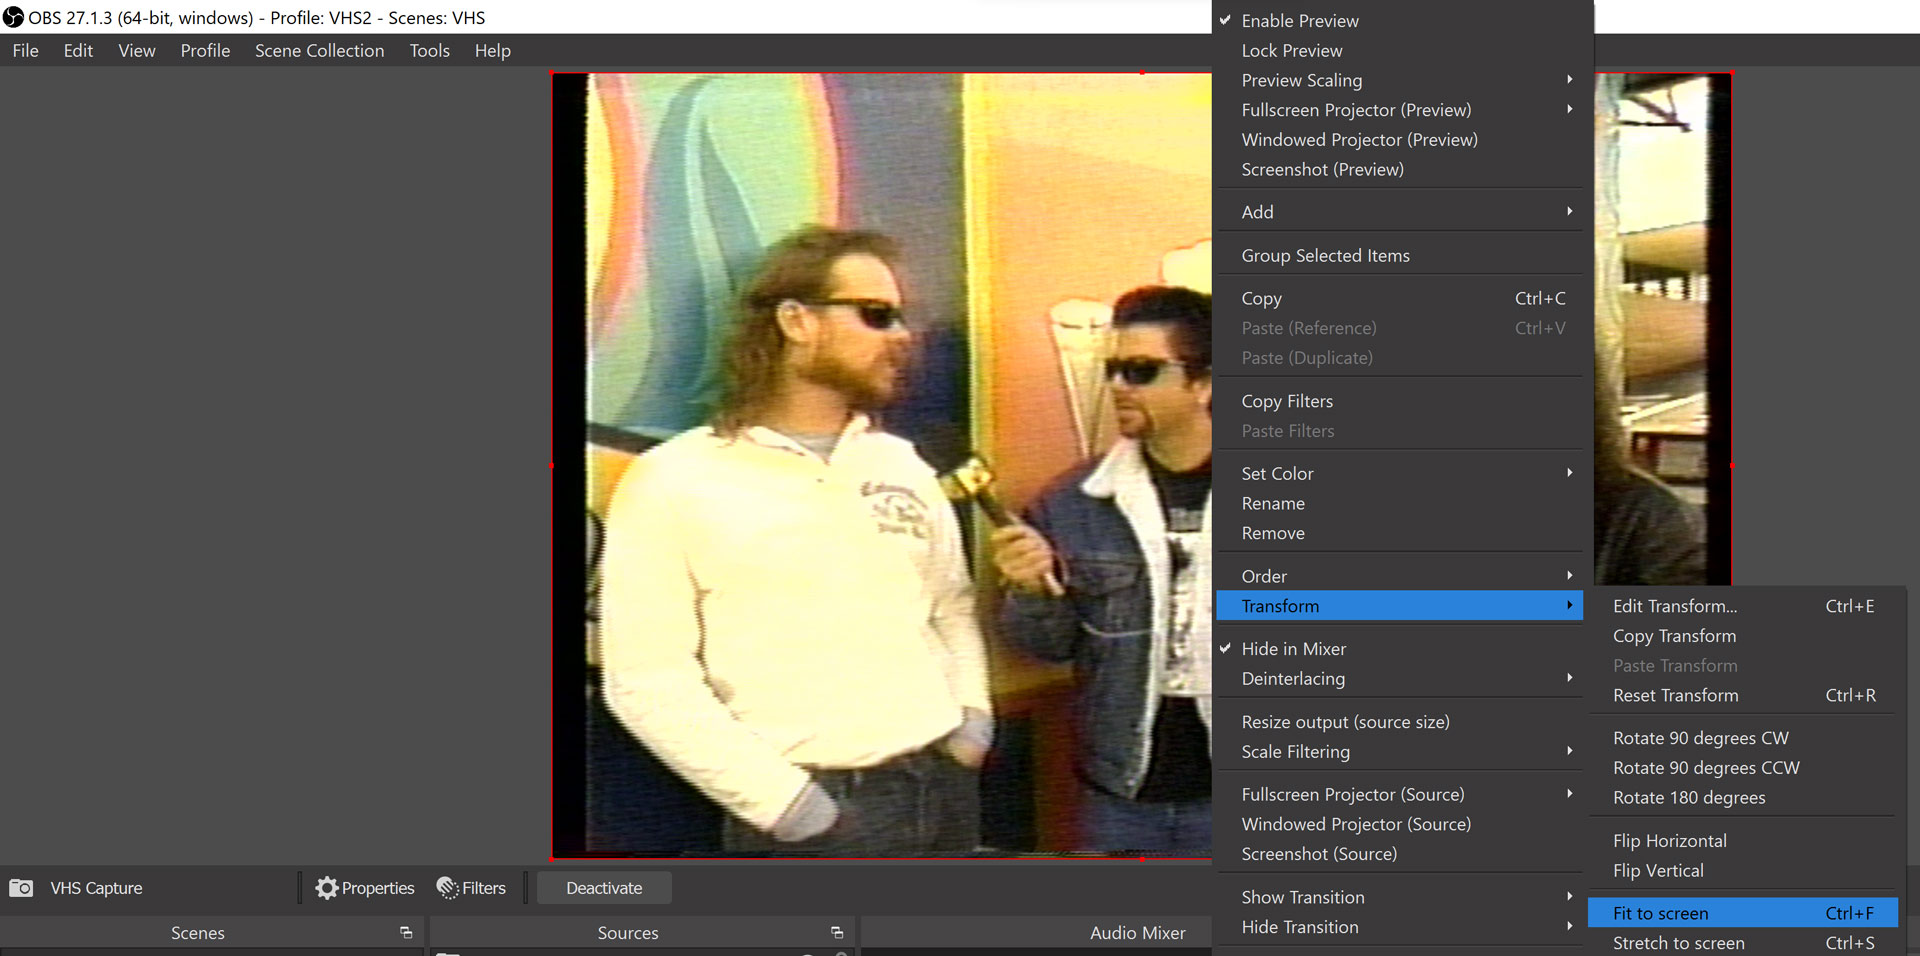
If, for some reason, your source does not appear scaled correctly to your canvas, it’s an easy fix. Right click on the preview window and find the “Transform” option, then select the “Fit to Screen” option (shown below):
NOTE: If the black bars on the edge of the screen bother you (that’s the “overscan” area) you can scale the output to remove them. I personally like to capture the entire video signal and crop the overscan area out later when I’m doing postprocessing, but you can do it here if you prefer. First, right click on the preview window and find the “preview scaling” option (shown below):
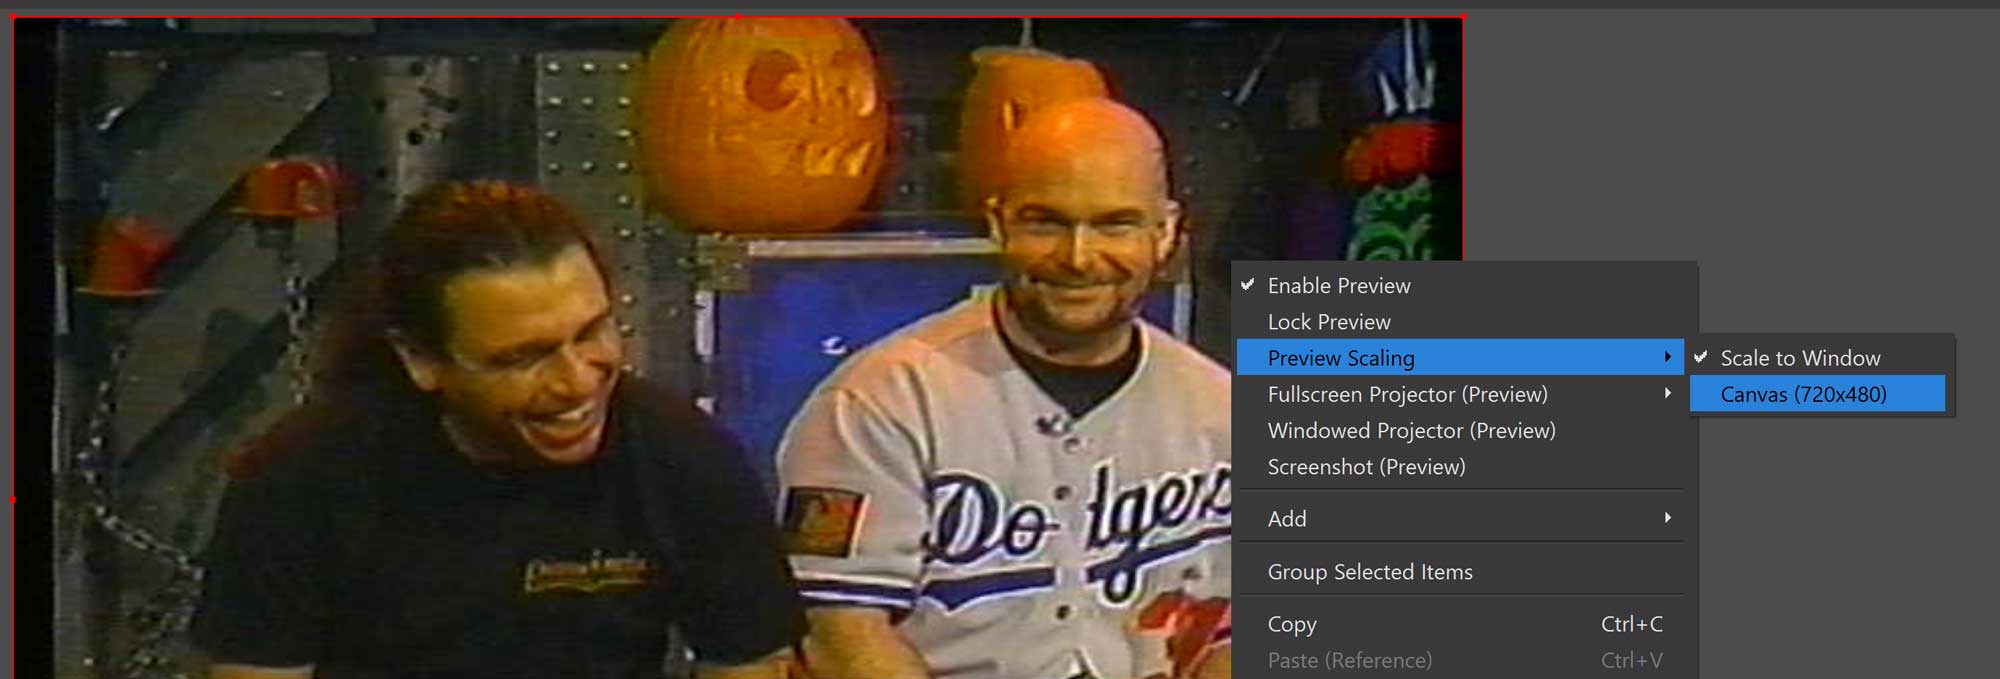
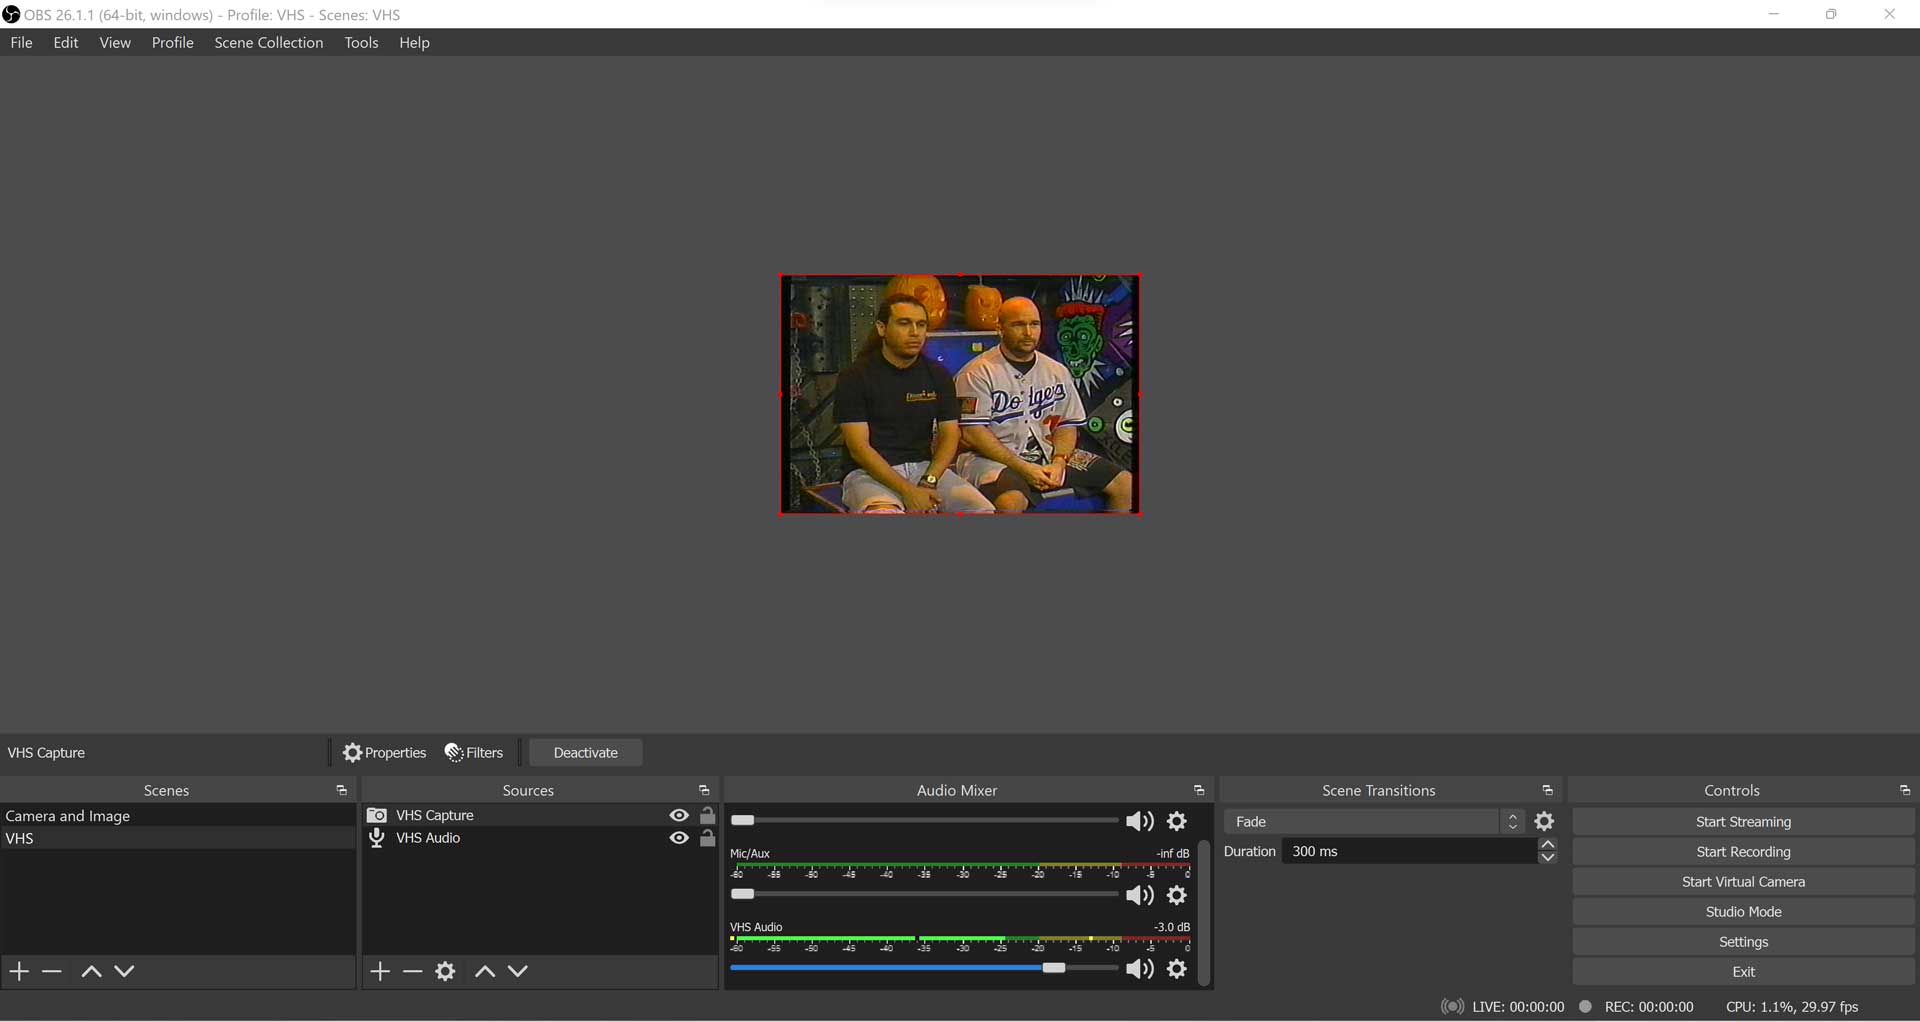
Change the “Preview Scaling” option to “Canvas (720×480).” Doing this will allow you to more easily scale the output, as shown below (notice how much space there is around the preview window and the software’s interface):
Next, click on the preview window so the outer edges turn red. Now hold the shift key on your keyboard and click any one of the four corners of the preview window, then drag to scale it up until the black bars disappear. Holding the shift key is absolutely necessary as it will maintain the aspect ratio.

Right click “Preview Scaling” again and change it back to “Scale to Window” – you may need to do this a few times to verify that the black bars are totally hidden.
Configure the Audio Mixer
Next, you’ll need to verify that the audio in the “Audio Mixer” window is properly configured. Any sources besides “VHS Capture” should be muted by sliding the volume slider all the way to the left. The “VHS Capture” slider should have levels showing when you have your VCR playing. Any other sources should not show any levels (especially “Desktop Audio”).

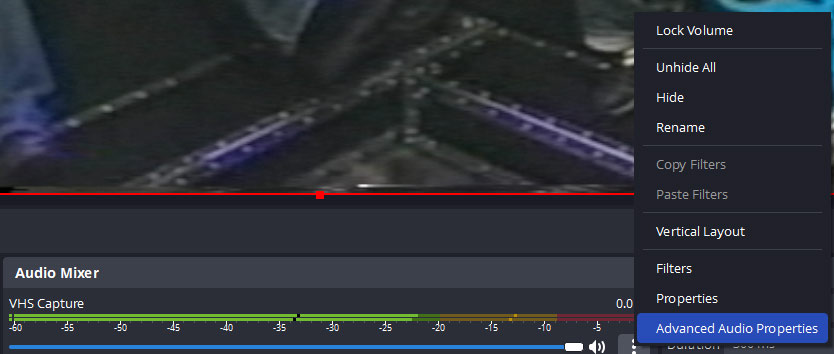
By default you won’t hear anything when your tape starts to play, but you can monitor the input if you want. To do so, click the little gear icon on your “VHS Capture” source (in the Audio Mixer). Select “Advanced Audio Properties” from the resulting menu, as shown below:
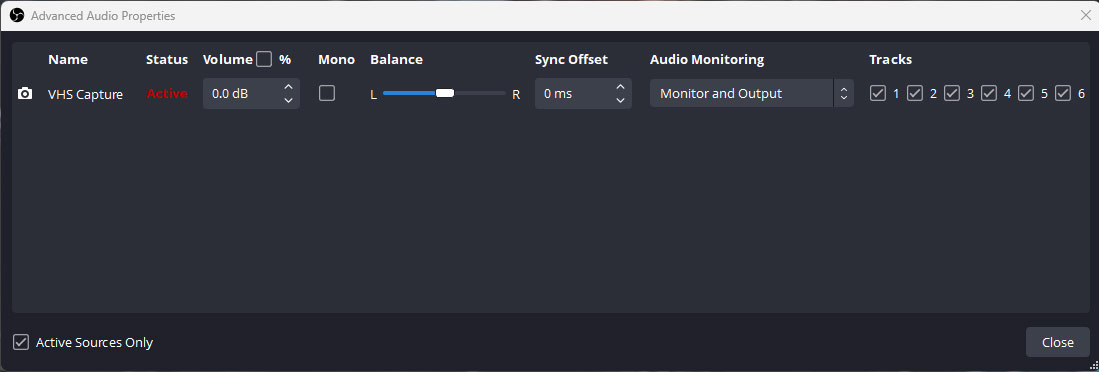
From within the “Advanced Audio Properties” window, you’ll see your “VHS Capture” source. Under “Audio Monitoring” select “Monitor and Output.” You’ll immediately hear the audio from your VHS tape.
NOTE: If you don’t hear any audio, hit the “Windows” key, type in “EZ” and the “EZ Grabber” software will appear. Open it, then immediately right click on the capture window in EZ Grabber and choose “Exit.” I don’t know why this kicks the audio back into gear in OBS, but it does.
Start to Record!
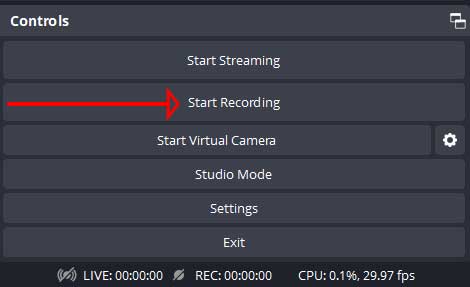
Everything is now configured, so you can start to record. To do so, hit the “Start Recording” button, found in the lower right in the OBS interface, shown below:
As you are recording, you’ll see a running tally of how much media you’ve recorded so far (bottom right of the OBS interface).
This is also where you stop your recording (the “Start Recording” button will change to “Stop Recording” once you push it) as shown below:

Here’s a full screen shot of what your OBS interface should look like after running through this tutorial.
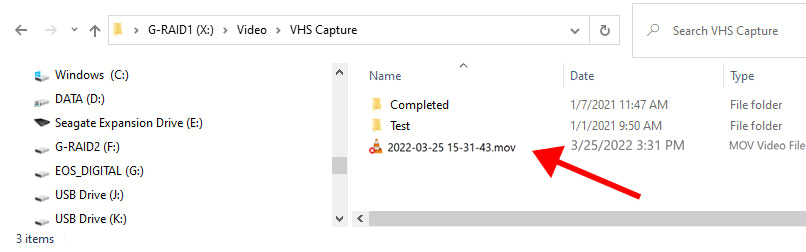
When you are done recording, you’ll probably want to rename the resulting AVI or MOV file since OBS just names it something arbitrary based on the date of the recording. To rename the file, browse to the “Recording Path” that you selected when you were setting up your output settings. In case you forgot where that setting was, it’s shown below. Browse to that location and you’ll find your file.

Shown below is the file that was created by OBS for me. You can see that it’s currently not named anything that’ll mean much to me a year from now, so I’ll want to rename it. A quick shortcut for renaming a file in Windows is to highlight it, then hit the “F2” key on the keyboard.
Some Final Notes
- Lossless AVI files will most likely bog down your editing software.
- Apple ProRes QuickTime files play nicely with most editing software.
- If your audio suddenly stops working in OBS, hit the “Windows” key, type in “EZ” and the “EZ Grabber” software will appear. Open it, then right click on the capture window in EZ Grabber and choose “Exit.” I don’t know why this kicks the audio back into gear in OBS, but it does.
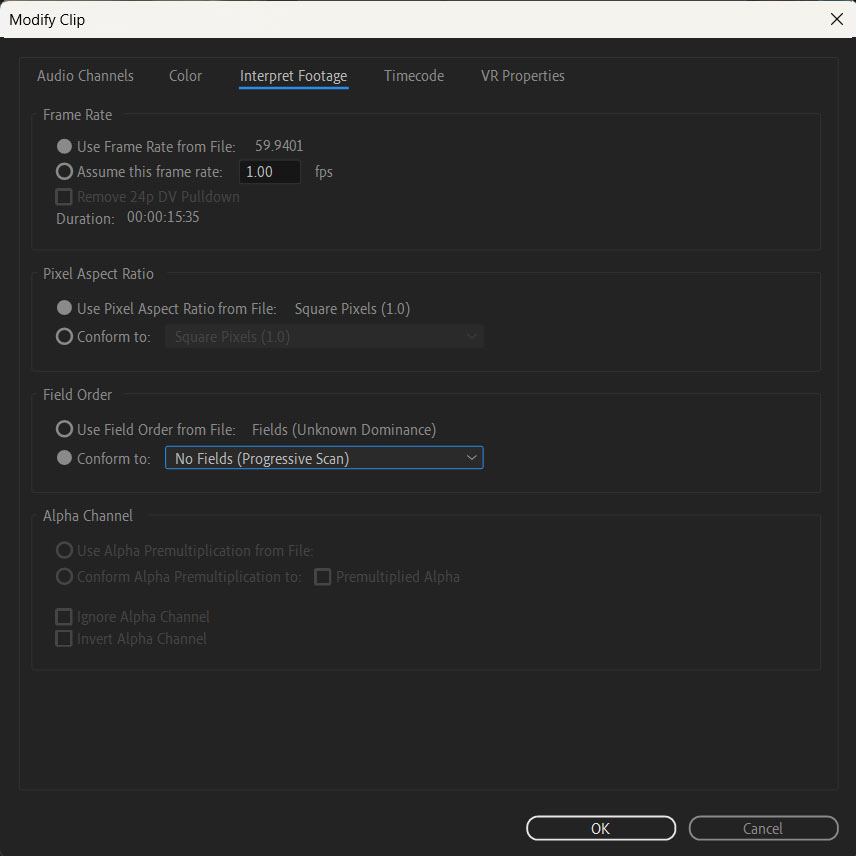
- Premiere will assume the incorrect pixel aspect ratio that OBS creates and may also assume that the media is field based. To change the settings, right click the file in your bin, choose “Modify” then “Interpret Footage.” In the resulting window, for the “Pixel Aspect Ratio” check the “Conform to” box and select “D1/DV NTSC (0.9091) from the dropdown. In the “Field Order” section, make sure it’s set to “No Fields (Progressive Scan). Everything else can stay the same.
That’s it! If you have any questions feel free to let me know.


