I was recently asked to put together a photo booth for an event at work. This was a somewhat last minute request and I needed to use equipment that I had on-hand. I thought my solution might help someone out who needs to do something similar (maybe at a wedding), so I decided to document how I solved the problem.
What you’ll need:
- An SLR that can be remotely fired (I use an older Canon 50D in this tutorial)
- Remote trigger
- Laptop (or even a desktop)
- Monitor or TV
- Table (for holding props, the laptop and the extra monitor)
- Tethering software (I use the free DigiCamControl software in this tutorial)
- USB cable for connecting the camera to the computer
- Tripod
- Printer (optional)
- External flash (optional)
- Velcro (optional)
The way this worked after everything was set up was pretty simple. People would walk in the room, push the button on the remote trigger (which was attached to a door using velcro), wait two seconds (the camera was on a 2 second self-timer), the camera would take the shot and the photo would be instantly displayed on a monitor connected to the laptop that the camera was tethered to. I didn’t set up a printer, but you still can (I explain how below). People had the instant gratification of seeing their photos on a screen and it was a huge hit.
Here’s how this all works…
The first thing you’ll need is (obviously) a camera that can be tethered to a computer. I tried going as far back as a Canon 10D, but no dice. So my next oldest camera that does work is a Canon 50D. I’m using an older camera just to show that you don’t need the latest and greatest in order for this to work. I also used an inexpensive Canon 40mm pancake lens.
Next you’ll need a computer that you can connect your camera to via USB. I used an old laptop running Windows 10.
If you want people to instantly see their photos without having to print them, you’ll need an external monitor. Once you have an external monitor plugged in, tell Windows to extend your desktop to it (don’t clone your desktops). Shown below are the settings in Windows 10 (to open the settings, right click your desktop and choose “display settings”).
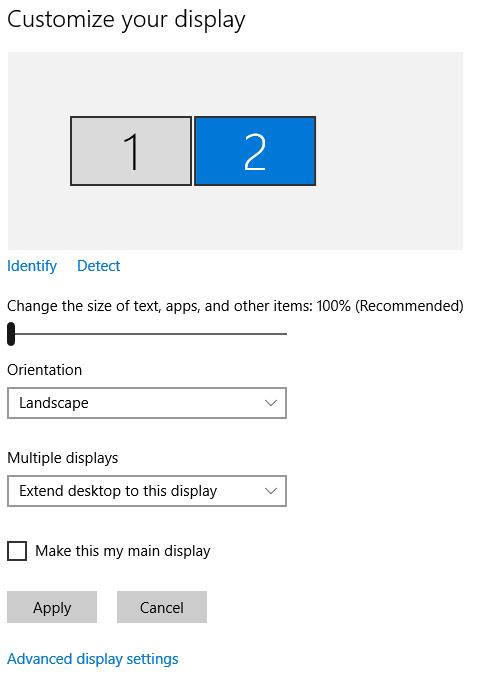
Adding a secondary display in Windows 10
I placed the monitor on a table (this one would be fine) and faced the monitor so people could see the photos seconds after they took them. The table also held props and the laptop that the camera was connected to.
Next you’ll need tethering software. Lightroom can do it, and I know that Nikon, Sony and Canon all have free utilities available that allow you to connect and control your camera from a computer. In my case, I used a piece of open source software called DigiCamControl, which works with numerous cameras (totally free to download). Full list of supported cameras can be seen here. Once downloaded, go ahead and install the software.
You’ll need a tripod. Nothing spectacular is needed, just something to hold the camera in place in the photo booth. This one would be fine. Once your tripod is in hand, attach your camera to it. I recommend shooting in landscape mode in case a large group of people want to use the booth.
You’ll also need a USB cable to connect the camera to the computer. Your camera probably came with one, but if not, you’ll need to figure out which type you need. On the Canon 50D, the USB cable is a Type B Mini. Once you have that in hand, plug one end into the camera and the other into your computer, then launch DigiCamControl.
Once in DigiCamControl, you should see your camera listed in the bottom right and left in the software (shown below, highlighted by red rectangles):
![]()
There are a few settings in DigiCamControl to be aware of, which I’ll outline below:
Turn off the “Show focus points” setting. For some reason, they show in the preview after the photo is taken. To do so, go to the “View” menu and deselect “Show focus points.”
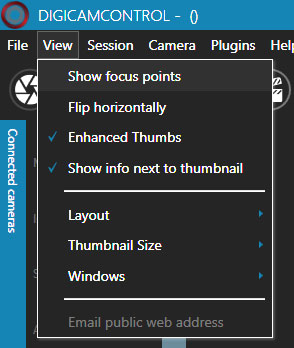
Turn off focus points
Next, if you are using a secondary monitor, you want to turn on the preview. To do so, go to File and choose “Settings.” In the Settings menu, choose the “Preview” option and make sure “Auto preview” is checked (shown below):
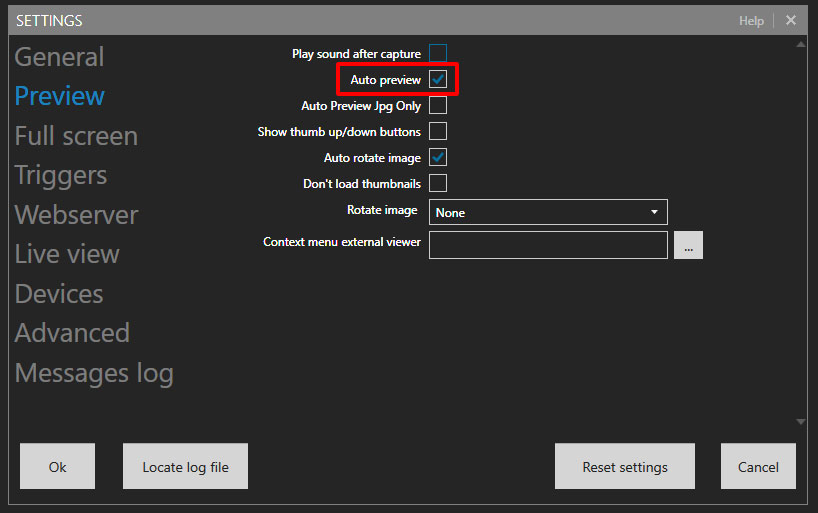
Auto preview checked
You’ll want the preview to open full screen and on your secondary monitor. To make that happen, go to the “Full Screen” option and make sure that the “Preview image after capture in fullscreen” is checked. For some reason the software insists that the preview only shows for a certain period of time, so enter in the amount of time you’d like it to be displayed. I chose 45 seconds. Lastly, make sure that “Show in secondary monitor” is checked. All of these settings are shown below:

DigiCamControl full screen options
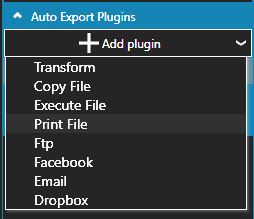
If you want to have the photo automatically print, you can do that too. Look on the right side of the screen in the software and twirl down the “Auto Export Plugins” settings. Click on “Add plugin” and choose “Print File.” You can name the plugin if you want, but you don’t have to. Once that’s enabled, everything the software captures will be automatically sent to your default printer.
Adding printing functionality

Configuring print settings
Note about printing – if you want to adjust your print settings, click on the “Print” icon (shown below), then choose “Print setup.” I obviously can’t tell you what your individual print settings should be, but if “scale to fit” is an option, you’ll want to enable it.
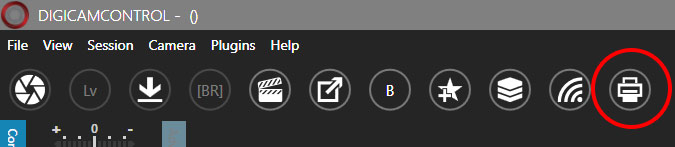
Click the Print button to open your printer settings
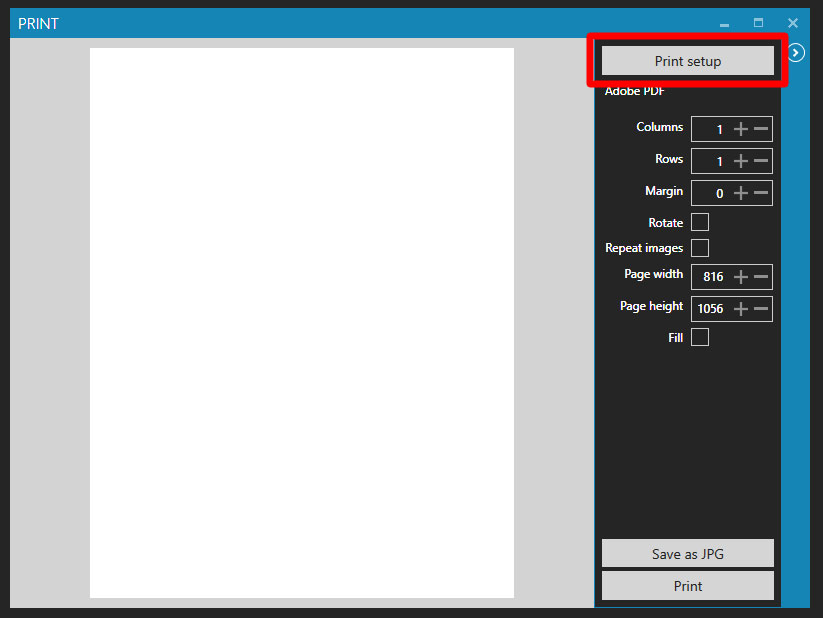
Click the Print setup button to configure your printer
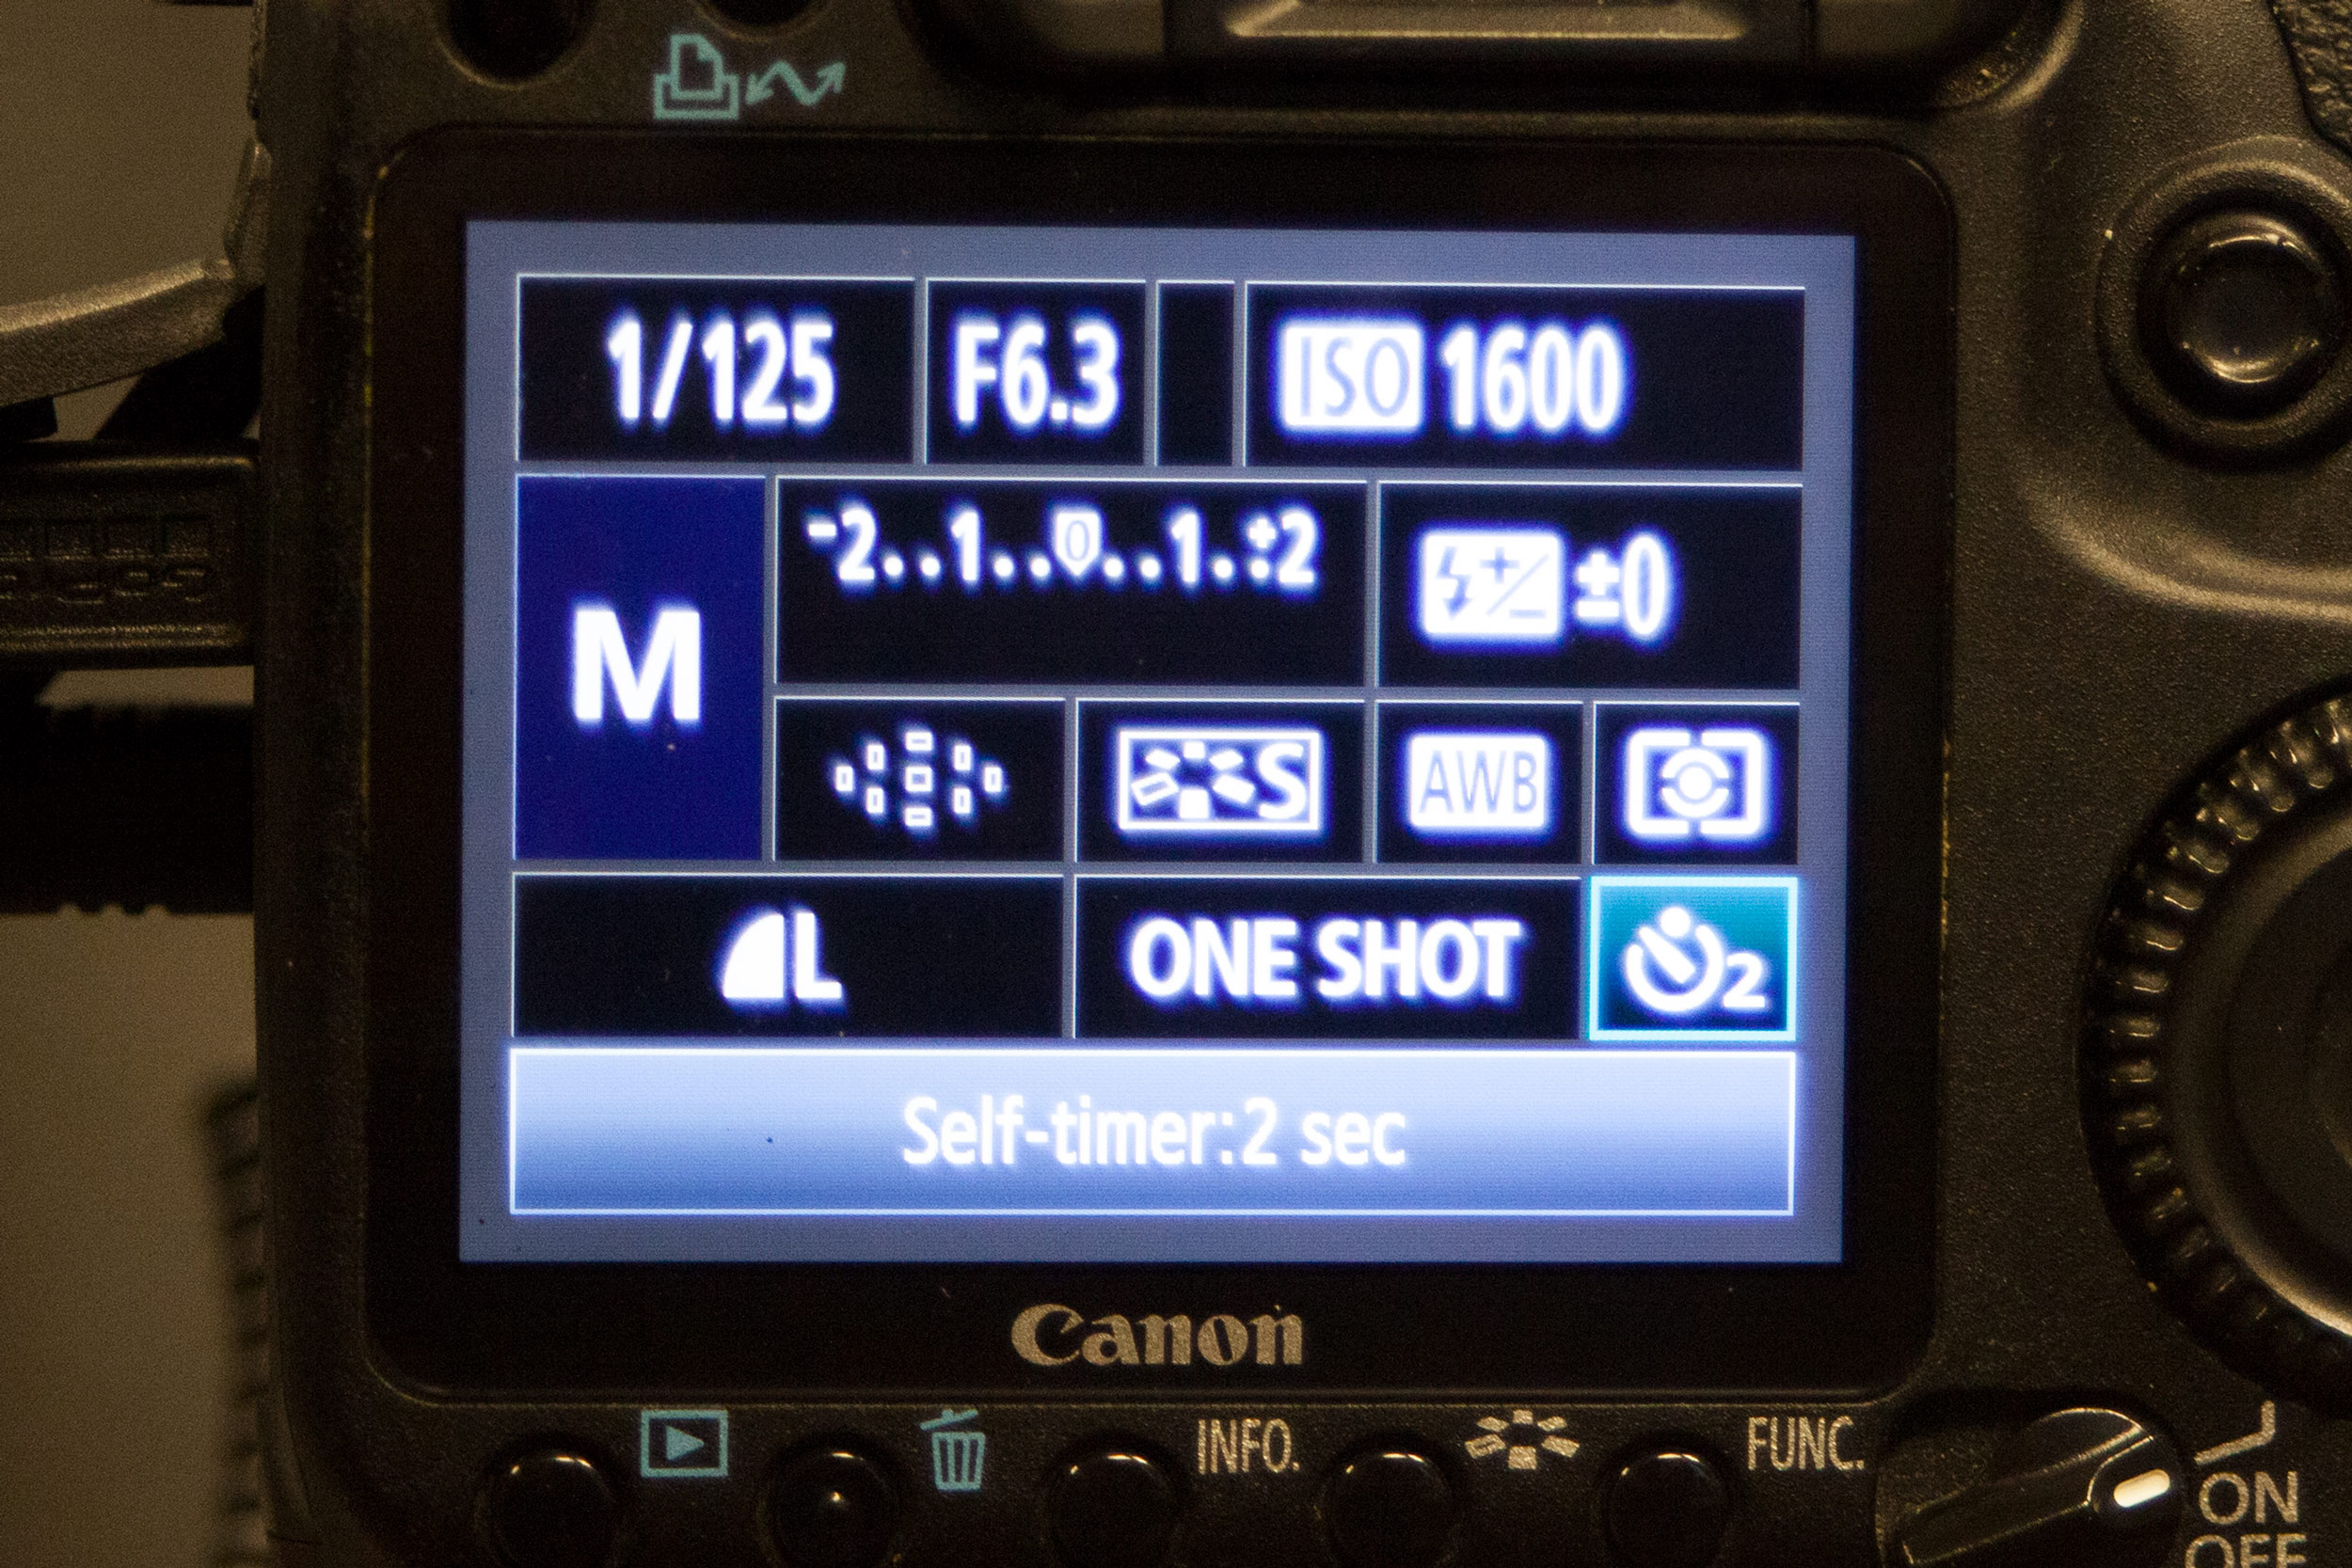
For the camera itself, you can adjust the settings within the software. Everything from ISO to shutter speed can be changed. The camera settings will vary depending on where you set up your photo booth, but I will recommend putting the camera in manual mode and using a high aperture (I used f/6.3) and a shutter speed above 1/60th sec (I used 1/125 sec). My ISO was 1600. Other settings to be aware of that can be changed in the software are:
- White Balance (I used auto)
- Exposure Comp. (I left this at 0.0)
- Compression (I chose Large Fine JPG)
- Metering Mode (the camera should be in manual so this setting doesn’t really matter, but mine was set on Evaluative metering)
- Focus Mode (I chose One-shot AF)
If you want to save the file both locally as well as to your computer, you can do that. In the “Transfer” settings, choose “Save to PC and camera.” Settings I used are shown below:
![]()
The software does also allow you to select a drive mode, but in my case (using a Canon 50D) those settings did not take effect. You definitely want the camera in a self-timer mode for your photo booth though, so make sure you enable it. On the Canon 50D, push the joystick on the back of the camera, then scroll over to the drive mode (it’ll probably be set to “Single shooting”). Press the center button to change the setting, then use the wheel on the back of the camera until you see the little timer icon with a 2 next to it appear, as shown below:
Another small setting that has a huge impact on the final product is making sure the “beep” on your camera is enabled. The beep is important because it lets the photo booth users know if the camera is counting down or not. Shown below is how to enable the beep on the Canon 50D:
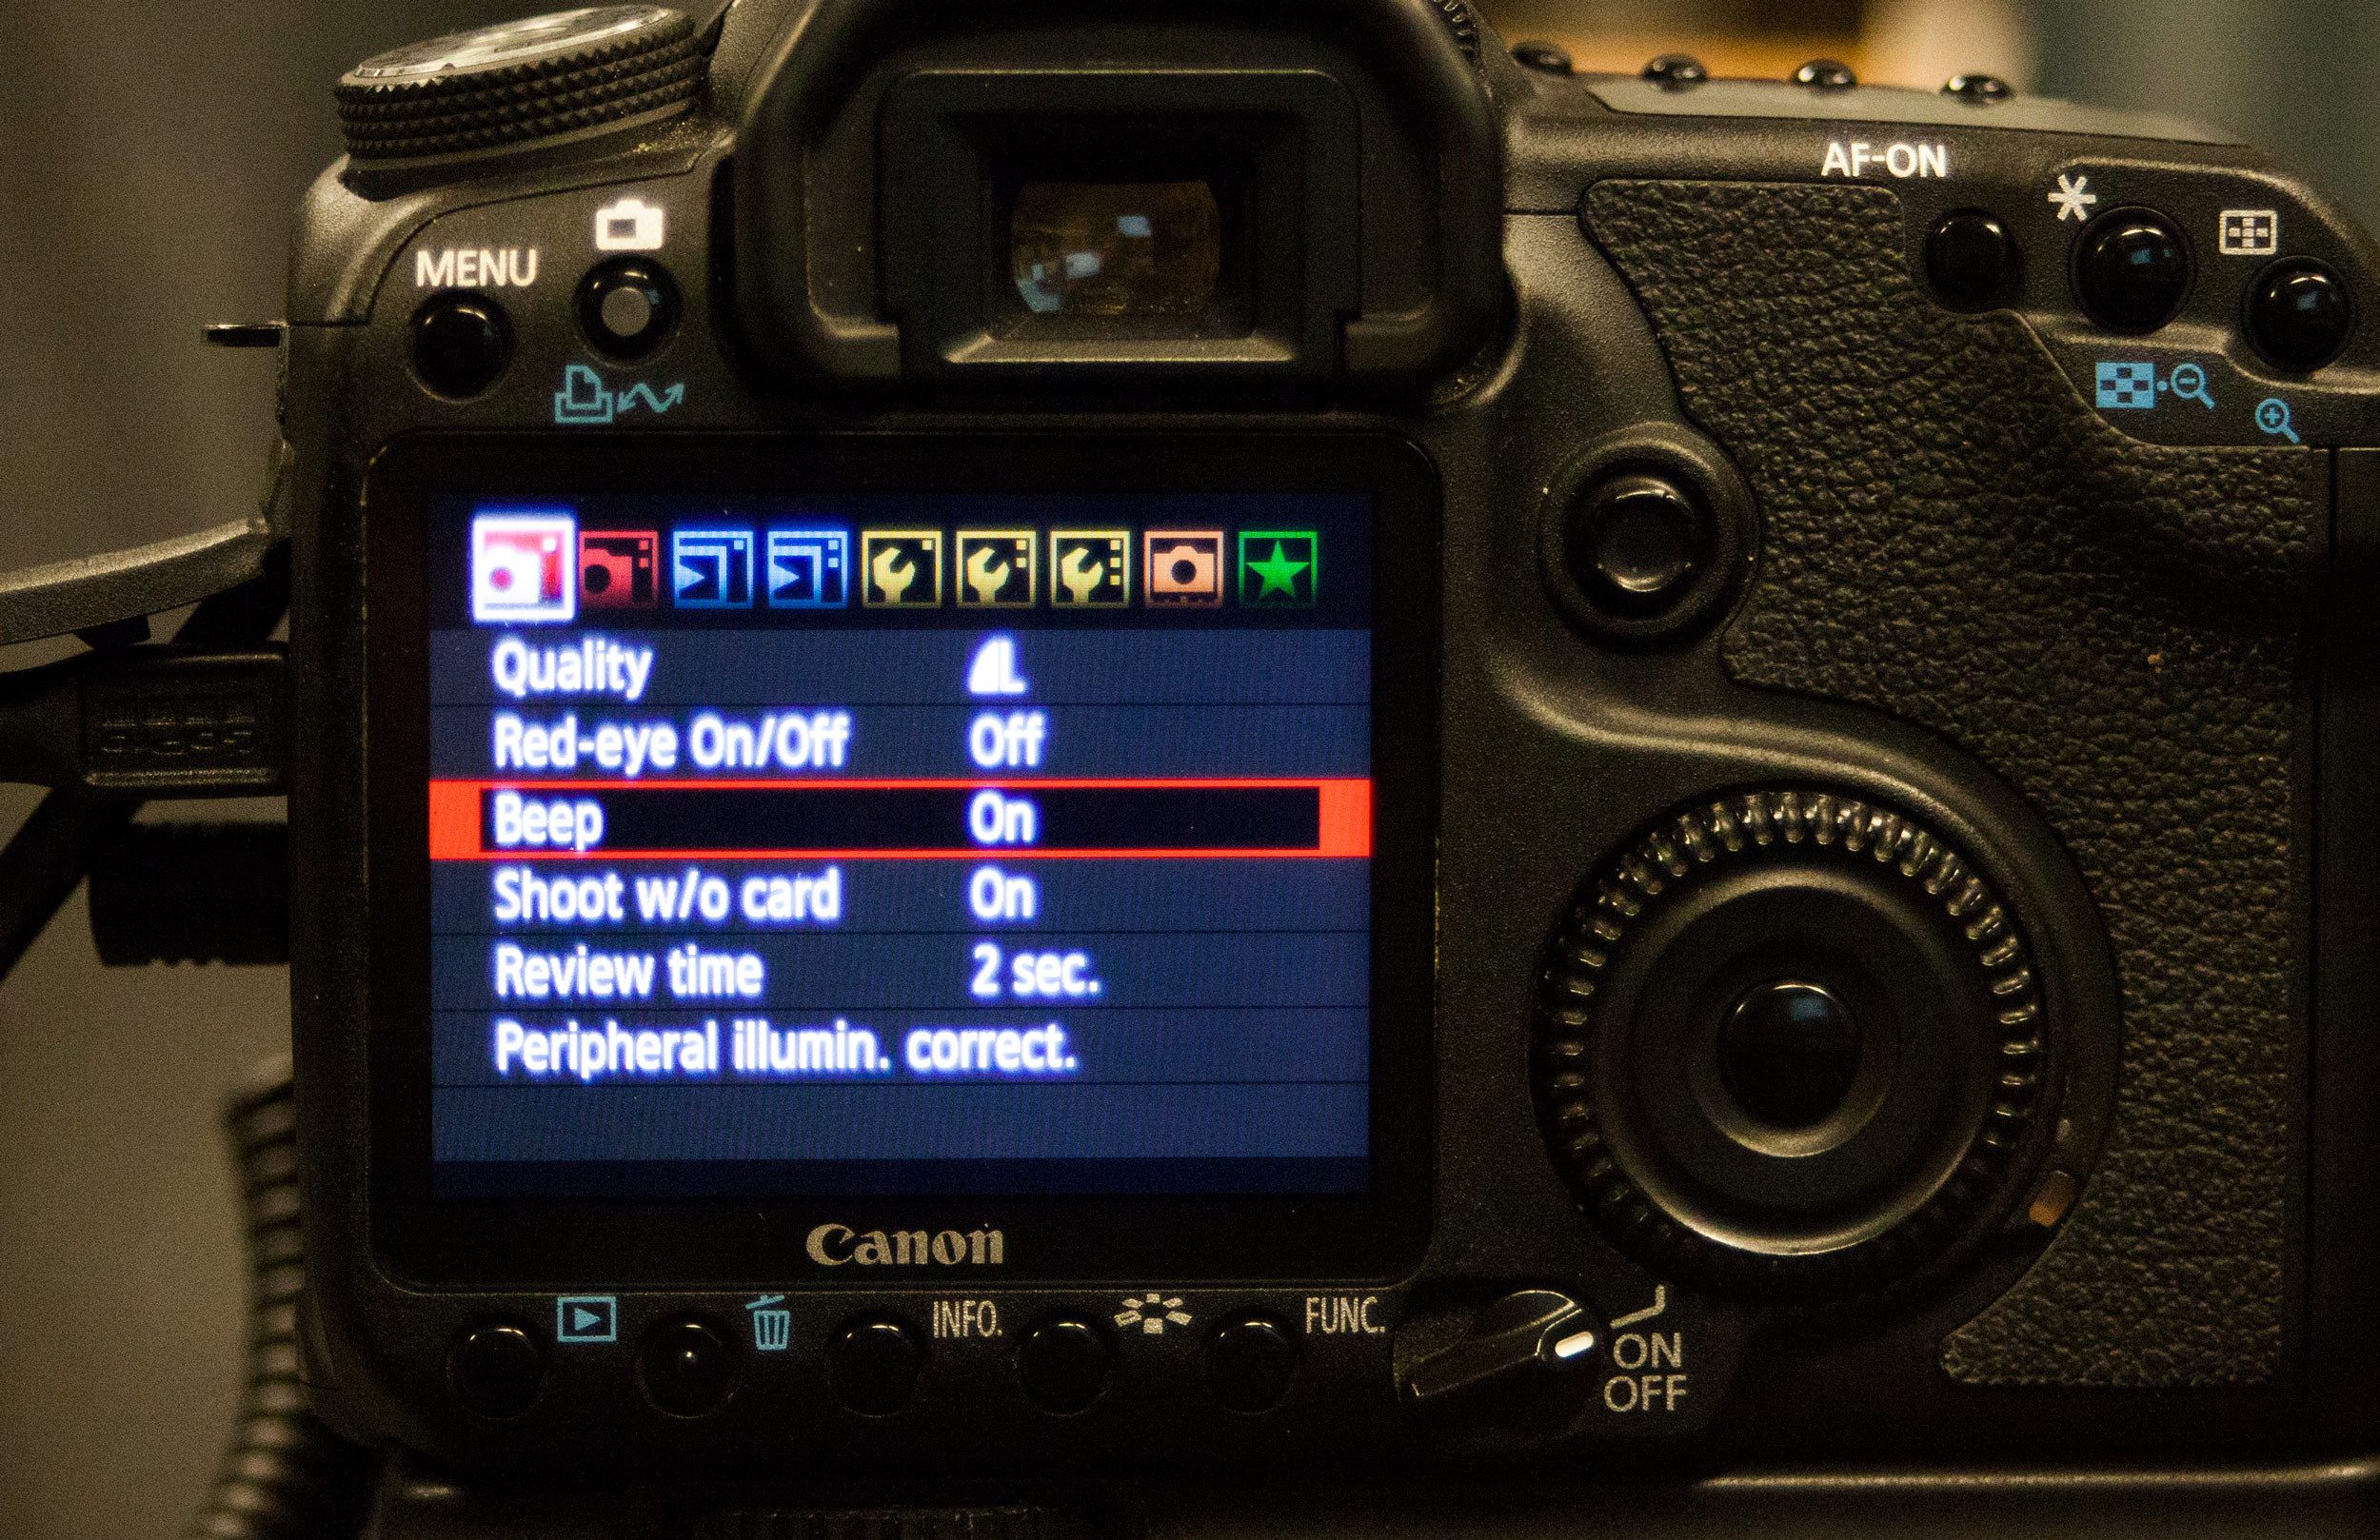
Make sure enable the beep sound on your camera!
In order for people to be able to remotely fire the camera, you’ll need a remote trigger. You’ll need to find one that works with your camera, but the one that worked for me was the Vello Freewave Plus. The receiver attaches the hotshoe on your camera, but it doesn’t rely on the hotshoe in order to work. Make sure to get the Freewave that works with your particular camera because the connection cable is very specific. Shown below is the Freewave attached to the Canon:

Vello Freewave attached to the camera
Plug the connection cable from the Freewave receiver into the port on your camera, as shown below:
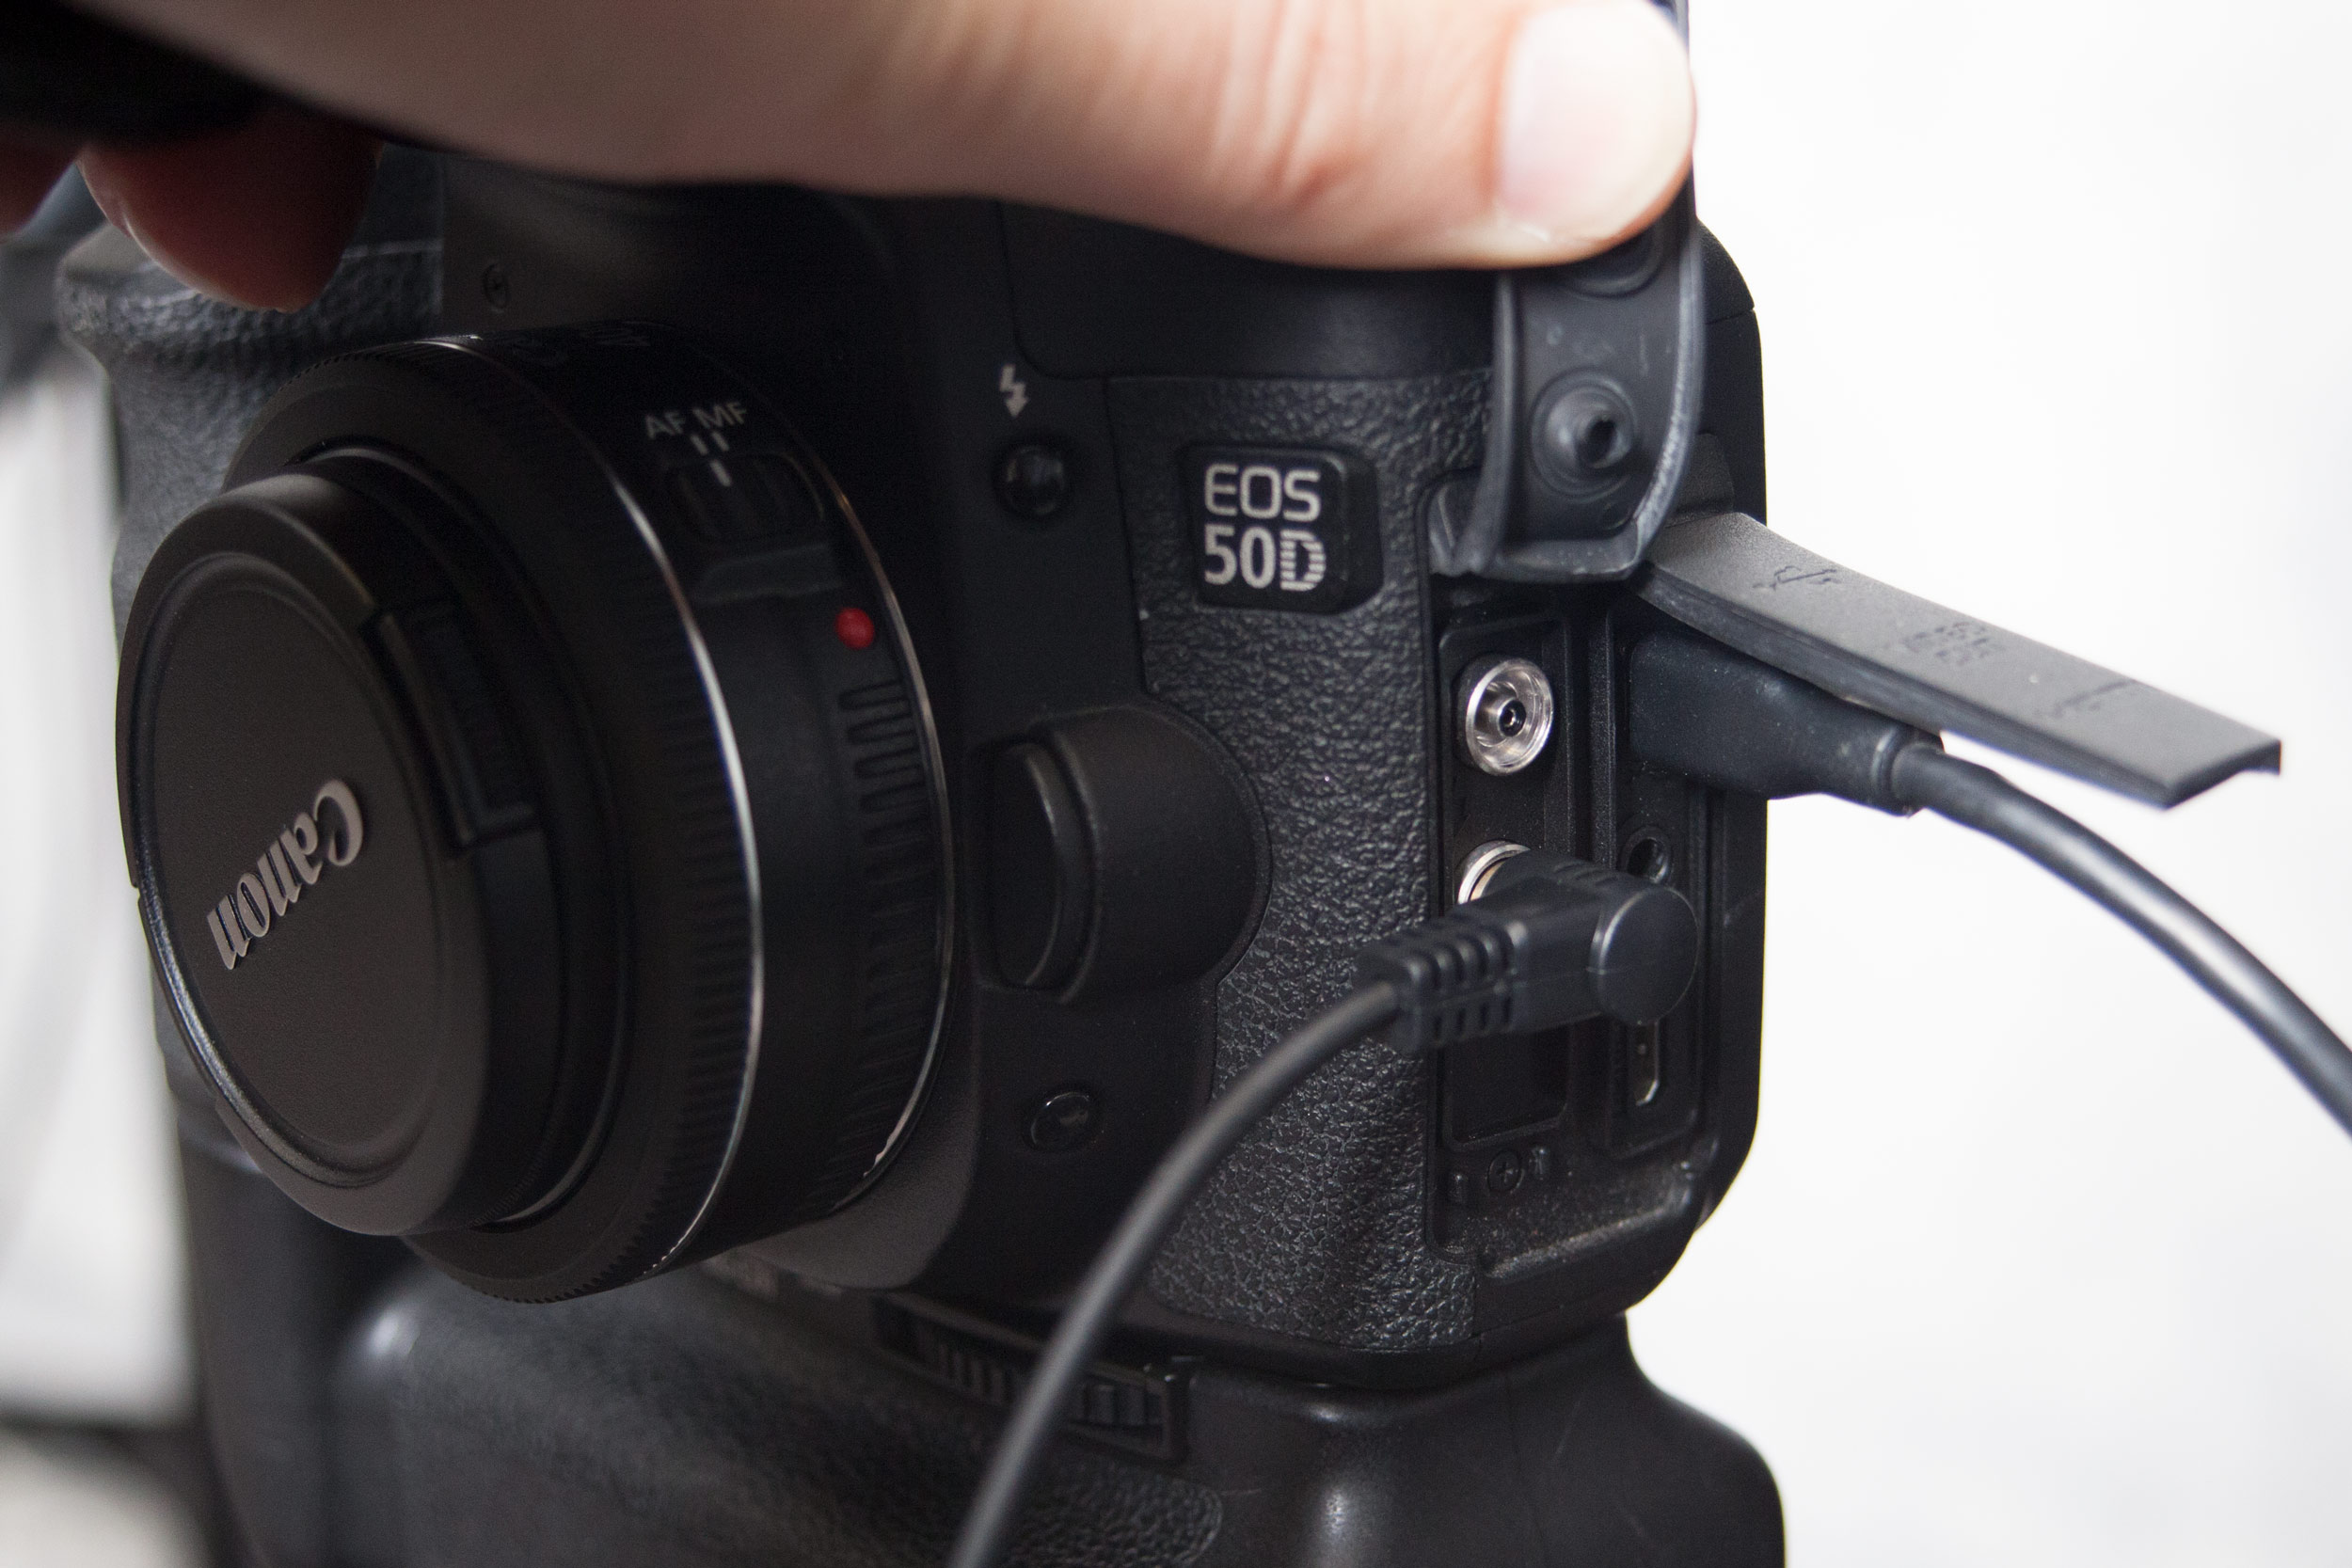
Freewave connection to camera
Once you have the remote trigger in hand and plugged it into your camera, give it a test drive. The camera should respond by focusing, then counting down from two and taking the shot. The DigiCamControl software will recognize that a photo has been taken and it will display your picture full screen on your secondary monitor, plus it will automatically print the photo if you set that up. Cool!
Once you know the remote trigger is working, you’ll want to have it available for your photo booth users. I used velcro to attach the remote trigger to the door in the room we used as the photo booth and then put together a sign explaining how to use the trigger. I taped the sign to the door. No matter what you decide to do with your remote trigger, I recommend that you have some way to keep it from being dropped into someone’s pocket on accident!
Below is the sign I taped next to the remote trigger. Feel free to use it if you want.
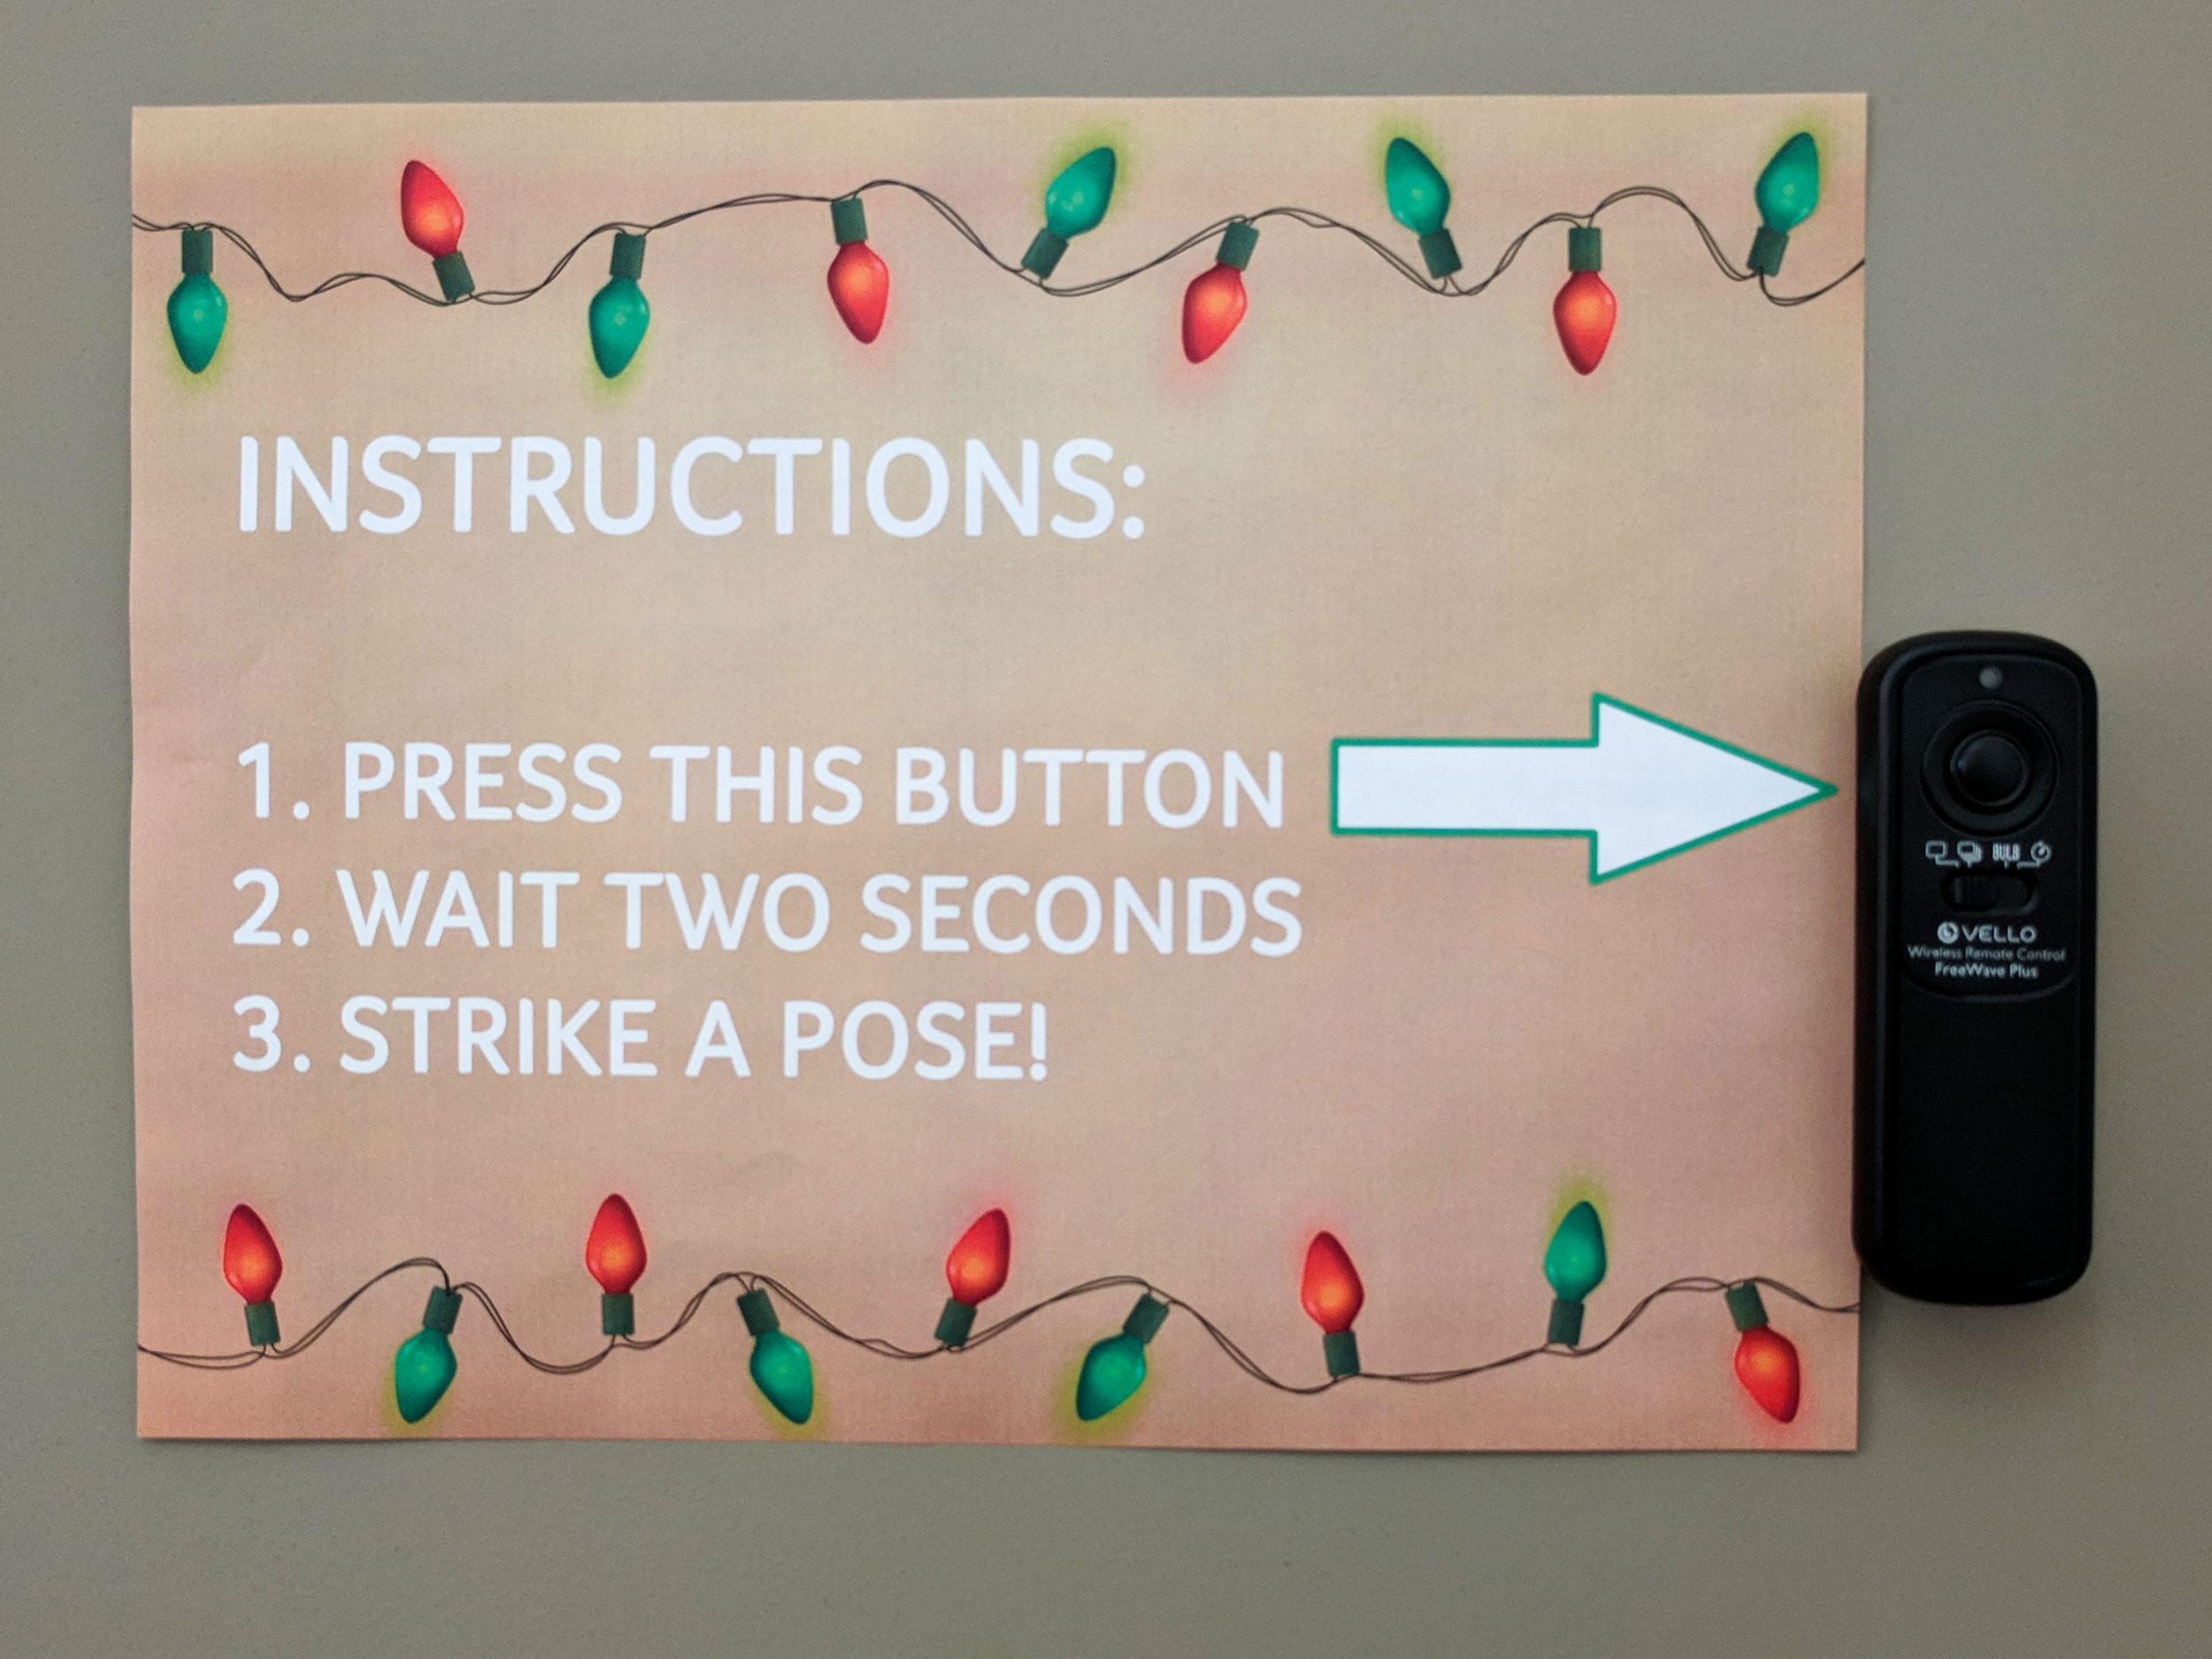
Instructions that I taped next to the remote trigger
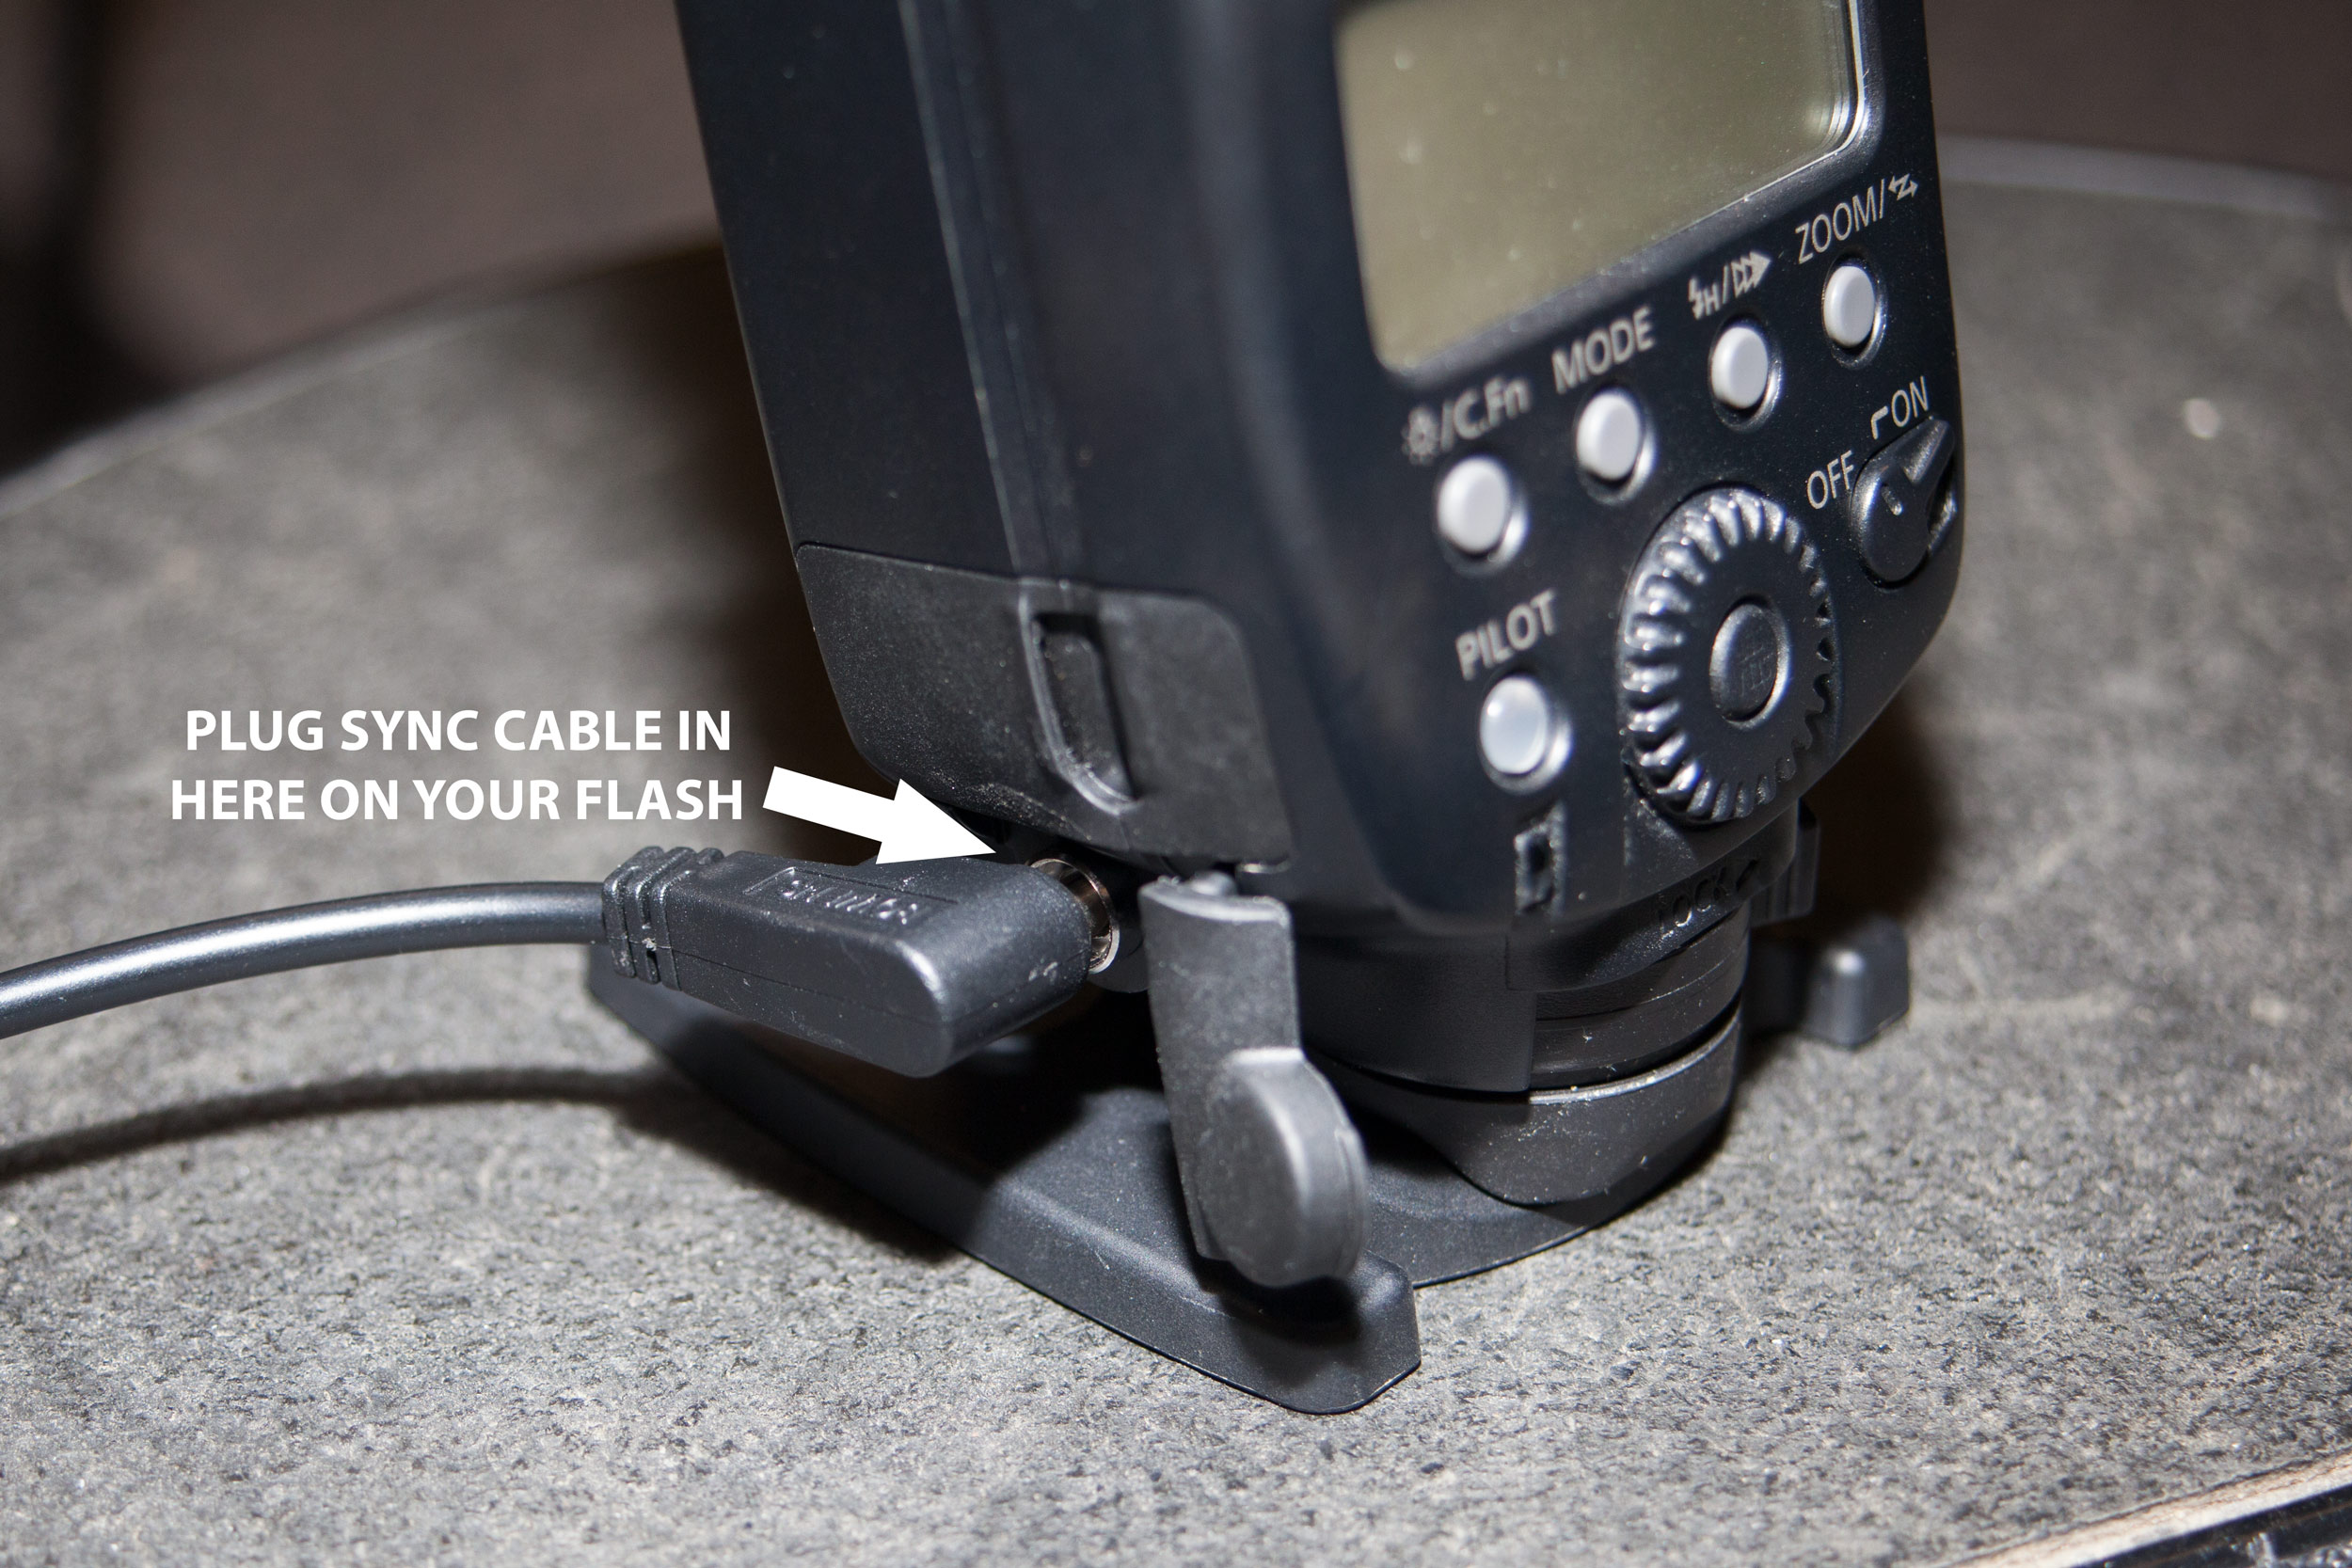
If you have an external flash, it helps in terms of controlling the lighting. I ended up using a large studio strobe (Lumiair by Bowens) but in all honesty the same effect could have been achieved using an external speedlite. Something inexpensive such as these would work fine. I didn’t want a directional flash, I just wanted the room filled with light, so I aimed the flash at the wall and adjusted the power accordingly. You could do the same with a speedlite, especially one that’s external and connected via a PC sync cable. Just plug one end of the cable into your camera and the other into the flash. The flashes I linked to include inputs for a PC sync cable. Shown below is the sync cable plugged into the camera and the flash:
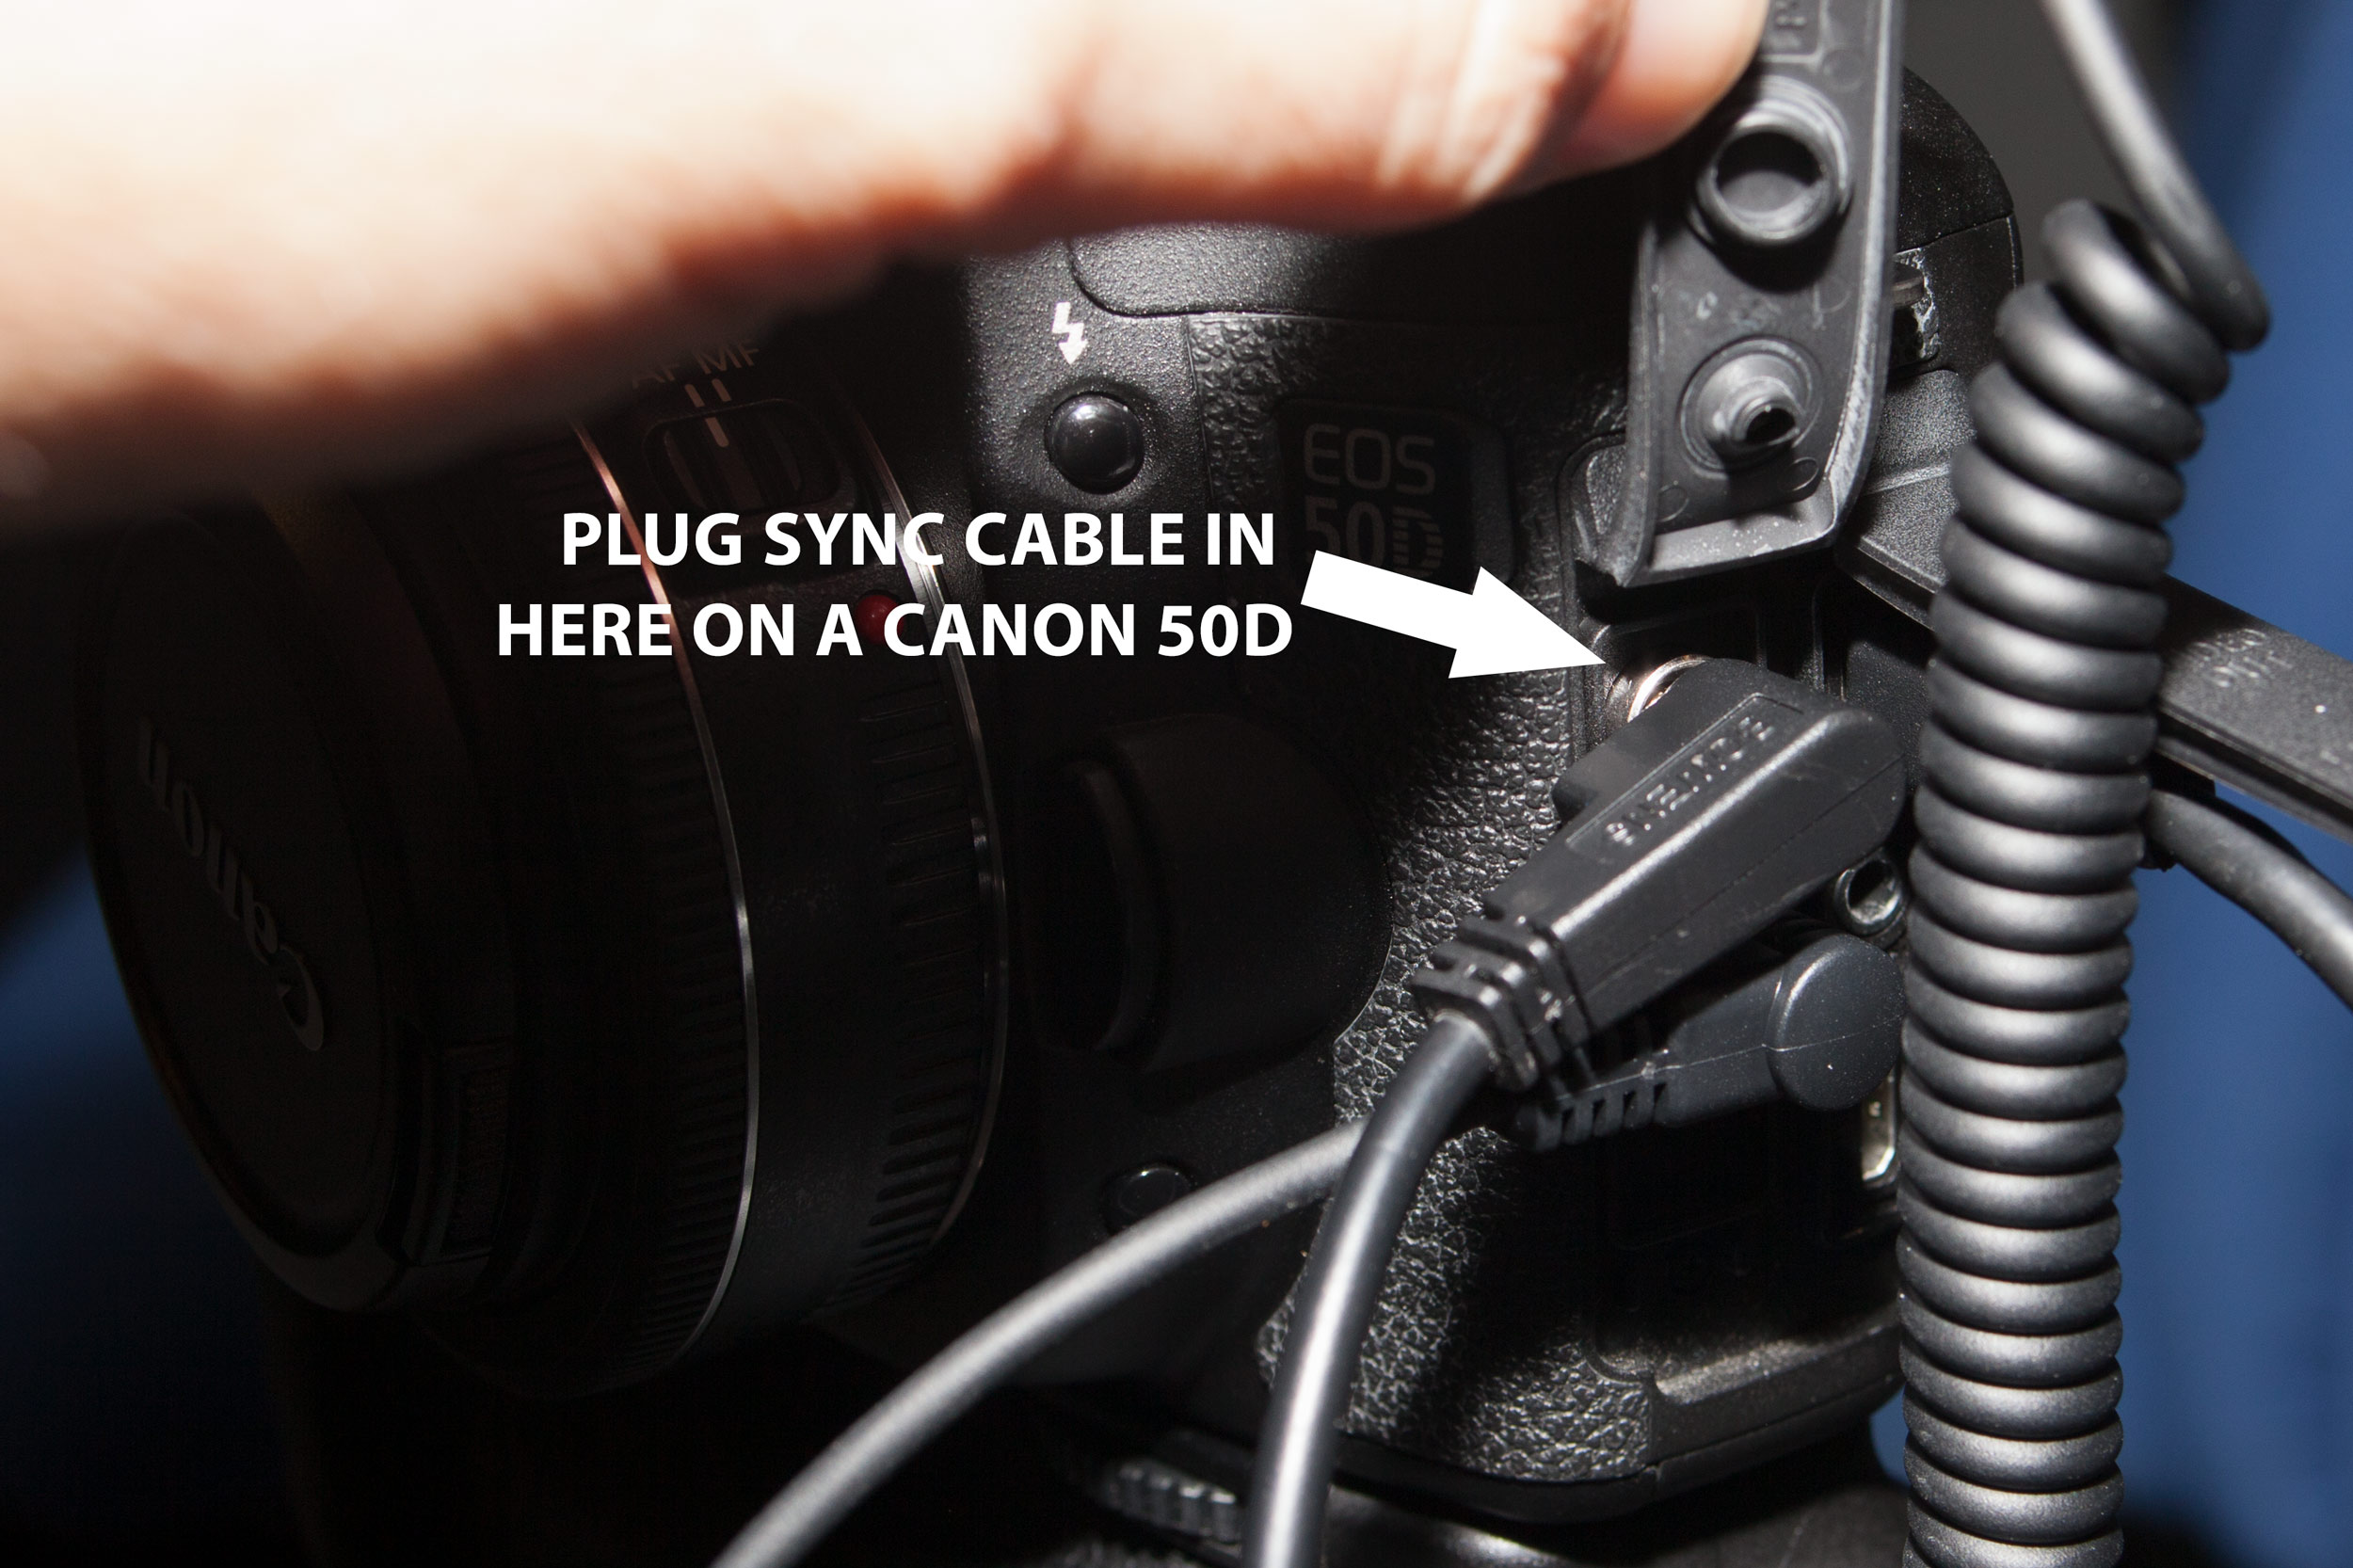
PC sync cable plugged into the Canon 50D
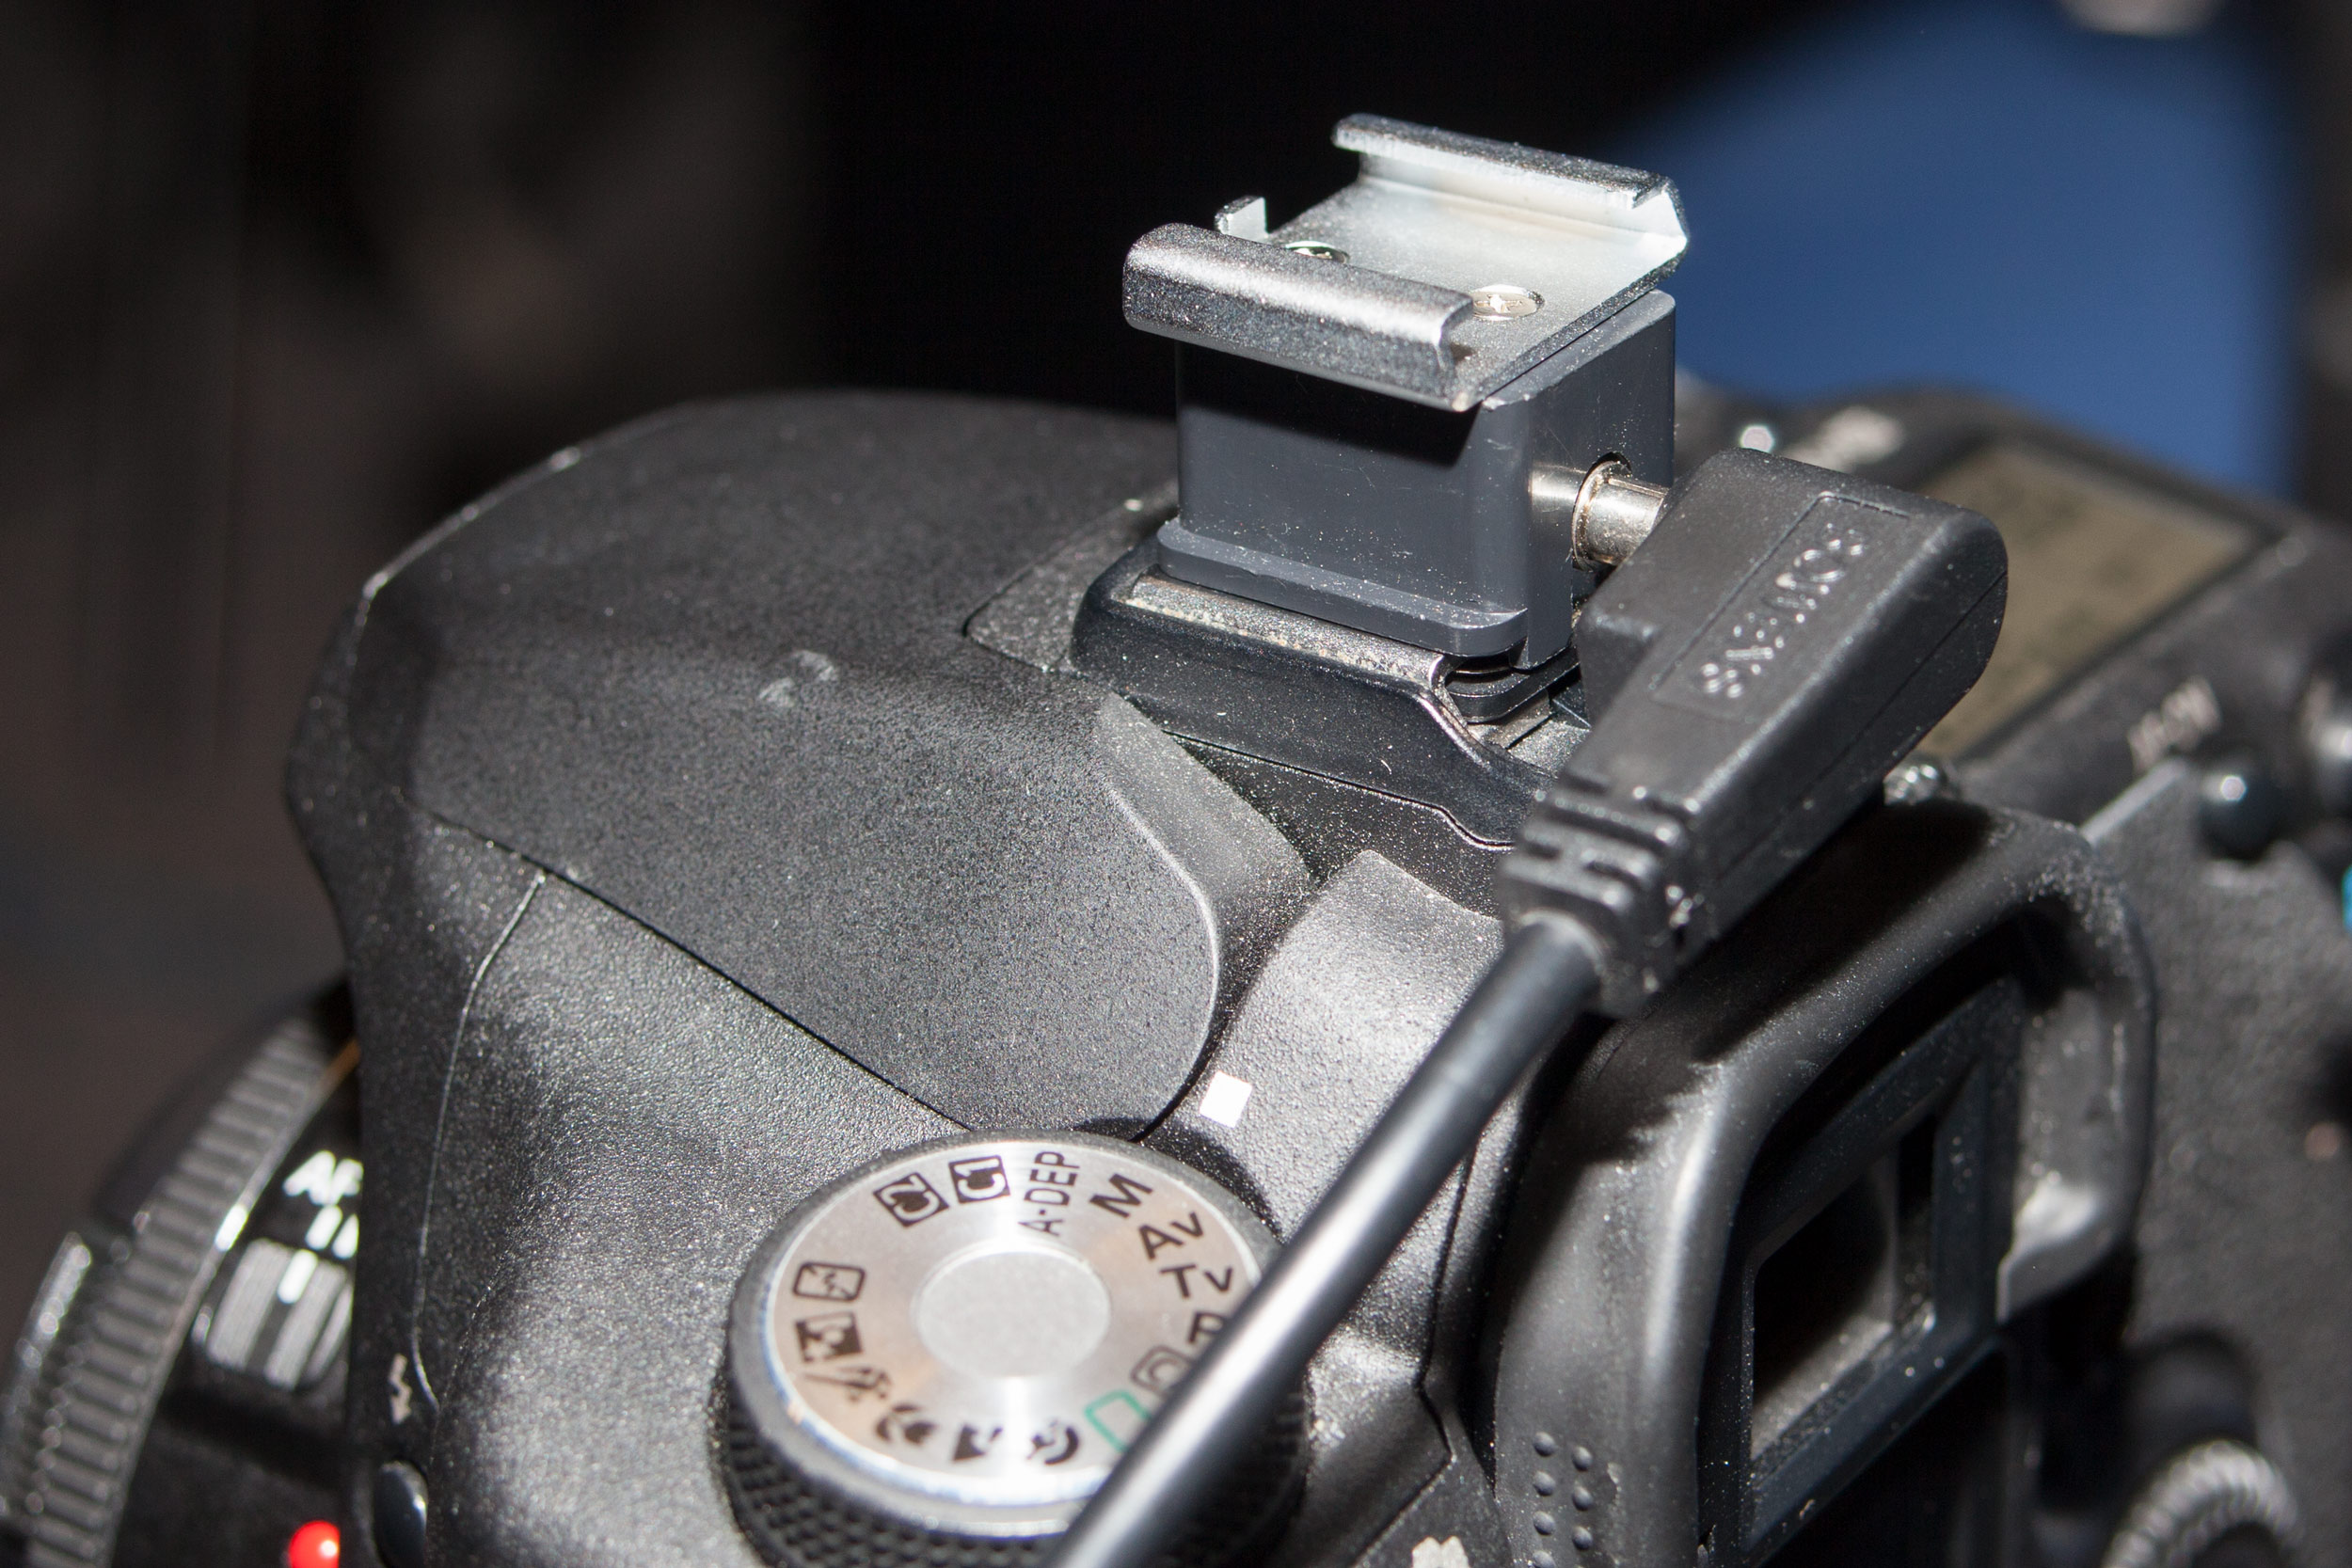
Plug the other end of the PC sync cable into the flash as shown here
If you camera doesn’t have a PC sync cable input but does have a hotshoe, you can still get a hotshoe adapter. Just put the adapter on your hotshoe and connect the PC sync cable to it, as shown below. The other end plugs into the flash as shown above.
PC sync hotshoe adapter with sync cable plugged in
You could even get an external softbox for the speedlite, such as this one which includes the light stand.
You could also use a flash that’s on the camera (just turn the head backwards or aim it straight up). You could even try using a flash diffuser for less directional light, as shown below:
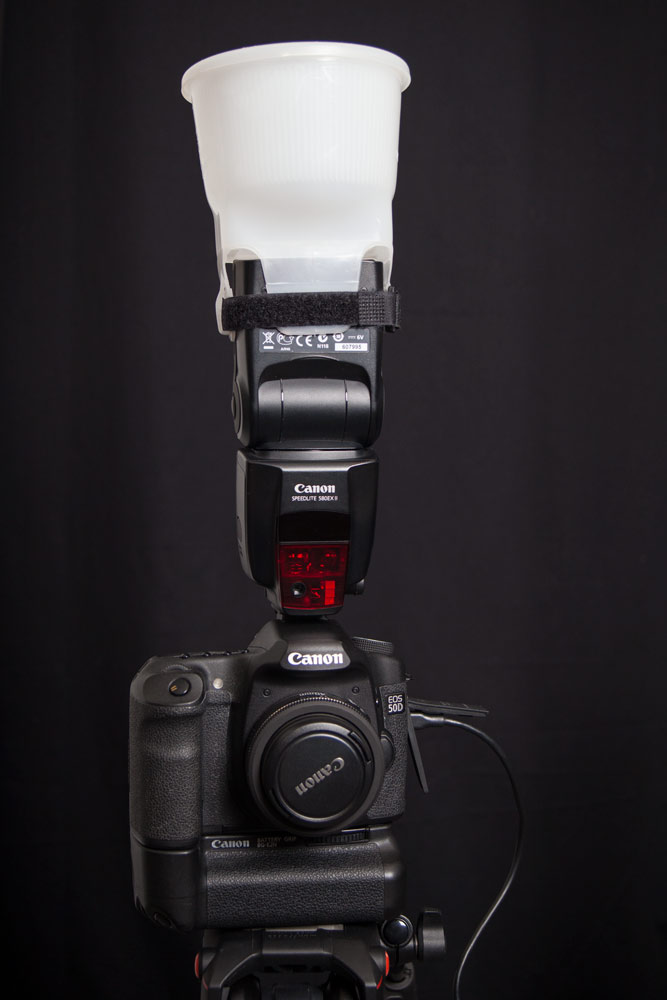
Flash with diffusor attached.
If you use a flash on the camera, you’ll need to figure out another way to mount the receiver for the remote trigger. The trigger doesn’t rely on the hot shoe in order to work, so it’s not a huge deal. One option for mounting the receiver off of the camera would be to pick up the Tether Tools StrapMoore. The StrapMoore attaches to one of the legs on your tripod and allows you to attach various accessories. Very handy. The image below shows how it works.
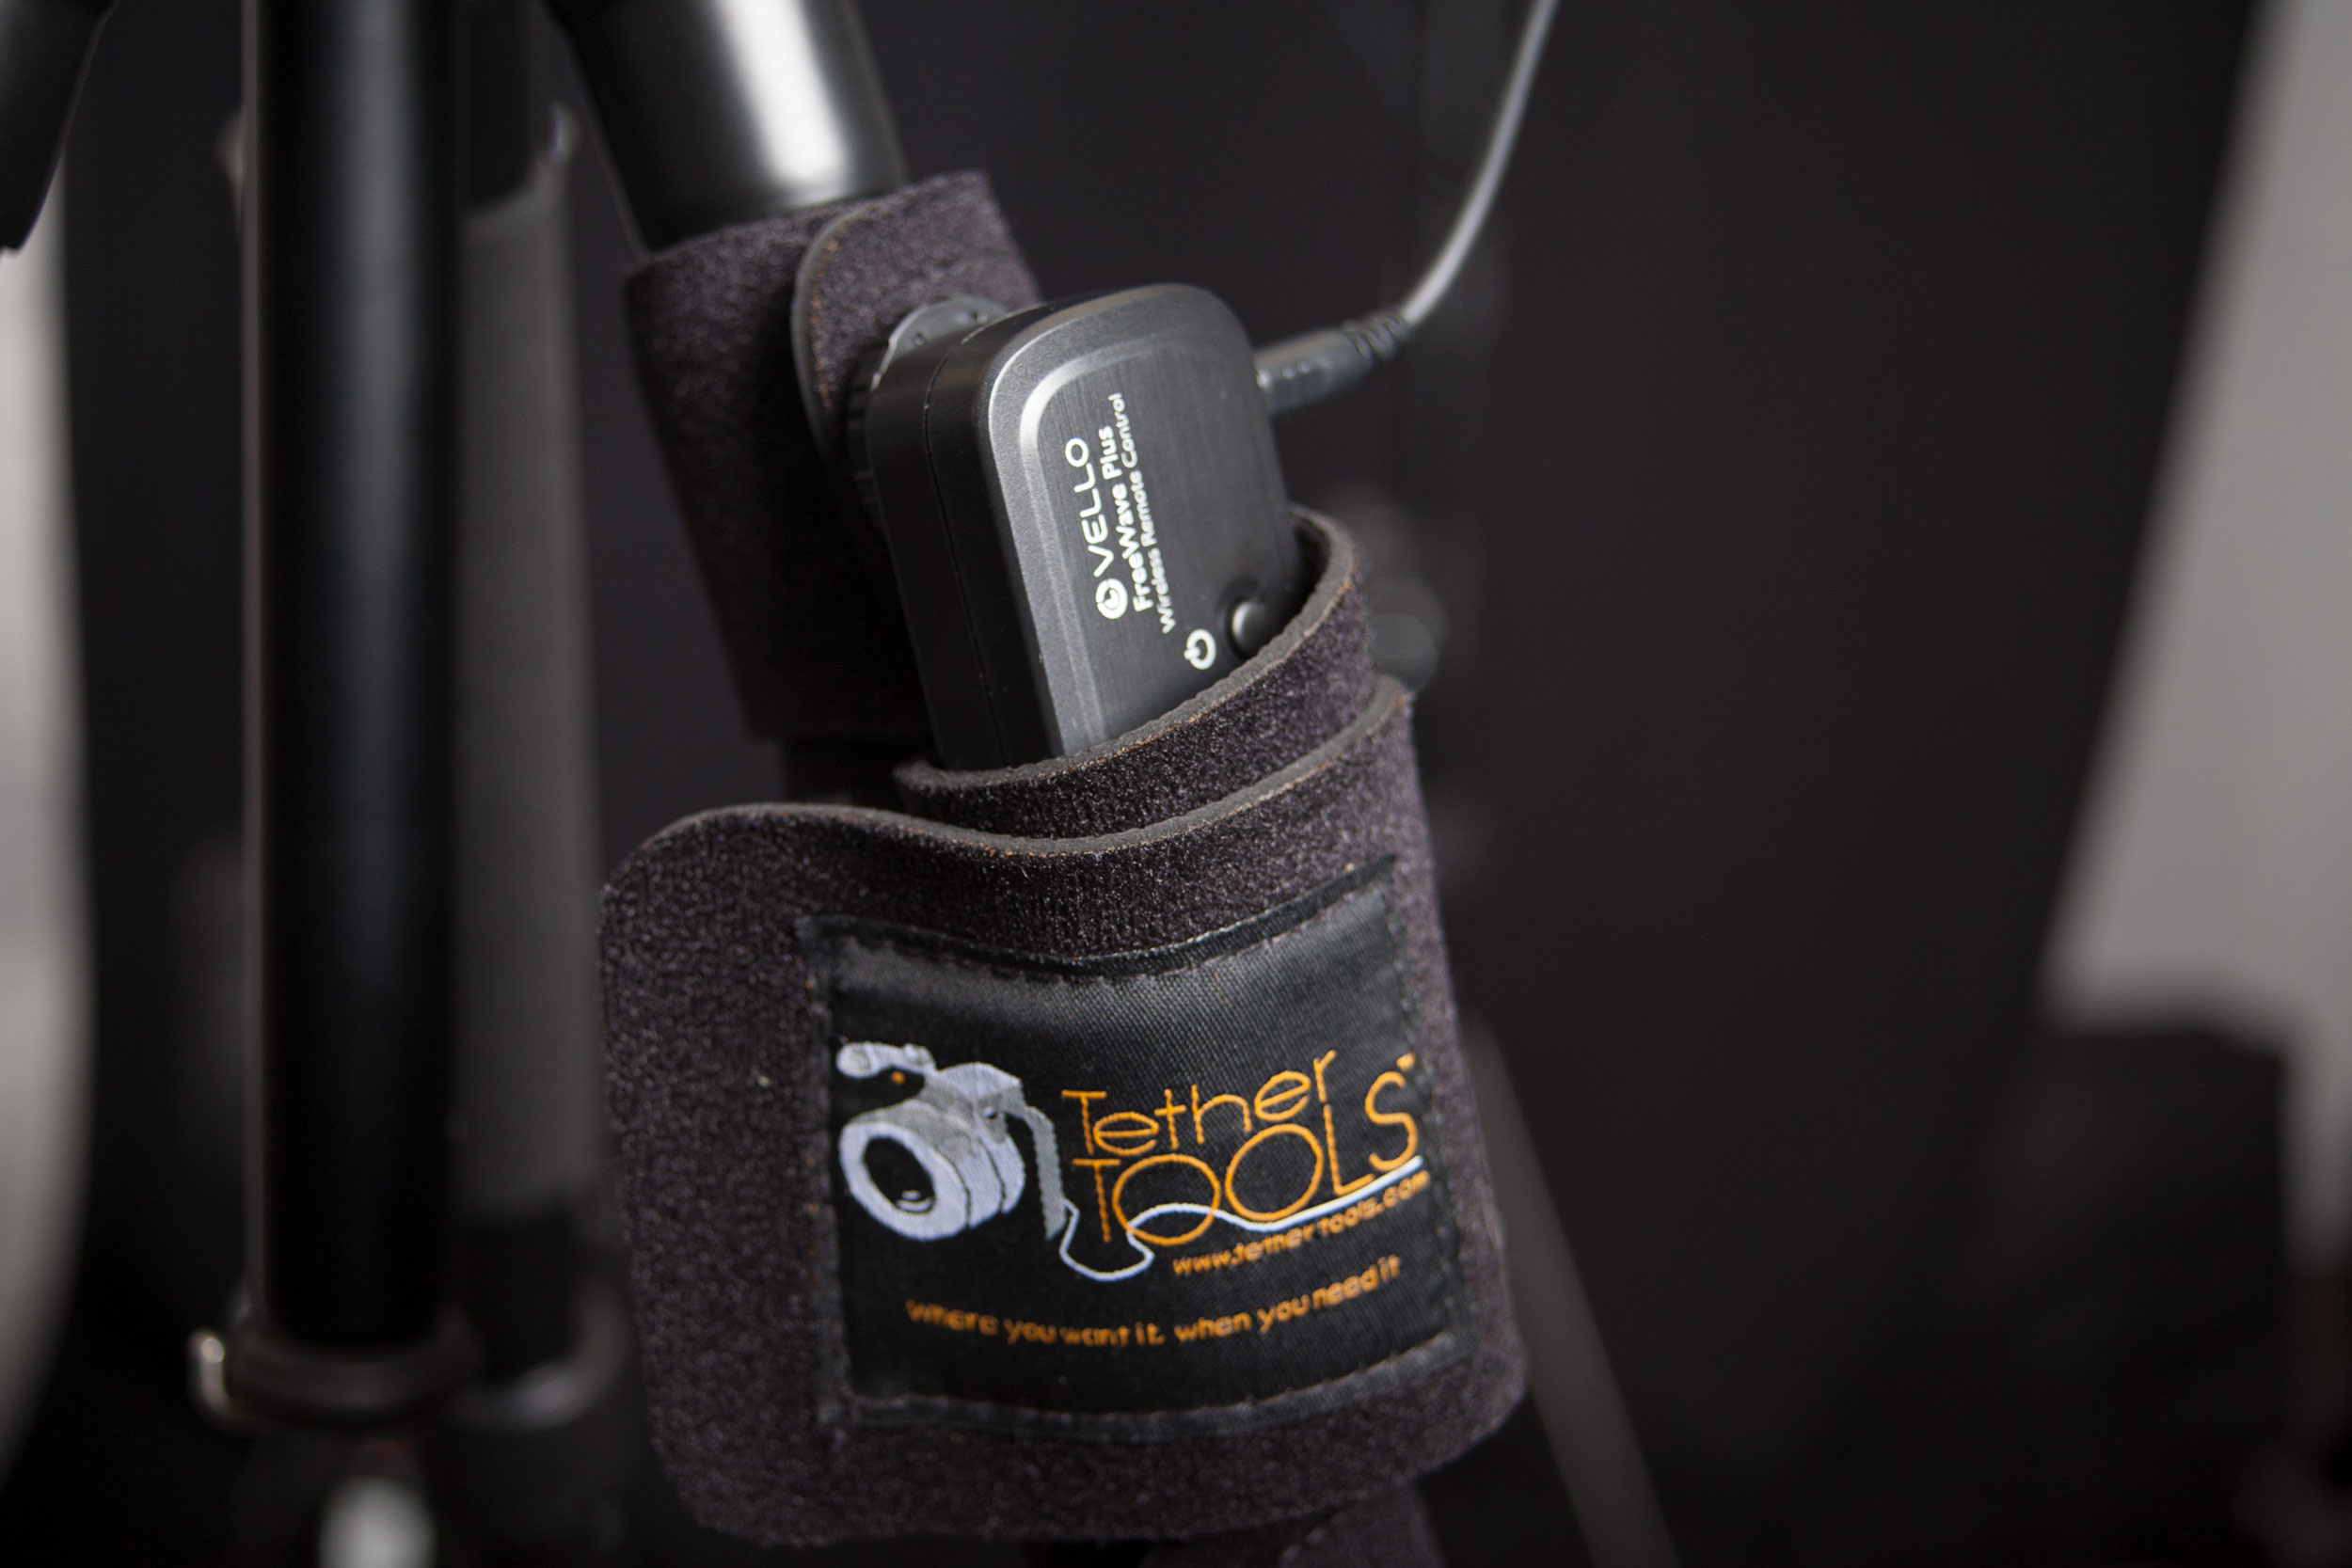
The Vello Freewave receiver held in place by the Tether Tools StrapMoore
As for location, I ended up using a small conference room. The only requirements for this setup to really work though would be a table to hold the laptop, a monitor, a printer (if you use one), some props if you want to go that route, and maybe a background. Plus a place to attach the remote trigger that’s within reach of your participants (I used a door in the room).
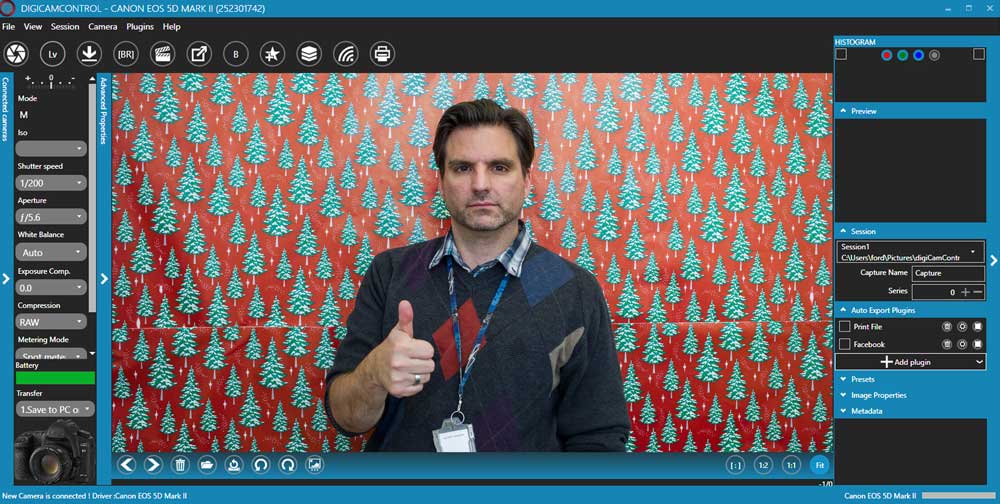
Shown below is my set up along with a test shot. On the wall opposite of this set up, we taped up some wrapping paper (you can see it in the test shot). The set up wasn’t much to look at, but it had it where it counted and everyone had a blast!
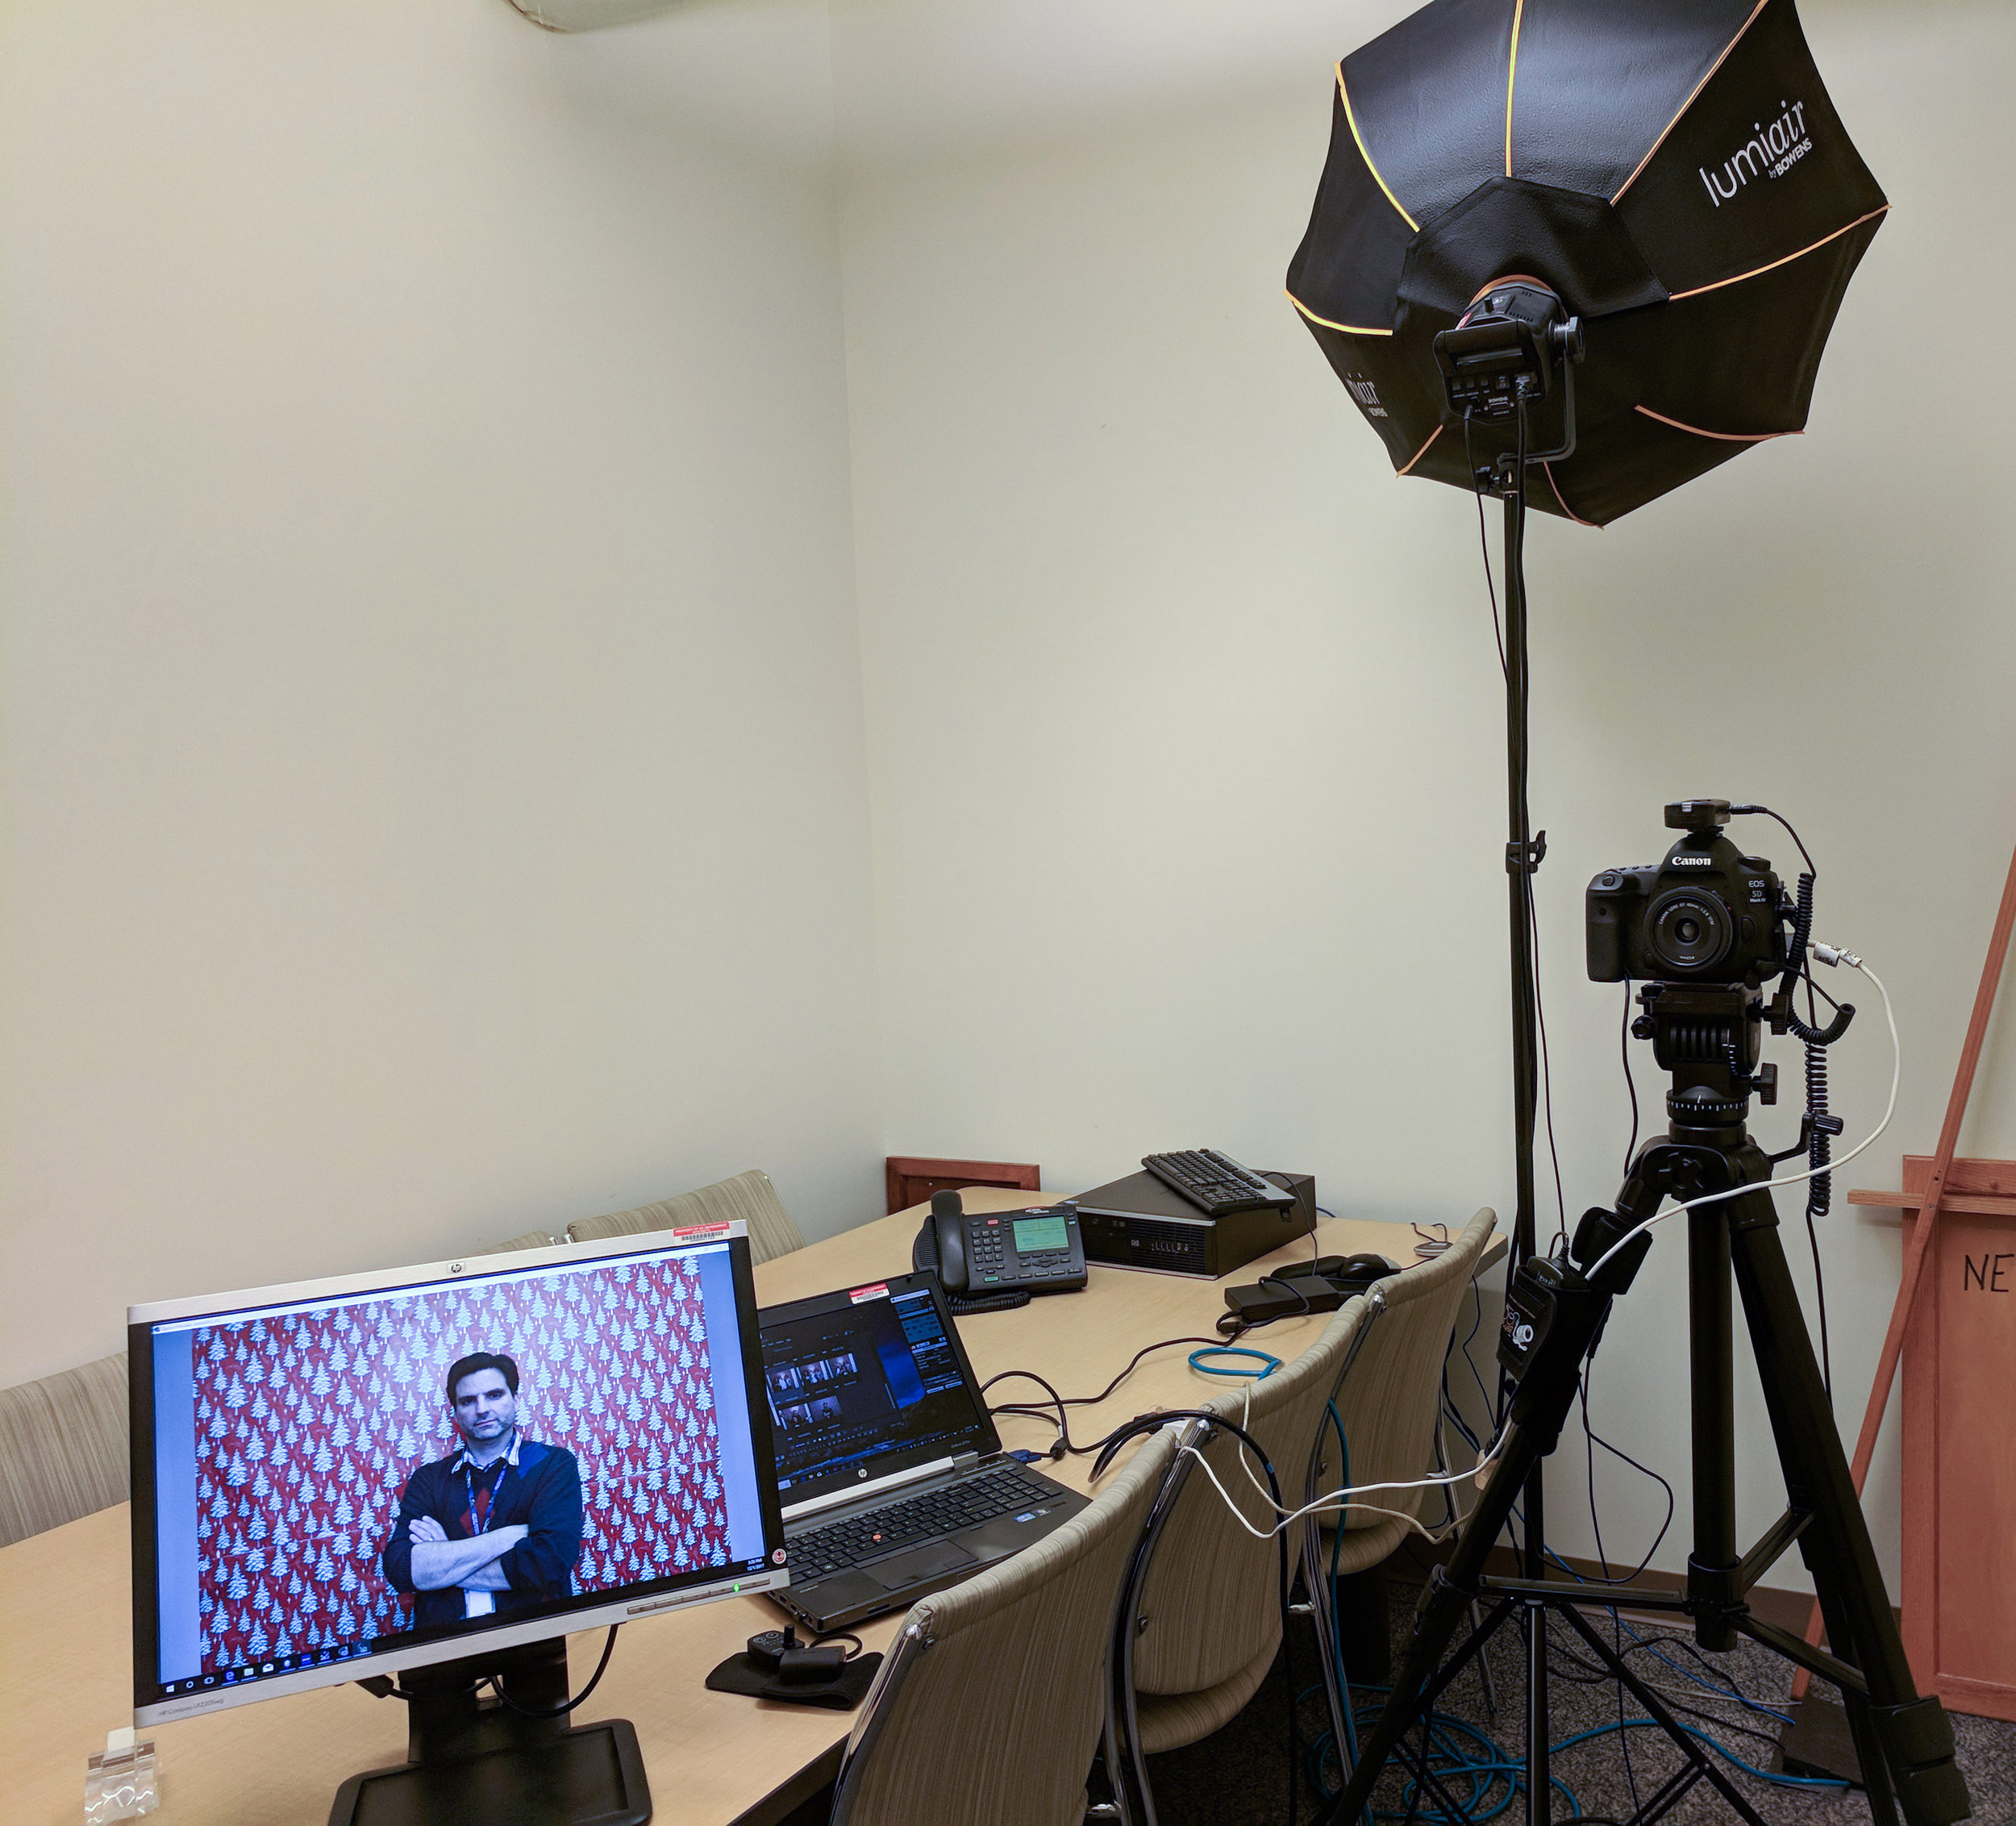
Makeshift photo booth in a conference room!

Here’s me showing maximum enthusiasm that the photo booth is working.
If you have any questions or suggestions, feel free to leave them in the comments below!


