I’ve been shooting video and selling DVDs and Blu-Rays of a dance recital for about ten years now, and I thought I’d share some of the lessons learned from the experience. My hope is that this post helps anyone who might be getting into this particular type of videography.
As payment for this particular gig, everything is reliant on sales of the DVDs and Blu-Rays (no payment from the dance studio in other words). This has been working for me very well year in and year out, so if you are approached with a similar type of situation just know that it can be very lucrative.
Here are some quick tech specs on the equipment that I use for shooting the recitals (as of 2024). Note that this is just what I use, but the general takeaway here is that it’s best to utilize three cameras:
- One Sony a1 camera with a Sony 24-70 f/2.8 lens – “closeup shot” camera
- One Canon C300 Mark II with a Canon CN-E 18-80mm lens – “medium shot” camera
- One Sony A7R3 attached to an Atomos Ninja with a Sony 24-70 f/2.8 lens – “wide shot” camera
- Libec TH-650 tripod
- Manfrotto MVT502AM tripod with Manfrotto MVH500AH head
- Magnus VT-350 tripod
- Rode VideoMic
- Sennheiser wireless mic
For authoring the DVD/Blu-Ray, I use Adobe Encore, which unfortunately is no longer available. Best alternatives are TMPGEnc Authoring Works 7 and Vegas DVD Architect.
The media and products that I use for producing the DVDs and Blu-Rays are as follows:
- Blu-Ray blank media – Verbatim printable BD-R, white surface with hard coat (great compatibility with older Blu-Ray players)
- Blu-Ray empty cases – Mediaxpo Blu-Ray Cases – 100pk
- Blu-Ray inserts – Professional Label Blu-ray Case Inserts High Resolution Matte 50 sheets 43383HR
- DVD blank media – Verbatim DVD-R 4.7GB 16X White Inkjet Printable with Branded Hub, 100-Disc
- DVD empty cases – Progo 50 Pack Standard Black Single DVD Cases 14MM
- DVD empty cases (for two discs) – Maxtek 14mm Black Standard Double Capacity DVD Case
- DVD inserts – DVD Case Inserts Matte 50 sheets 8514HR
- OWC Mercury Pro 16X Blu-ray Burner
- Epson Expression Premium XP-7100 (for printing DVD/Blu-Ray inserts and disc labels)
Here are the lessons learned from shooting video of a dance recital, circa 2024:
Lesson 1 – Shoot More Than One of the performances!
If there is more than one performance of the show, definitely record at least two of them! In my case there are always three shows, plus a rehearsal. I’m given access to the rehearsal, which is great. I’m able to calmly dial in all my settings, test camera angles, practice camera movements and get an overall feel for what to expect during the actual performance. If you have access to any type of rehearsal, especially if this is your first time shooting one of these, absolutely take it! For the show itself, there are two performances on one day and a third performance the next day (the two performances on the first day are each slightly different). I record both of the performances on the first day. The real blessing in disguise here is the fact that some of these performances involved some very young kids, and generally if very young kids are involved that almost always means that someone is going to end up crying. Nearly every year there is at least one kid with pretty bad stage fright. With any luck though, whoever ends up crying or not participating during one performance will not have the same issue with the other performance. I’ve been able to use footage from both performances to carefully edit the show to make it appear as if the kid with stage fright was happy throughout. Without having recorded two performances I would not have had that option.
Lesson 2 – Use more than one camera (preferably three) and get an extra videographer if you can
I always shoot each performance with two cameras mounted on tripods all the way in the back of the auditorium and have my wife shoot with a camera off to one side of the stage. I prefer to edit with a wide shot, a medium shot, and a super close-up shot.
Camera Configurations:
Camera 1 – Canon C300 Mark II with a Canon CN-E 18-80mm lens. This camera is a “medium shot” which I use to zoom in only as far as seeing the performer’s full body (not just their face). For the most part though, this camera’s job is to get all the performers in one nice, tight shot.
Camera 2 – Sony A7R3 attached to an Atomos Ninja with a Sony 24-70 f/2.8 lens. This is the stationary “wide shot” camera on a very tall tripod, which simply shoots the entire stage. That camera is my “in case all else fails” shot to cover up things like people walking in front of a camera or any other random issues.
Camera 3 – Sony a1 camera. This camera is the “close up shot” that my wife runs.
Here’s a diagram showing my setup. You can see I had two cameras all the way in the back and one very close to the stage.
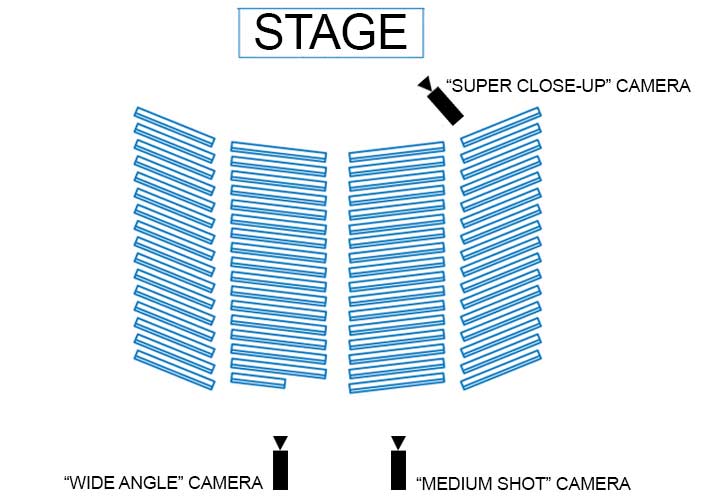
This is the setup I used for shooting a dance recital. Three cameras, one close-up, one medium and one wide.
Lesson 3 – Get a Tall Tripod!
That “in case all else fails” camera I mentioned earlier? I had it mounted on an old Bogen 3036 tripod, which extends to over six feet via a geared center column. This particular tripod is no longer available and has since been replaced by the Manfrotto 475B Pro Geared Tripod. I’d also recommend grabbing the Manfrotto 502 Video Head. Having a tripod that goes this high can really be a lifesaver. On my “medium shot” camera, I have my tripod as high as it will go and I stand on a chair in an attempt to shoot over people’s heads, but invariably someone really tall would still walk directly in front of me, ruining my shot. Having the super tall, wide shot as a backup was great. I didn’t use the wide shot all that much in the final edit, but when I did use it I was very glad it was there as an option.
Lesson 4 – Get at Least a Few Close-ups of Every Dancer
Every parent who ends up buying a DVD or Blu-Ray is really buying it to see their kid perform, and to have a lasting memory that can be played anytime they like. If the video doesn’t include at least a few nice close-up shots of their kid, you are going to end up with a very unhappy customer. This is the main reason that I enlist my wife to man the “super close-up” cameras. Her instructions are literally to just shoot as many close-up shots of each dancer in every single act of the recital. In the end, I’m always very happy to have these close-up shots during the editing process.
Lesson 5 – Capture Good Ambient Audio
I get a feed from the soundboard for the audio used throughout the performance, but it’s also important to capture good audio of the audience before, after, and sometimes during each performance. There’s a lot of sound that emanates from the stage as well, so I always use two specific microphones. I use a Rode VideoMic to capture ambient audio from the “super-close” camera. This allows me to get great audio from both the audience as well as the stage. Next, I put a Sennheiser wireless mic on the stage itself (I used gaffer’s tape and taped it to the front of the stage, dead center). I was surprised at how much these additional audio options added to the overall quality of the final product. The sound of tiny feet running across the stage just before an act started, or the sound of the shoes during a tap dancing routine, it all added to the feeling of “being there” when watching the finished product. So I’d definitely recommend capturing audio from close to the stage if you can manage it.
Lesson 6 – Use Manual Focus Where Necessary (and/or Focus Peaking)
I know it seems crazy to suggest manual focus when shooting a live event, but hear me out. For the stationary wide shot camera I went with manual focus. I dialed in the focus settings as soon as the show began, used focus peaking, and occasionally double checked the focus throughout the show. I did this because the stationary camera was never going to move, which meant the focus was never going to change, and sometimes video cameras have a really hard time maintaining focus in situations where the lighting is constantly changing (you’ve probably noticed). It worked out great. Not all cameras have focus peaking as an option, but if you do have it I’d definitely suggest using it. For the camera that I man, I used autofocus but switched to manual focus between each act (when the lights go down). That way the camera wasn’t searching for focus when the lights come back up. The super close-up camera did struggle with focusing from time to time (since it was on auto), but it didn’t much matter. The footage from that camera was used as needed, so cutting out any out of focus shots wasn’t a problem.
Lesson 7 – Use Zebra if Possible
If your camera has a “zebra” setting, it’s well worth turning it on. This setting overlays some stripes onto the image to indicate exposure levels over the areas that are close to overexposure, Basically, if you see these stripes appear (especially on a dancer’s face), you’ll want to lower your exposure a bit. Zebra stripes on the background is usually not as big of a deal.
Lesson 8 – Shoot using 29.97 FPS
I always use 29.97 for these recitals. The lighting on the stage can vary between very bright and somewhat dark, and using higher frame rates (like 60 fps) means less light enters the camera. That forces you to use a higher ISO, which results in more noise in the video. So I always stick with 29.97 and I’ve been happy with the results.
Lesson 9 – For DVDs, Only One Hour Per 4.7 GB Disc!
If you are offering DVDs as an option to purchase, try to limit the length on the disc as closely as possible to one hour. Unfortunately, that means performances that run upwards of two hours should be split between two discs (the recital that I shoot always has two acts, so I just split each act between two discs if the entire performance runs for over an hour). The other option would be to burn the performance to a dual-layer disc, but you might run into player compatibility issues. This is not an issue when using Blu-Ray discs.
Lesson 10 – Burn Discs Slowly and Verify Them!
When burning your final product to disc, I recommend that you burn your discs at the slowest speed possible and if your burner allows it, verify each burn. I’ve seen issues arise when burning discs at faster speeds. I use DVD Decrypter to burn my discs.
Lesson 11 – Offer more Than One Way to Pay for the DVDs and Blu-Rays
The way I arrange to have orders placed is to use WooCommerce to allow customers to pay for orders via PayPal or a credit card via my Online Store. I charge $30 for “in-studio pickup” and $35 to ship the DVDs. I charge the same amount for DVDs as I do for Blu-Rays, mainly because I’m trying to encourage Blu-Ray sales so people get a better product. I also email a pdf order form to the dance studio, which they distribute as needed, but about 99% of my orders are from my online store nowadays.
If you are interested in the process I used for editing my footage, I put together a tutorial on multicam editing in Adobe Premiere over on my YouTube Channel.
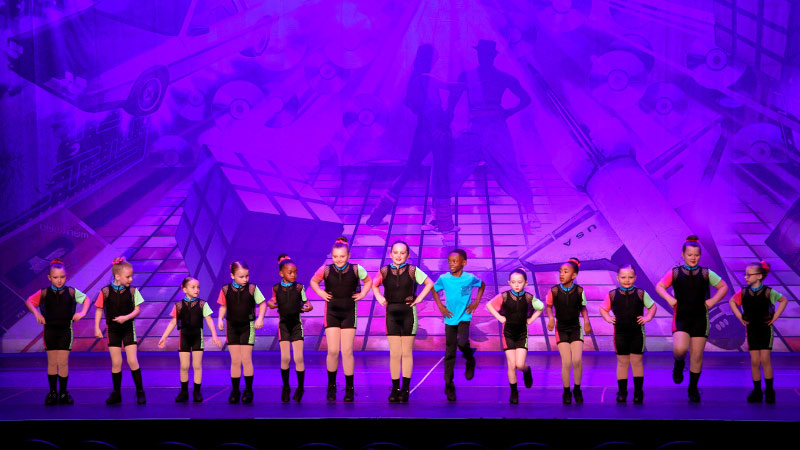
Below is a quick montage of the dance recital.
Thanks for reading. If you have any questions or comments, feel free to leave them below.


