
Have you shot some high frame rate footage using your GoPro and are now wondering exactly how to get it to play back in slow motion? Fortunately, there are a few ways to do this, one of which is entirely free! This post outlines the various ways to go about getting that high frame rate footage to play back slowly and smoothly. Before I begin, are you here to figure out how to get your GoPro to shoot at 240 fps to begin with? I have another post about that here.
This post covers footage shot with a GoPro Camera using high frame rates. The software packages I use in the tutorial are GoPro Studio 2.5 and Adobe Premiere Pro CC 2014.
I recorded a 25 minute video on the various ways to slow your high frame rate GoPro footage down using both GoPro Studio as well as Adobe Premiere Pro CC 2014, which you can watch right here:
For those who don’t want to site and watch for 25 minutes and would rather read, here’s what I cover in the video:
Slowing Down High Frame Rate GoPro Video Using GoPro Studio
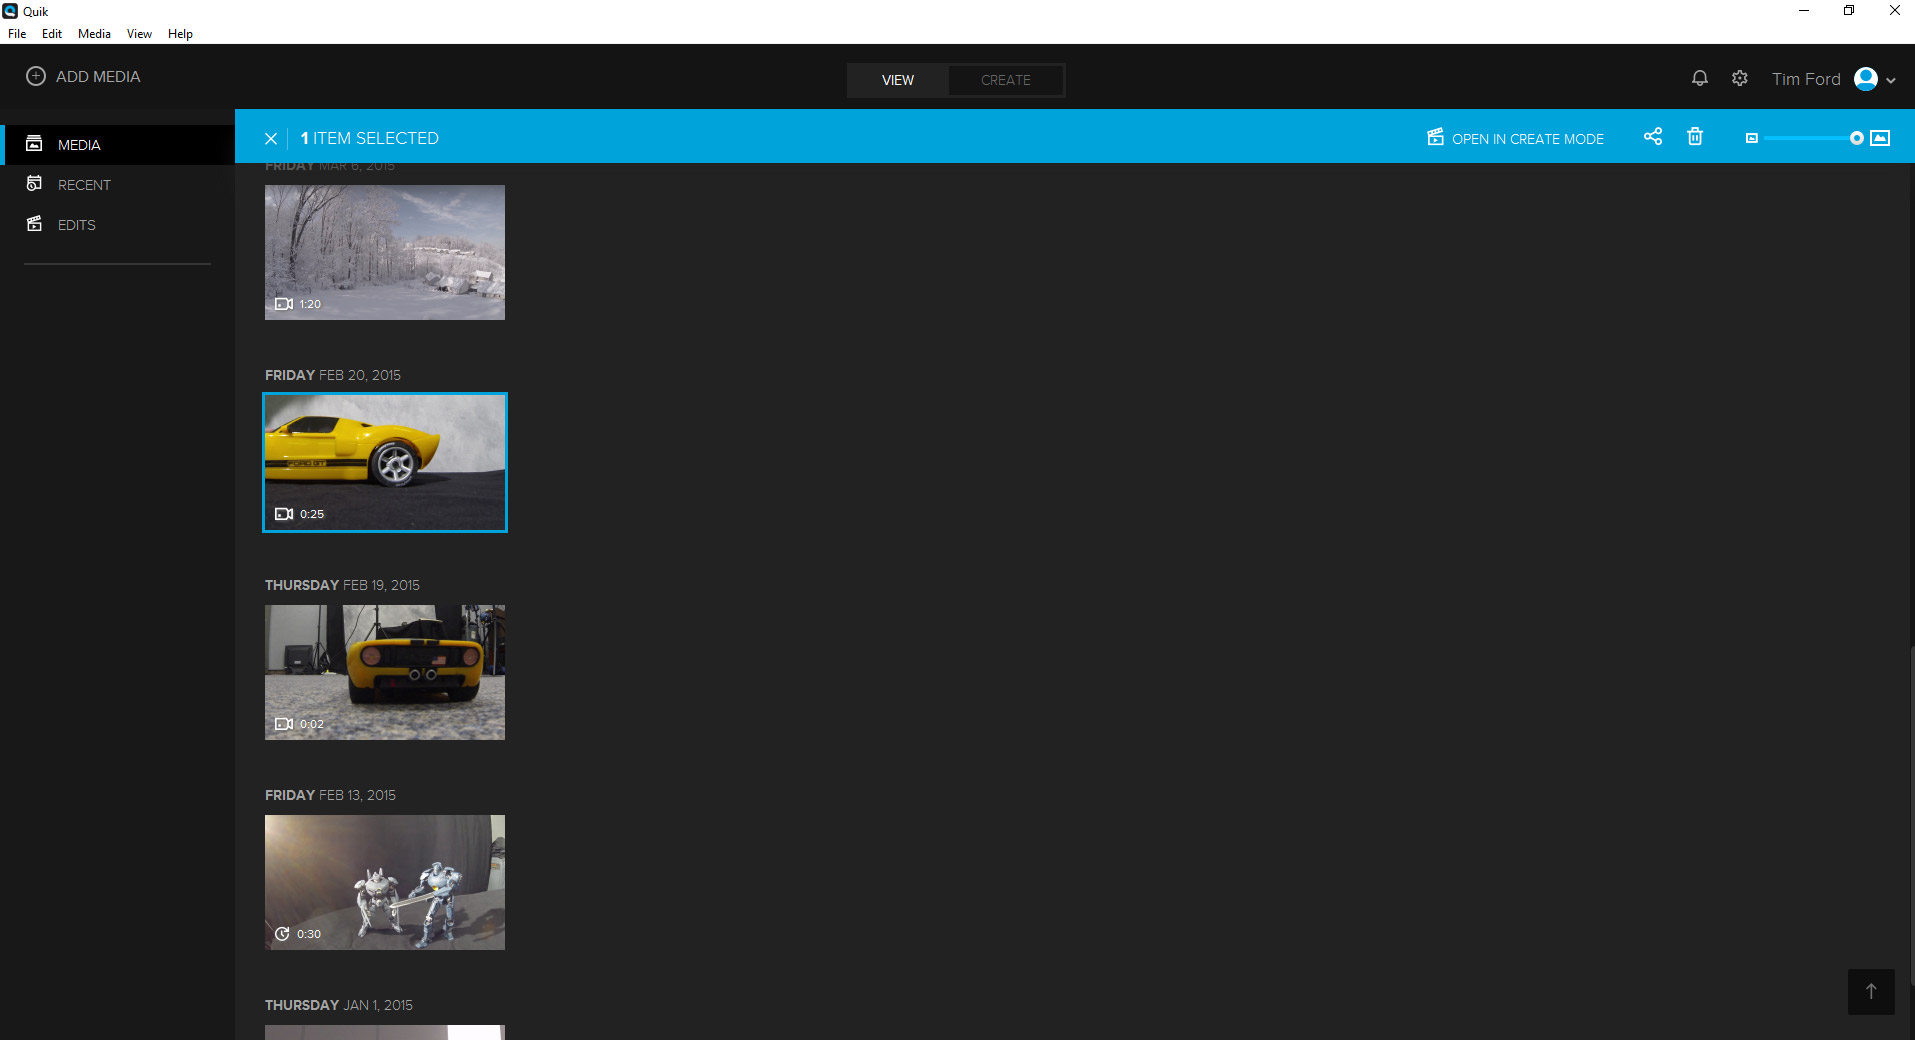
You’ll be happy to hear that the first method I’ll cover is absolutely free! This method relies on the free GoPro Studio software, which is bundled with the GoPro Quick app, which you can download from the GoPro website. GoPro Studio allows you to import your GoPro footage, isolate the portions you want to work with, then do further refinements to the footage. In the Quik app, you need to first add a location on your computer where you have media files stored. Once you’ve done that, the files will be listed as shown below:
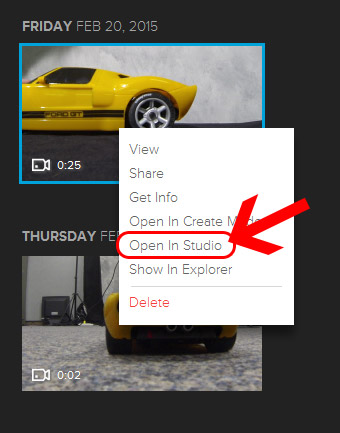
Now right click on the clip you want to work with and choose “Open in Studio” (you can also choose “Open in Studio” from the File menu)
Go Pro Studio will launch.
Now that you are in GoPro Studio, you can begin working with the file you chose in the Quik app. You can also add more footage by clicking the “Import New Files” button.
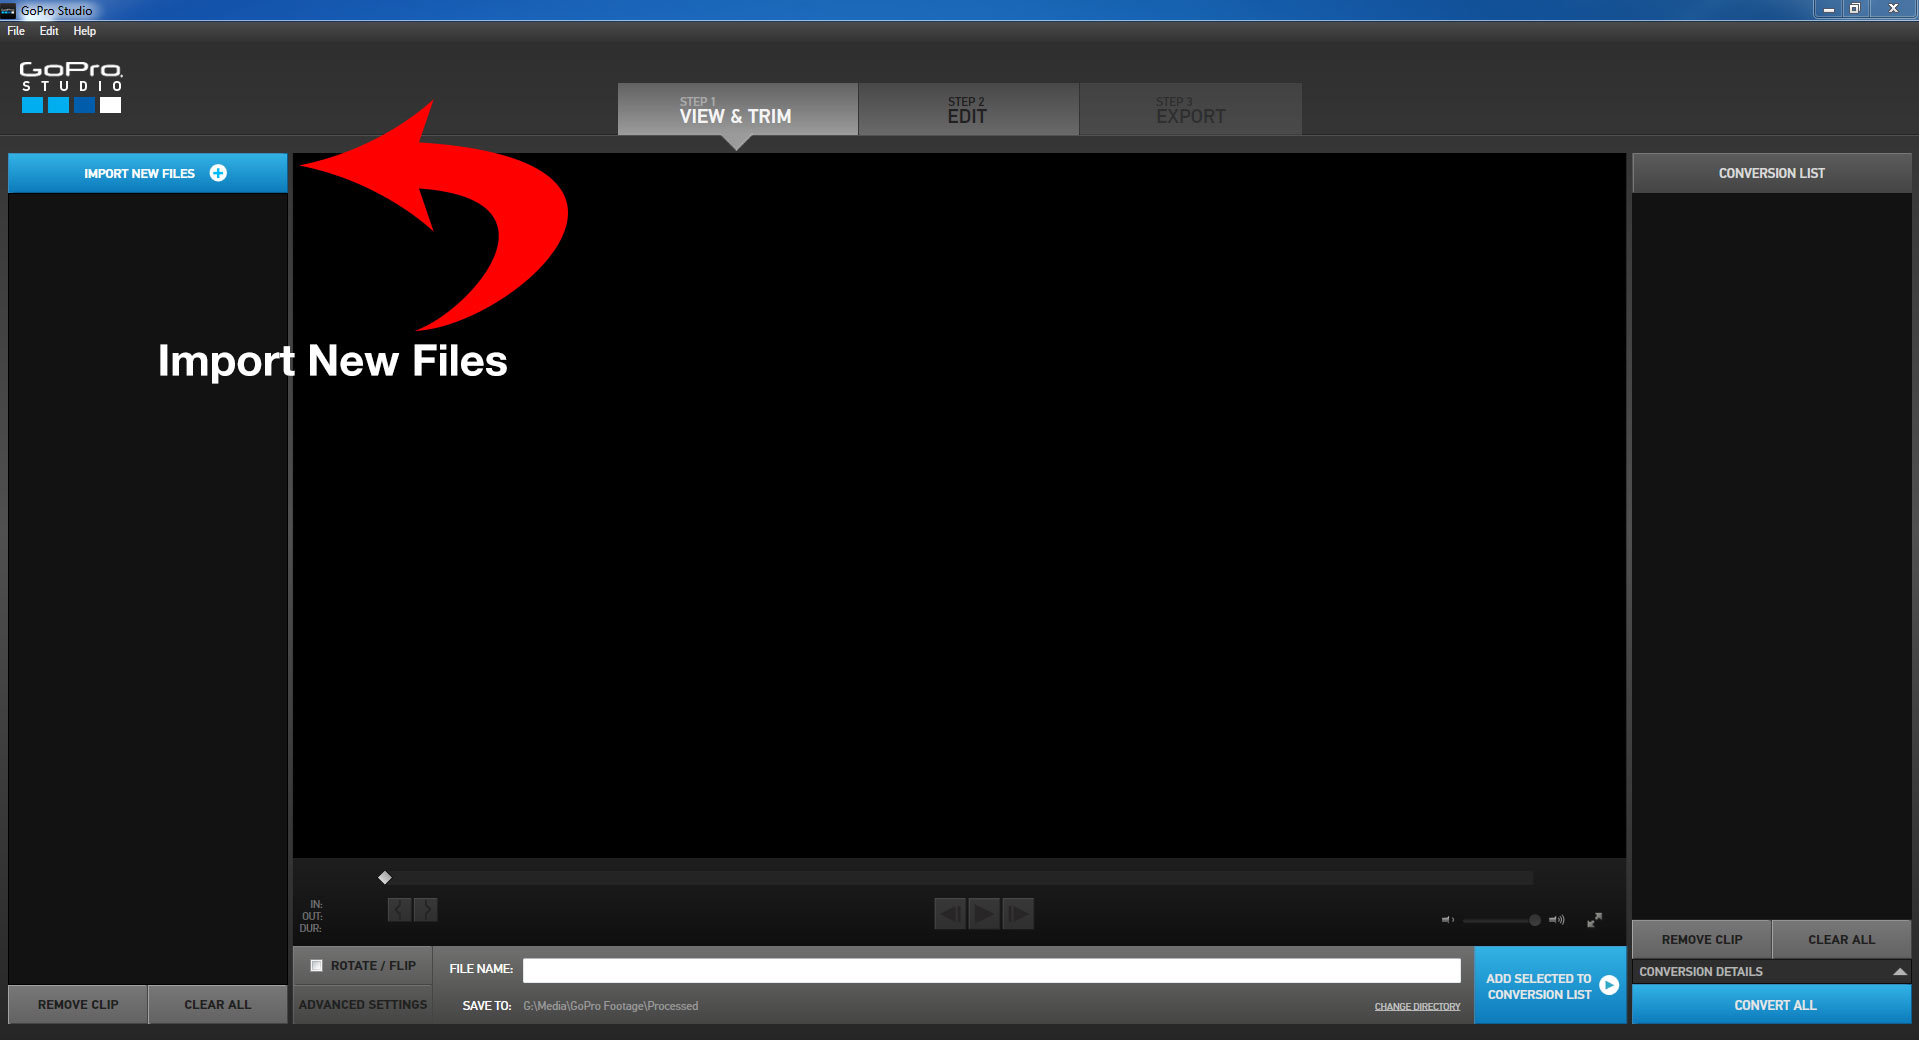
Import files into GoPro Studio.
Once the file(s) are imported, you can pick and choose the segments you’d like to work with in the editing process. Just mark In and Out points to select the segments you want to work with, then click “Add Clip to Conversion List”. If you want to work with the entire clip without segmenting it up, just immediately add it to your conversion list. Either way though, this is a required step before moving on.
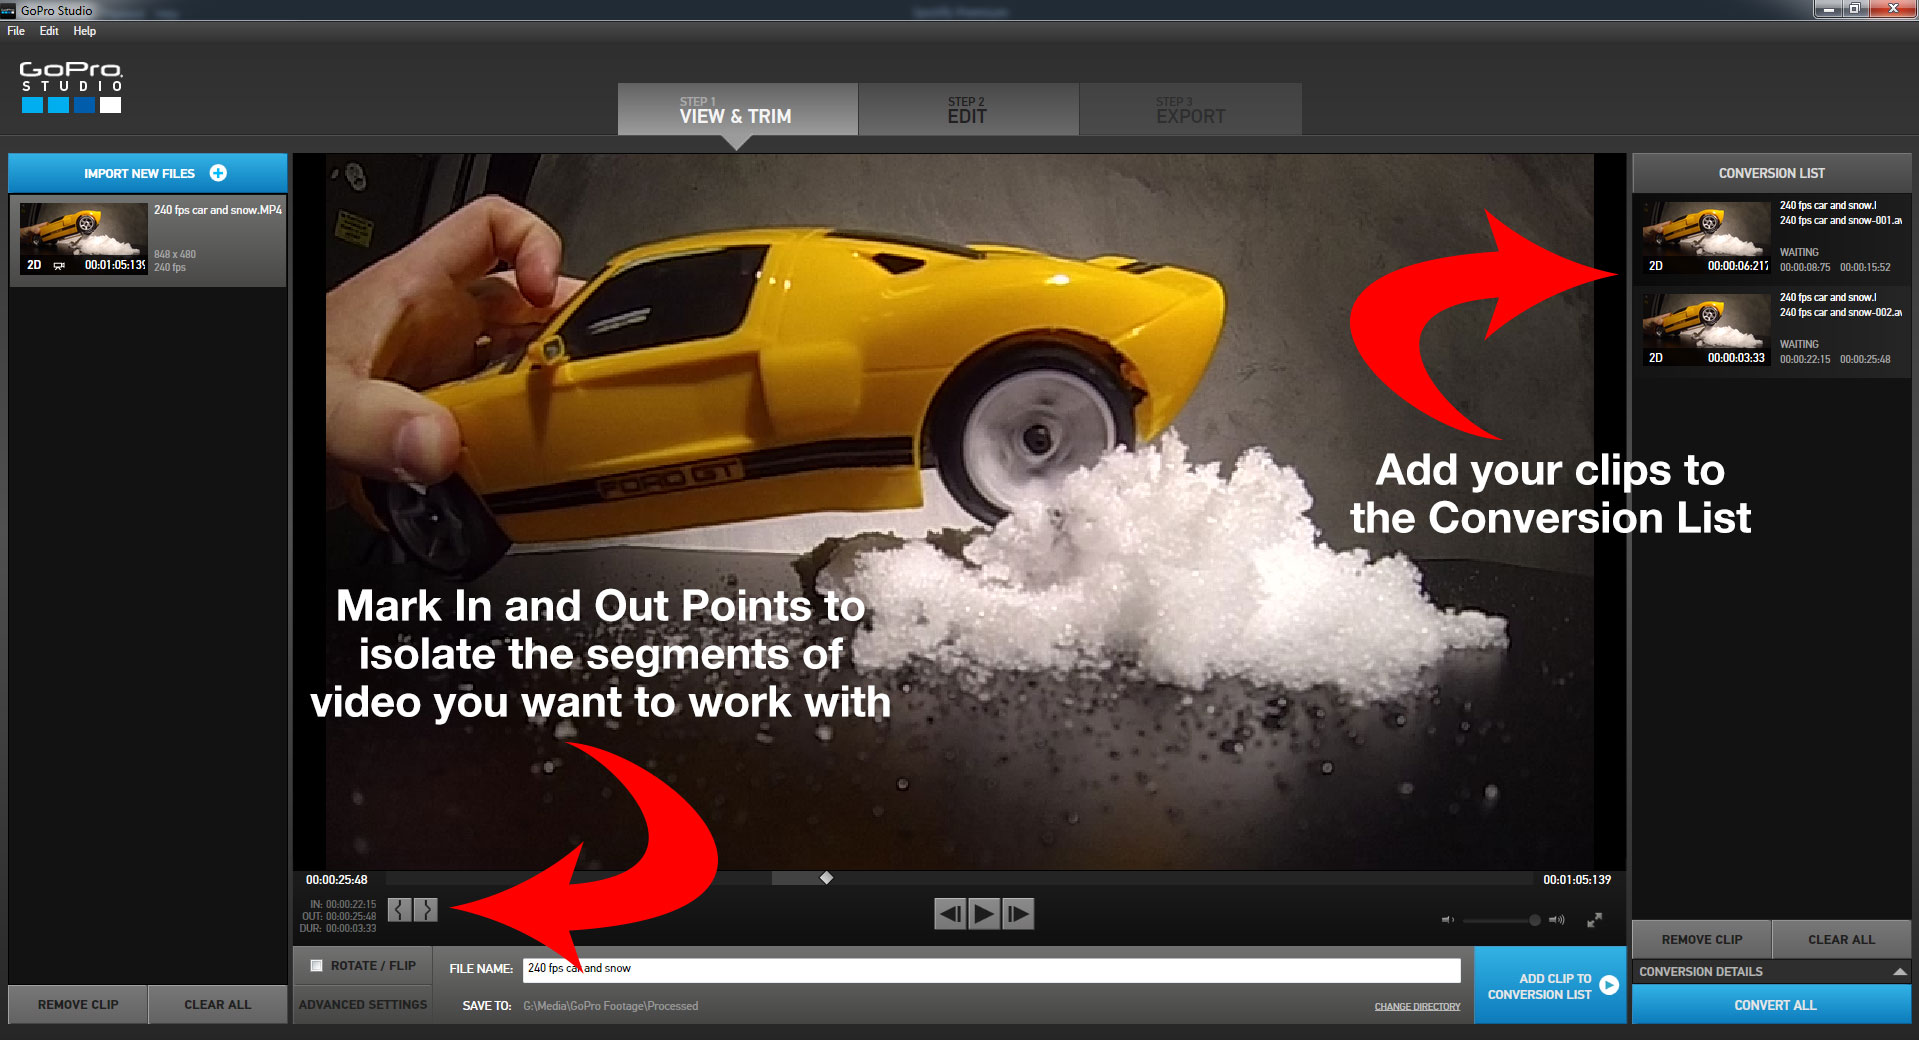
Add your isolated clips to the Conversion List.
Before you convert the files, you’ll want to check your settings. Click on the “Advanced Settings” button on the bottom left side of the screen to adjust your various settings.

Click “Advanced Settings” to set quality and frame rate settings
At this point you can actually choose to slow the footage down if you want, although I’d recommend moving to the next step first. If you want to slow it down now though, just change the frame rate to something much slower that what it was originally shot with (like 24 fps if the footage was shot at 240 fps). Otherwise, the other options to be concerned with here are to make sure your image size remains the same (unless you are looking to upscale it) and that your quality is set to “High”. You can use either AVI or MOV (I generally use MOV, but it’s up to you). You can also choose to remove fisheye if desired, and you can choose to make these your default settings.
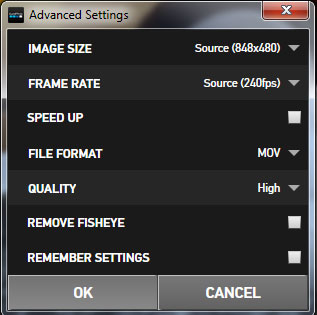
Use this dialog to select your image size, frame rate, file format and quality.
The last step before converting is to make sure you are happy with the file names that will be generated by the conversion process as well as where the files will be stored. Each clip in the conversion list will have its own unique file name (there will be a numeric designation added when you have multiple files in the list).
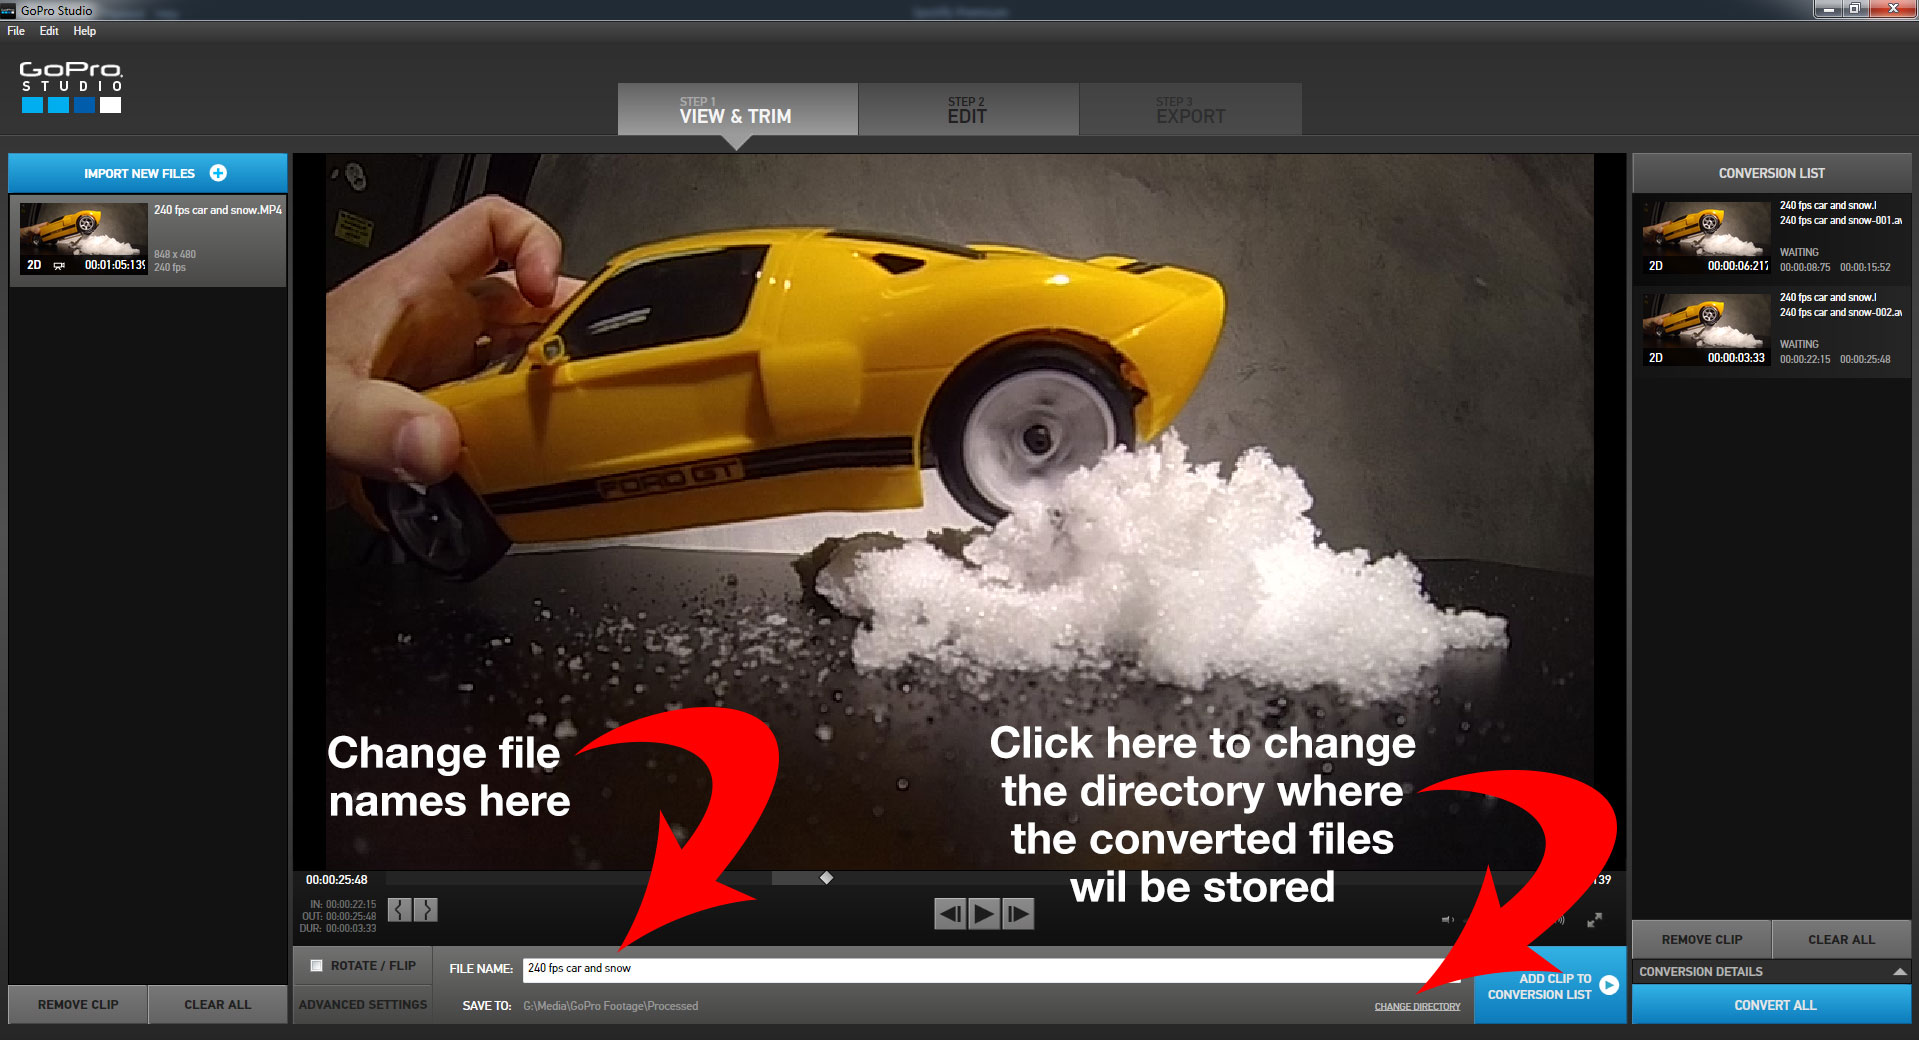
Change file names and the directory for saved files here.
Once you are ready to roll, hit the “Convert All” button.
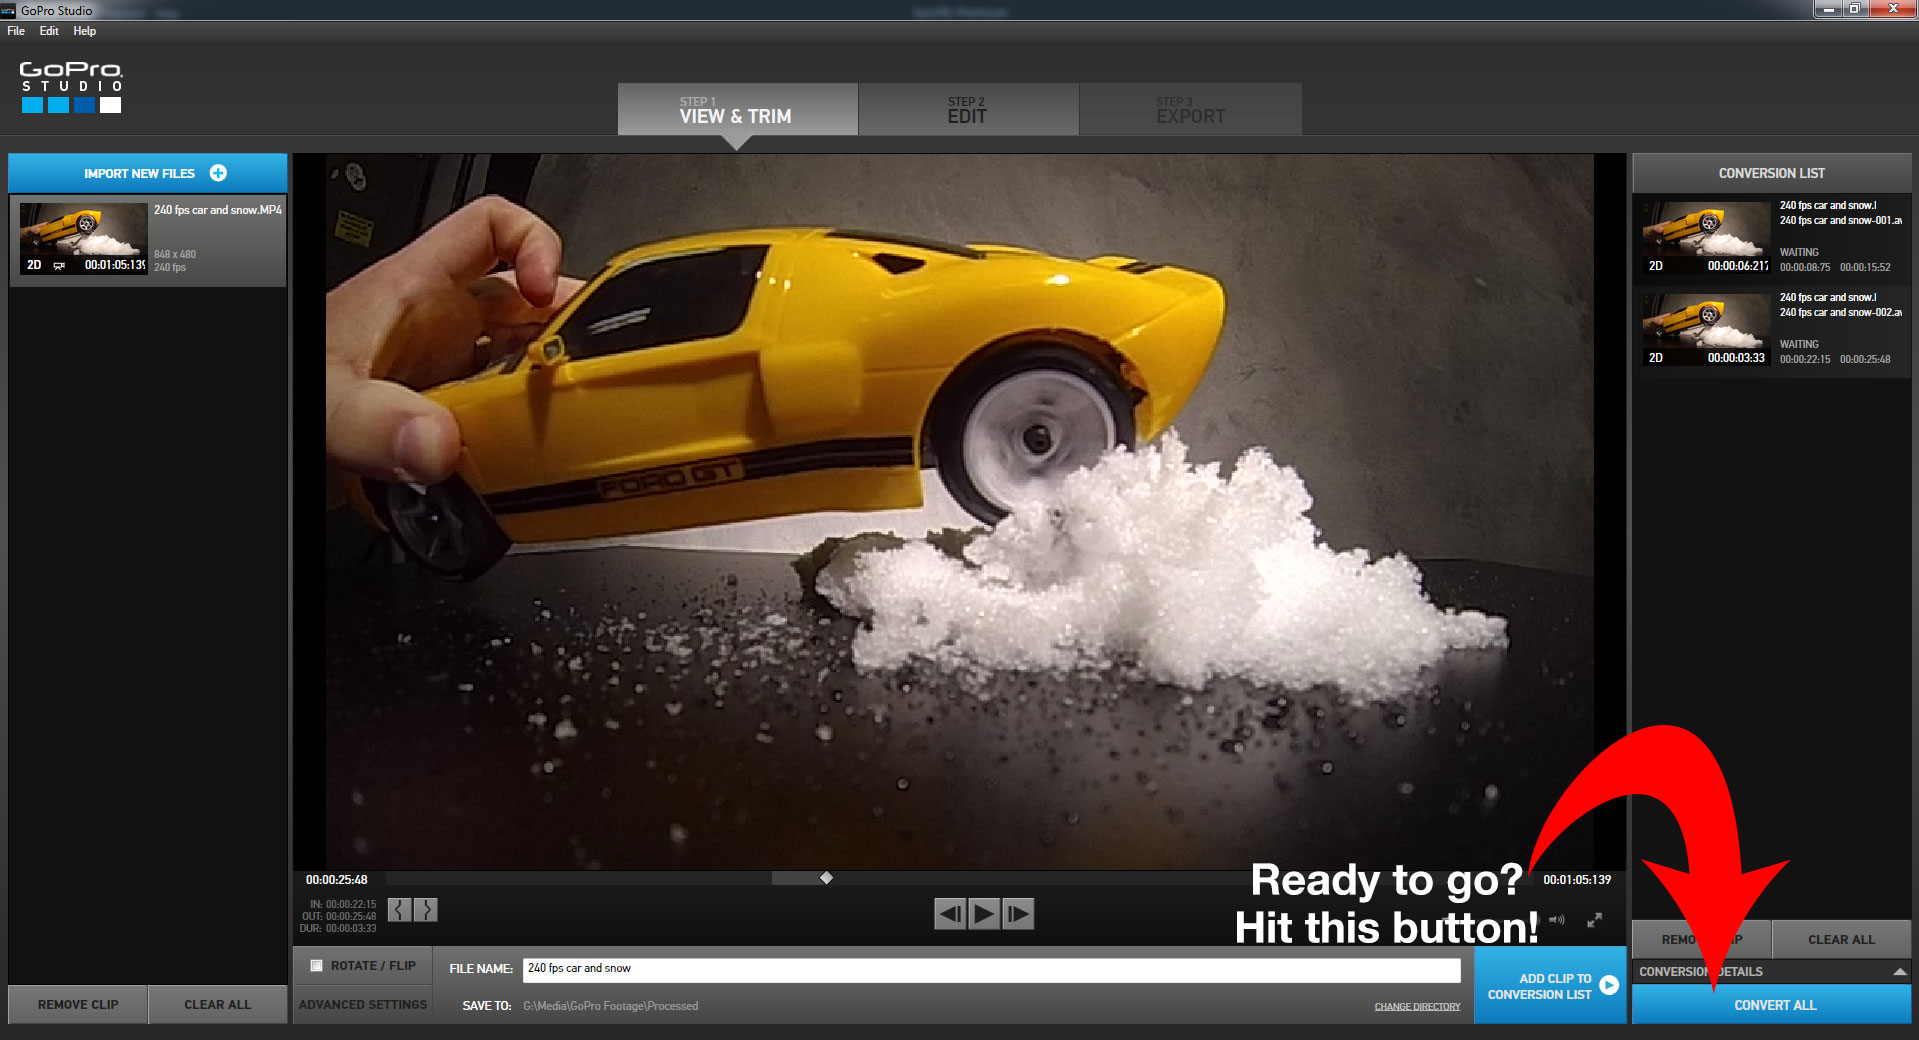
Ready to convert those files? Hit “Convert All”.
Once the files are converted, you’ll be prompted to move on to Step 2.
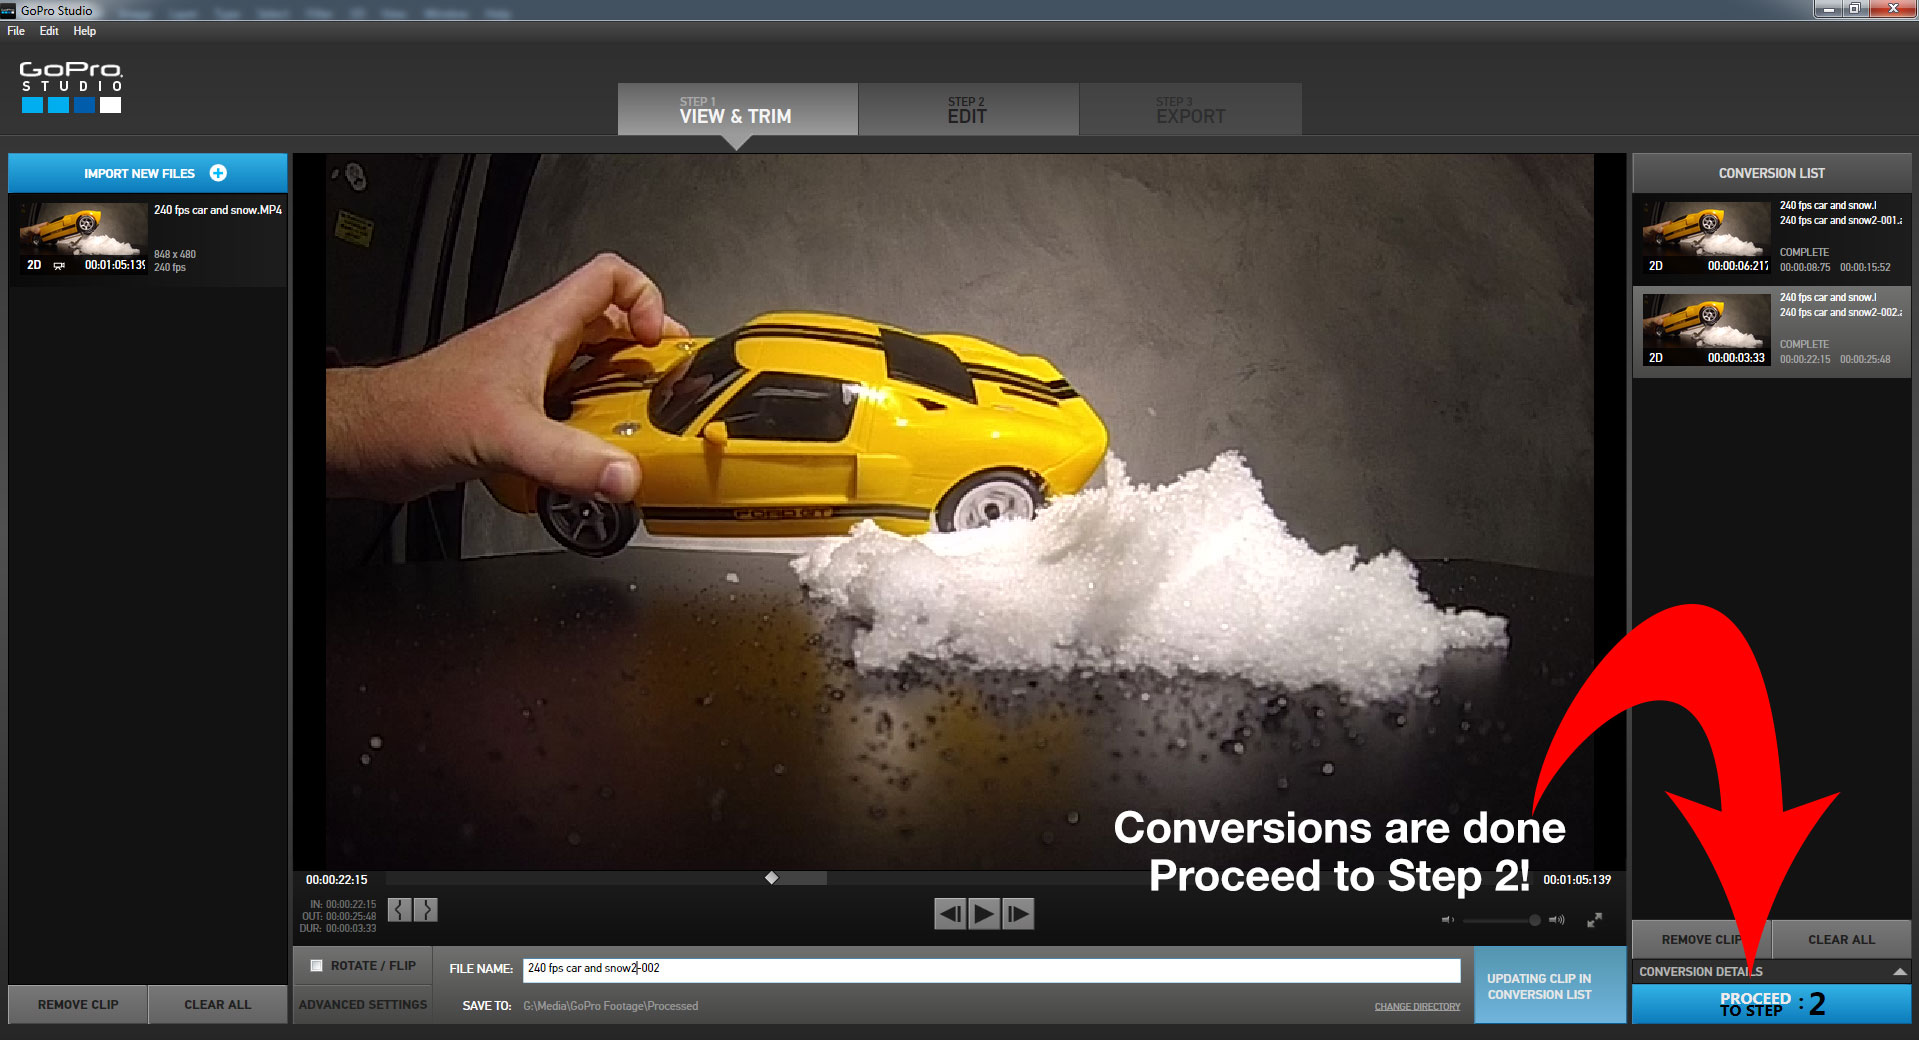
Once your conversions are done, proceed to step 2!
Editing Your Footage
Step 2 is the editing process. You’ll be prompted to select an editing template, but at this point just hit the “Blank Template” option.
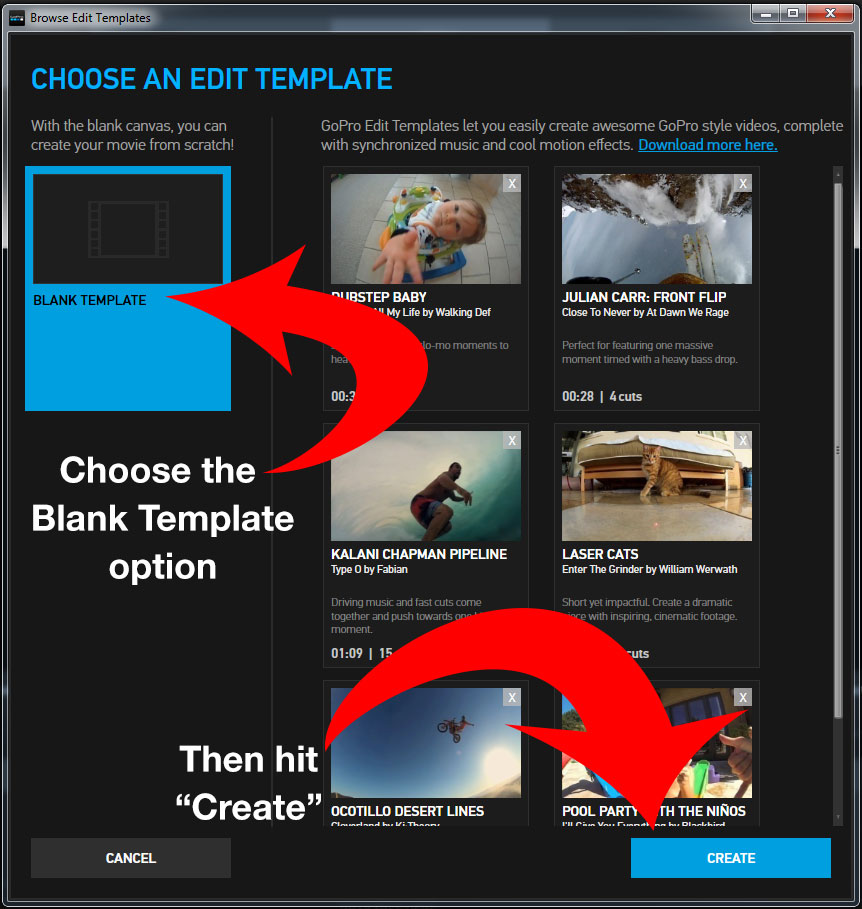
Choose the “Blank Template” option, then hit “Create”
You are now in “Edit” mode. GoPro Studio has a very basic video editor built in with typical video editing functions. You have a clip bin (the clips you just converted), a source viewer, a timeline, video controls for playback speed and some audio and image controls. There are also some visual presets you can apply (similar to Instagram).
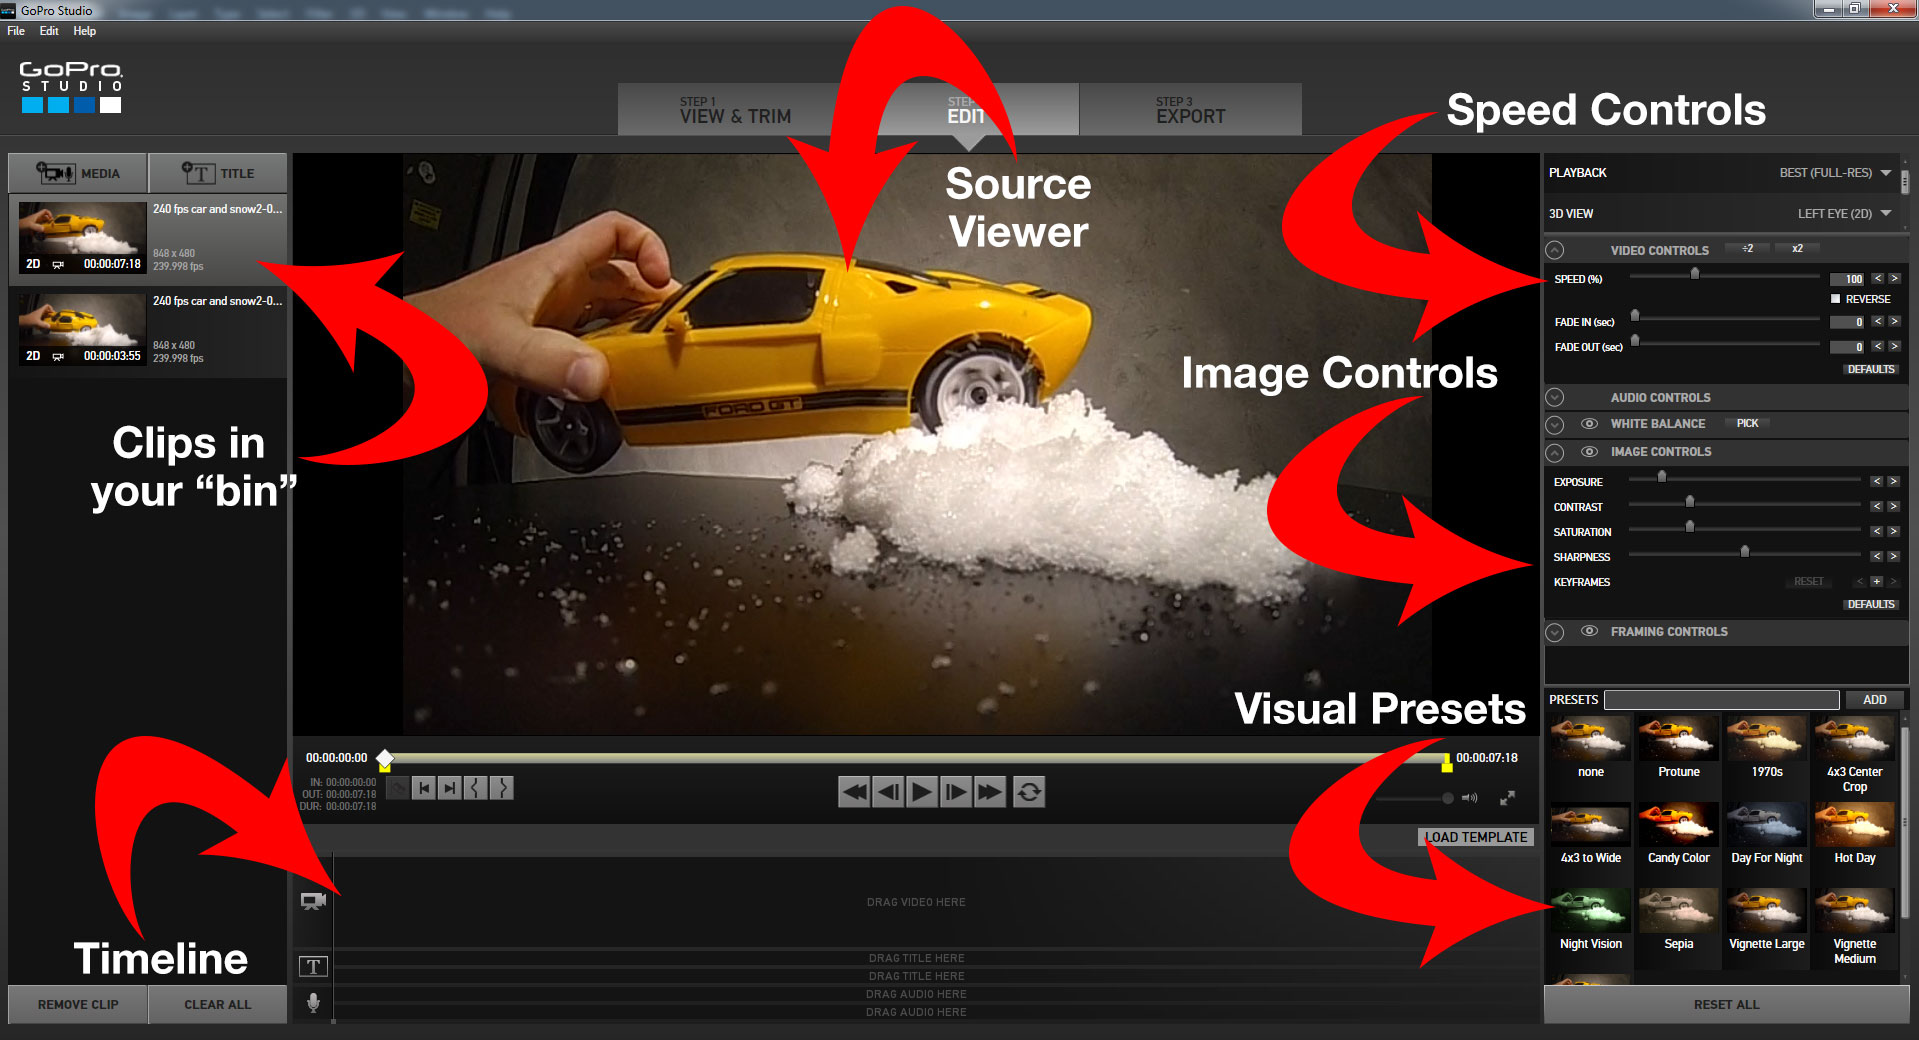
GoPro Studio Editing Interface
Editing is pretty simple. You can use the Source Viewer to preview your clips and further define the sections you want to work with by marking In and Out points. I’m not going to get into video editing techniques here, but it’s essentially the same as every other video editing program you’ve used. Mark your In and Out points (if desired) and drag your clips to the timeline. At this point, as they say in Star Wars, “this is where the fun begins.”
Now I can select any of the segments in the timeline and slow them down, add image controls or even add any of the various presets provided by GoPro Studio. You are here to learn about slowing footage down though, so let’s focus on that.
One of the cool things about GoPro Studio is that it allows you to segment out the pieces of video that you’d like to slow down by adding cuts in the timeline. So in the example of the footage I’m working with, I want to isolate the sections of video where the car’s rear tire really gets some snow kicking up. So I’ll just drag the yellow playhead until I find the beginning of a segment where some snow starts to fly and add a cut. I’ll advance the playhead to where the snow stops flying and add another cut. This isolates the segment that I’d like to slow down, and I can now click on it and adjust the speed for just that particular segment.
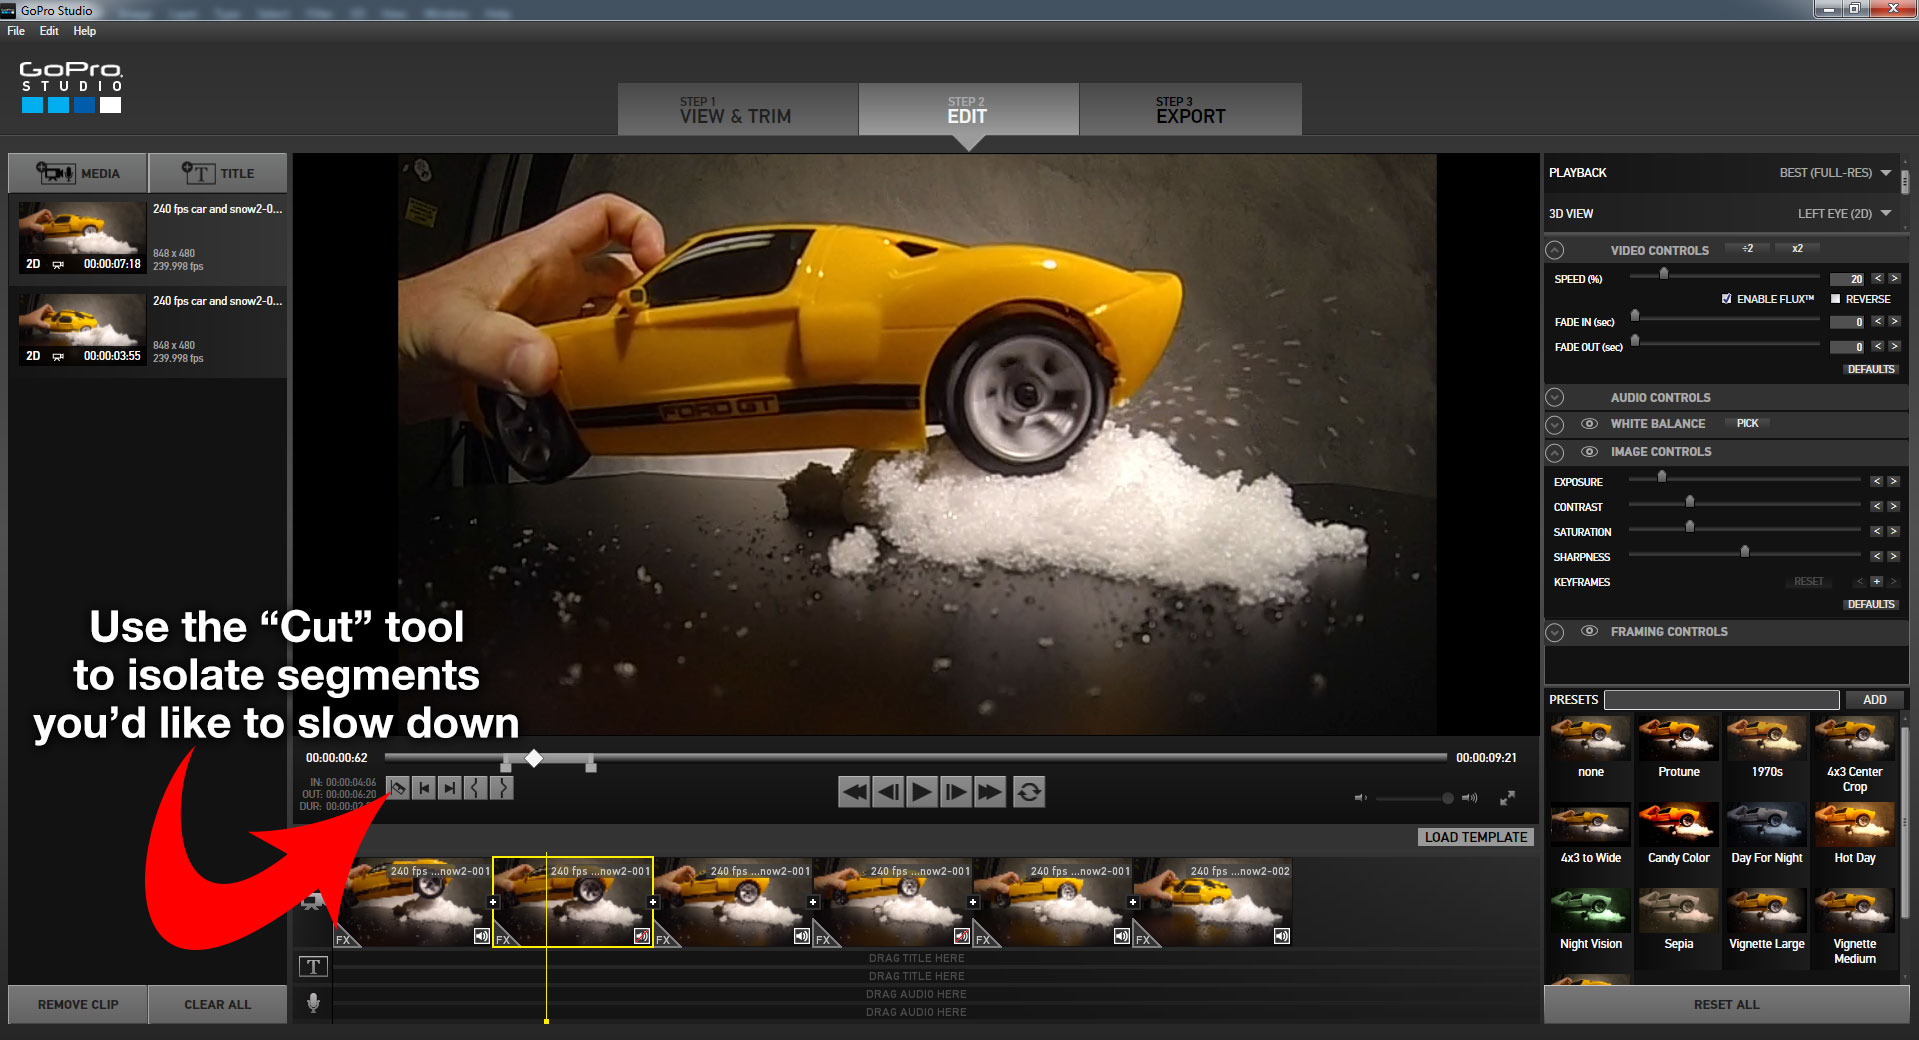
Use the “Cut” tool to isolate segments you’d like to slow down.
I should mention at this point that GoPro Studio 2.5 introduced a feature called “Flux”, which is essentially what Adobe has been calling “Frame blending” for years. The idea is that as you slow footage down, depending on your frame rates, you can end up with choppy looking video. Flux attempts to correct this choppiness by interpolating between each frame for smoother playback. It’s literally doing the same thing as frame blending – it’s looking at the outgoing and incoming frames and doing a bit of “blending” between the two so the jump from frame to frame isn’t so drastic. It works very well most of the time, but be aware that it will increase your export time by a LOT.
In the screen shot below, I’ve isolated the 2nd clip in my timeline by clicking on it, then I went over to the “Video Controls” panel and set the speed to 20%. Flux was enabled automatically as soon as I changed the speed, but you can disable it if you’d like. Note also that the audio is turned off on any clip with the speed altered. When I hit the play button, GoPro Studio will play the footage in regular speed until it reaches the first cut, play the slowed down segment at the speed you specified, then continue playing at regular speed.
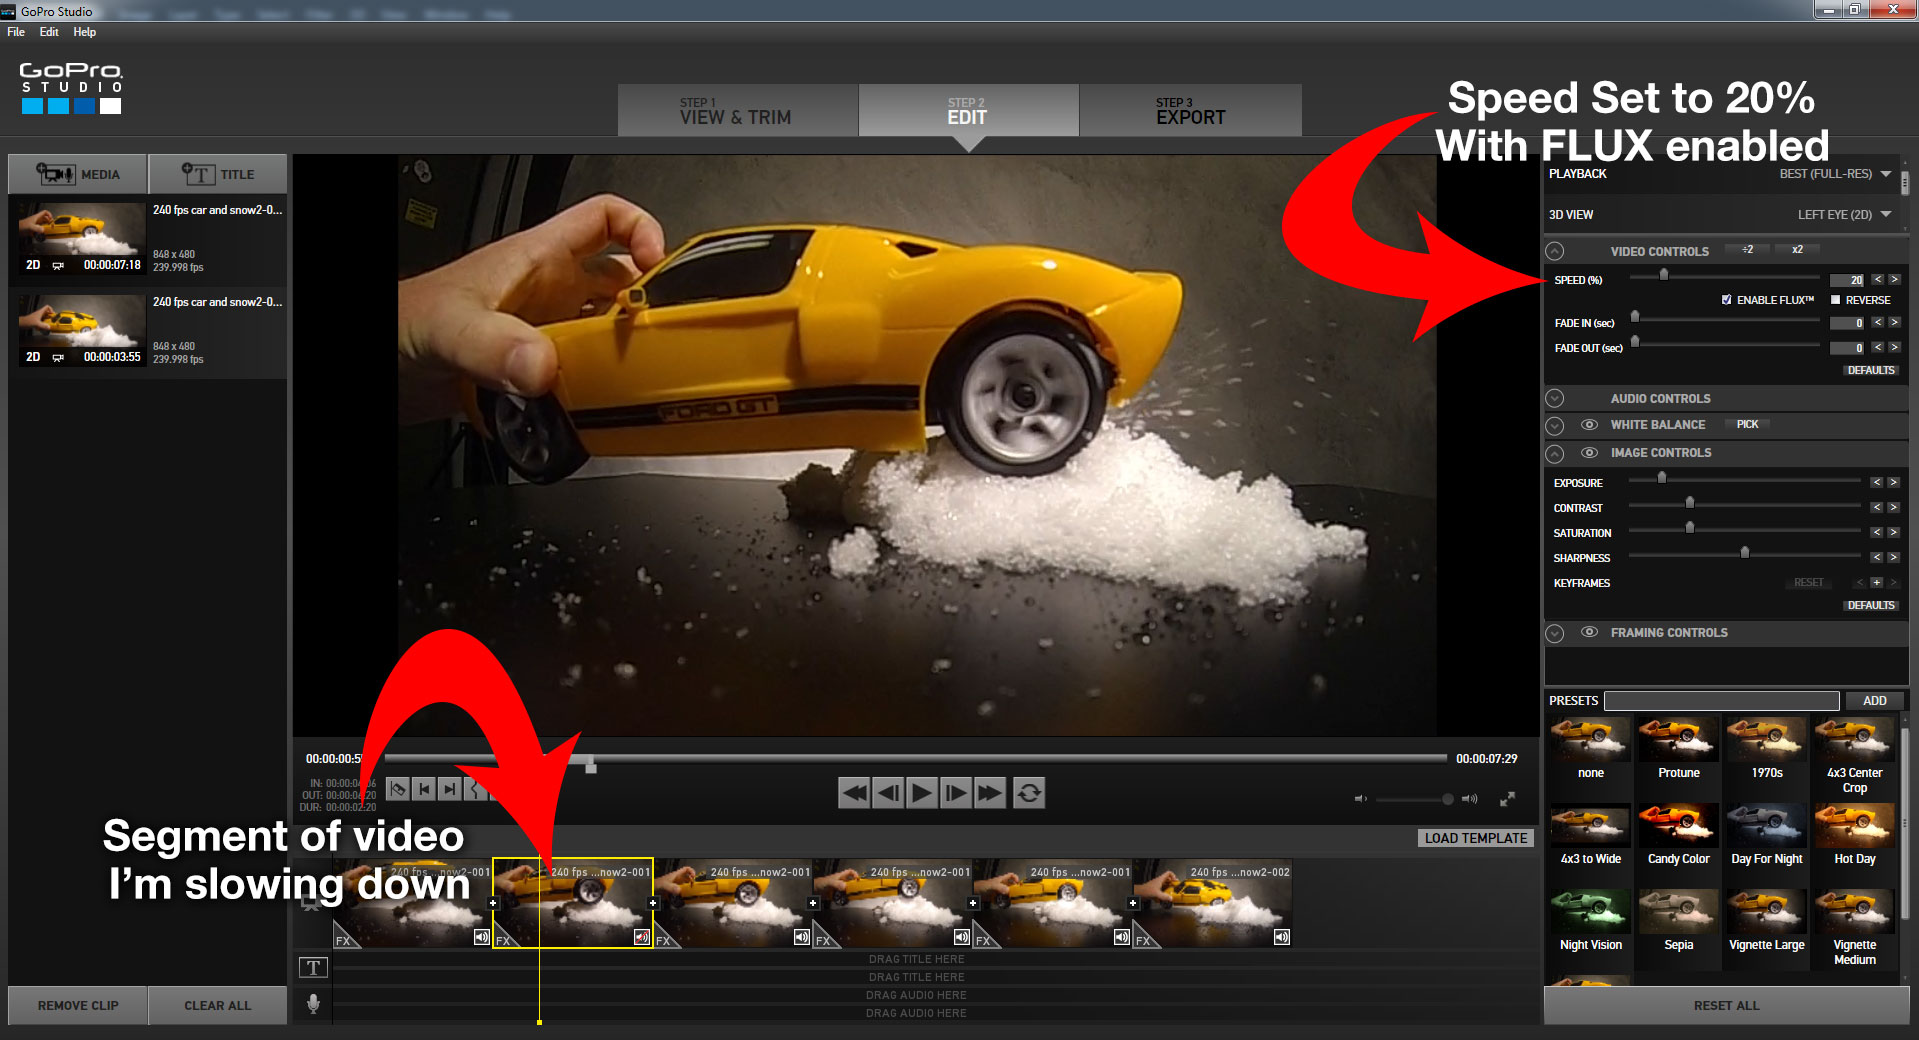
Segment of video selected in the timeline with speed set to 20% and FLUX enabled.
You can continue editing your footage until you are ready to export, which is the last step. To export, hit the “Step 3 – Export” button at the top.
Exporting From GoPro Studio

Click “Export” to create your finished video
There are several settings in the export options. Fortunately there are presets for both YouTube and Vimeo which is probably where your video is ultimately heading. If not, you can create your own custom export setting. One thing to note here is that if you want to use the FLUX feature, it’s not enabled by default. If you do decide to use it, as I previously mentioned, it will dramatically increase your export time.
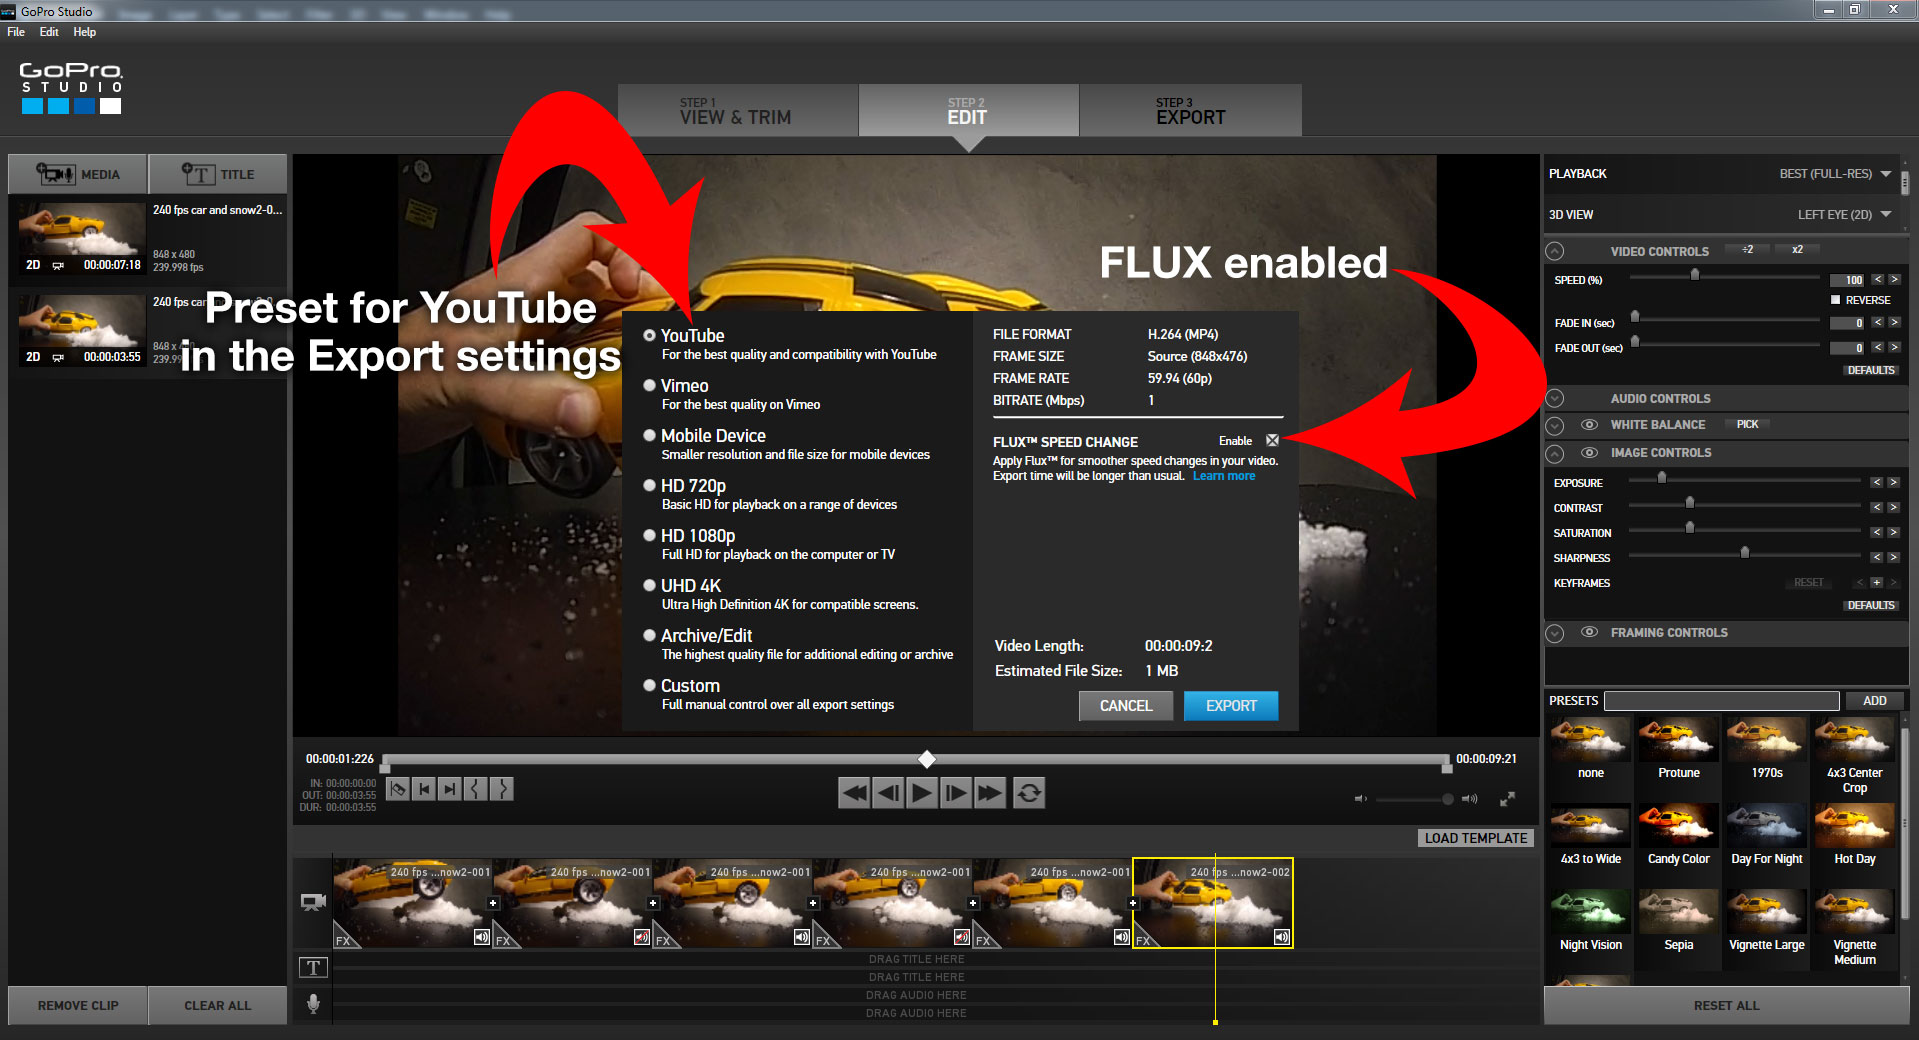
Export settings with the YouTube preset selected and FLUX enabled.
So that’s about it for using GoPro Studio 2.5. Next up I’ll cover how to slow your footage down using Adobe Premiere Pro CC.
Slowing Down High Frame Rate GoPro Video Using Adobe Premiere Pro CC
The next steps I’ll cover will all be in Adobe Premiere Pro CC 2014, which is obviously not free software. Premiere Pro has some definite advantages, which I’m sure comes as no surprise.
Time Remapping and Keyframes
The method with the most control in Premiere Pro is using Time Remapping along with keyframes. Time remapping allows you to specify the sections of your video you’d like to slow down (similar to what you just learned in GoPro Studio) but you can also keyframe the interpolation going to and coming out of the slow motion footage. In other words, you can have footage playing at regular speed, then have it slowly transition to slow motion, then slowly transition back to regular speed. Here’s how it works:
First things first, you need to get your clip into Premiere Pro. I’m assuming you know how to create a new project at this point. Just choose File, then “Import” and browse to the file you’d like to work with.
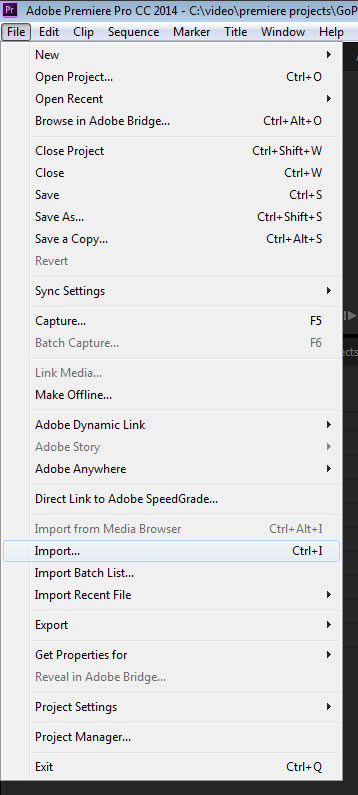
Choose “Import” from the File menu.
Once the clip has been brought into Premiere, you can start working with it immediately. Just double click on it and it opens in your source viewer. You can then pick the sections of your clip that you’d like to work with by marking In and Out points. Once you’ve marked your In and Out points, you need to create a sequence. The easiest way to do that is to drag the clip from your bin onto the “New Item” icon, which will create a new sequence with the correct resolution, frame rate, etc. You can also add more In and Out points to your clip and drag and drop those segments to your timeline if necessary.
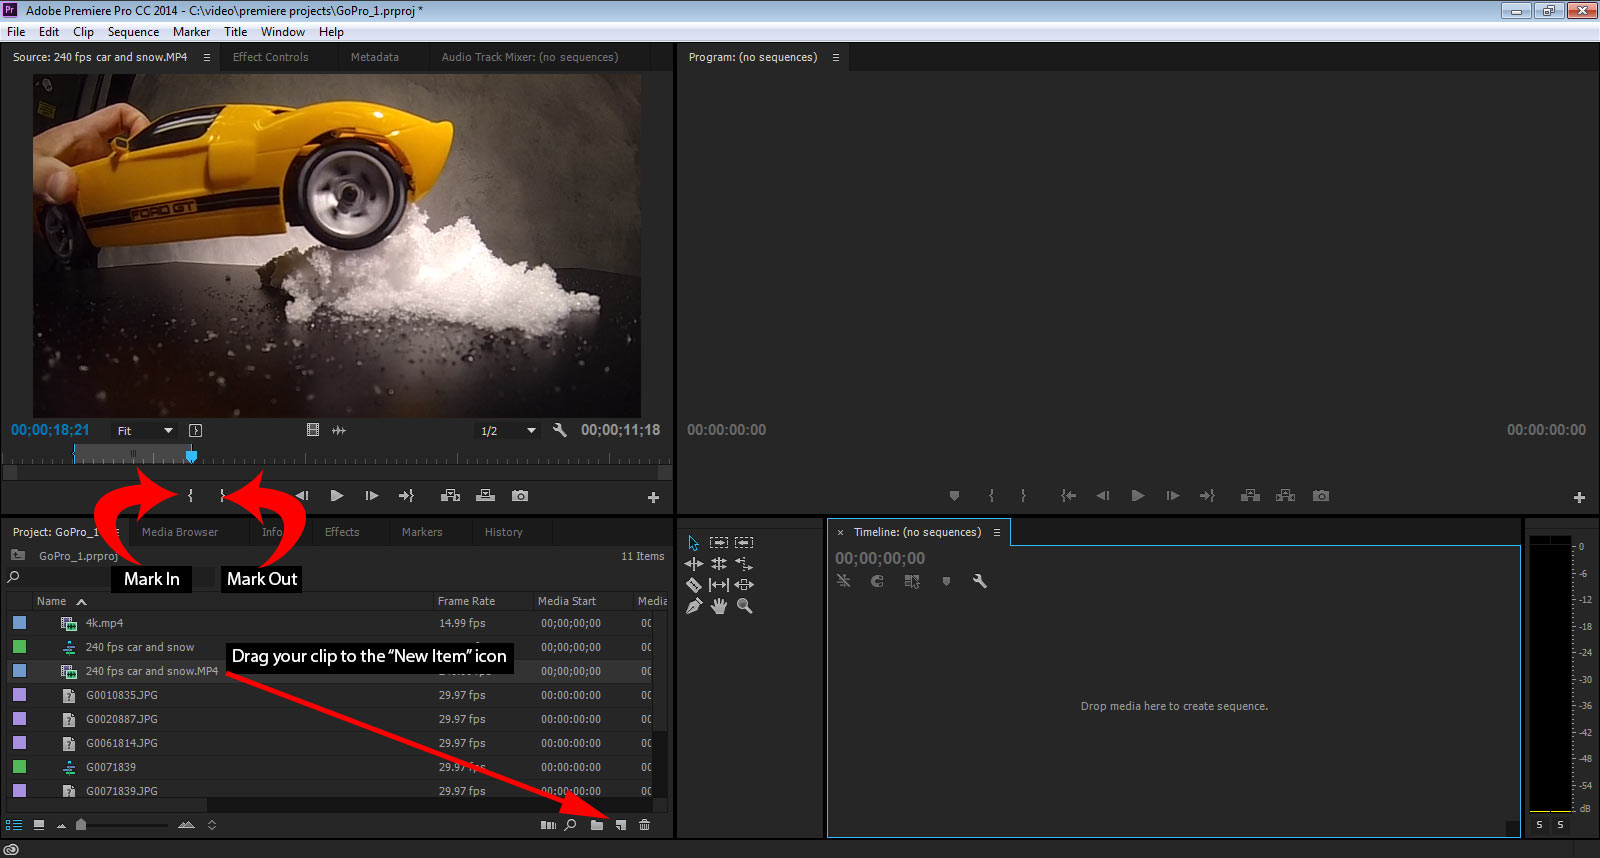
Mark an In and an Out, then drag your clip to the ‘New Item” icon to create a sequence.
You now have at least one clip in your timeline, so you can start to determine which sections to slow down. The first thing you’ll need to do is expand V1 so you can see the “new keyframe” button. Click and drag the upper most portion of V1 (just above the eyeball) to make the track larger. Once you’ve done that, you’ll see the “Add Keyframe” button.

Expand V1 in order to be able to add keyframes.
Now you need to determine the section of video you’d like to slow down, then add keyframes to isolate that particular section. To do so, advance the playhead to the beginning of the segment you are slowing down, then hit the “Add Keyframe” button (tip: you need to have the clip selected in the timeline in order to be able to add keyframes). Advance the playhead further along the timeline until you reach the end of the segment you are slowing down and add another keyframe.

Now that you’ve isolated the section you want to slow down, you can use the Time Remapping bar on the timeline to adjust the speed of the clip. Click on the bar between your keyframes (you may need to zoom in on the timeline) and drag down. You’ll see a percentage amount as you drag down (see the image below).

At this point you’ve done basically the same thing as what I showed in GoPro Studio. You’ve isolated a section of a clip to slow down. The biggest difference in Premiere Pro CC, however, is that you can further refine the transition from regular speed to slow motion. If you zoom in on your timeline and look at your keyframes, you’ll notice there are handles on either side, which you can click on and drag. Clicking and dragging will open up control options to allow you to edit the transition from regular to slow motion. The further you drag one of the handles, the longer the transition will be. You’ll also notice that you have a way of controlling how smooth or abrupt the transition should be by adjusting the bezier curve between each keyframe. Grab one of the handles of the curve adjustment tool and drag to the right, and you’ll notice the curve taking on more of an “S” shape. A smooth “S” shaped curve creates a nice, slow transition. Continue dragging and eventually the curve becomes a 90 degree angle, which creates an abrupt jump to slow motion.
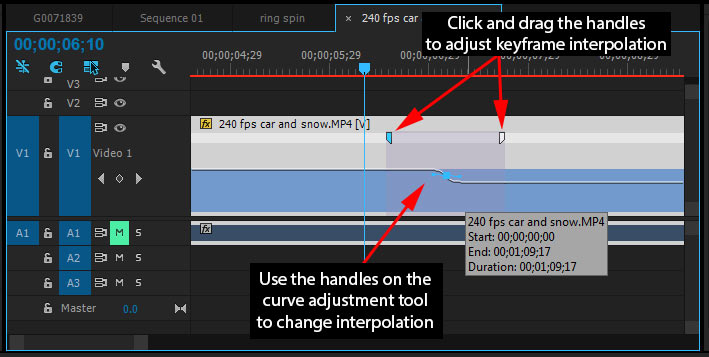
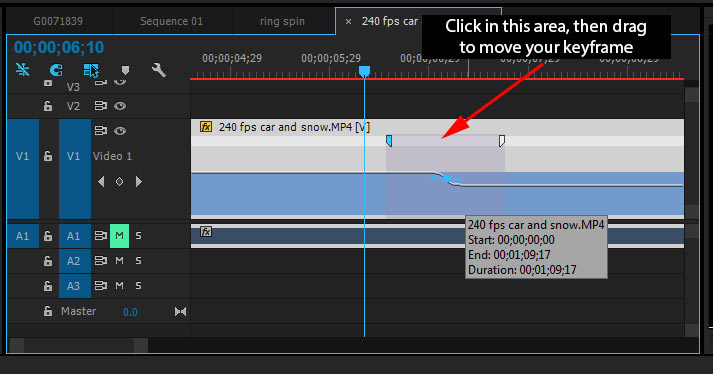
Lastly, if you want to change the position of your keyframes, you need to click the area between the two handles, then drag. For some reason, you can only move your keyframe position after you have opened up the transition control handles. Not sure why that is.
So that’s one way to adjust high frame rate footage in Premiere Pro CC. This method gives you the most control, but there are actually some other ways to do it. If you are just looking to slow down your entire clip with no need for keyframes, here’s how to do that:
Using High Frame Rate Footage in a Low Frame Rate Timeline
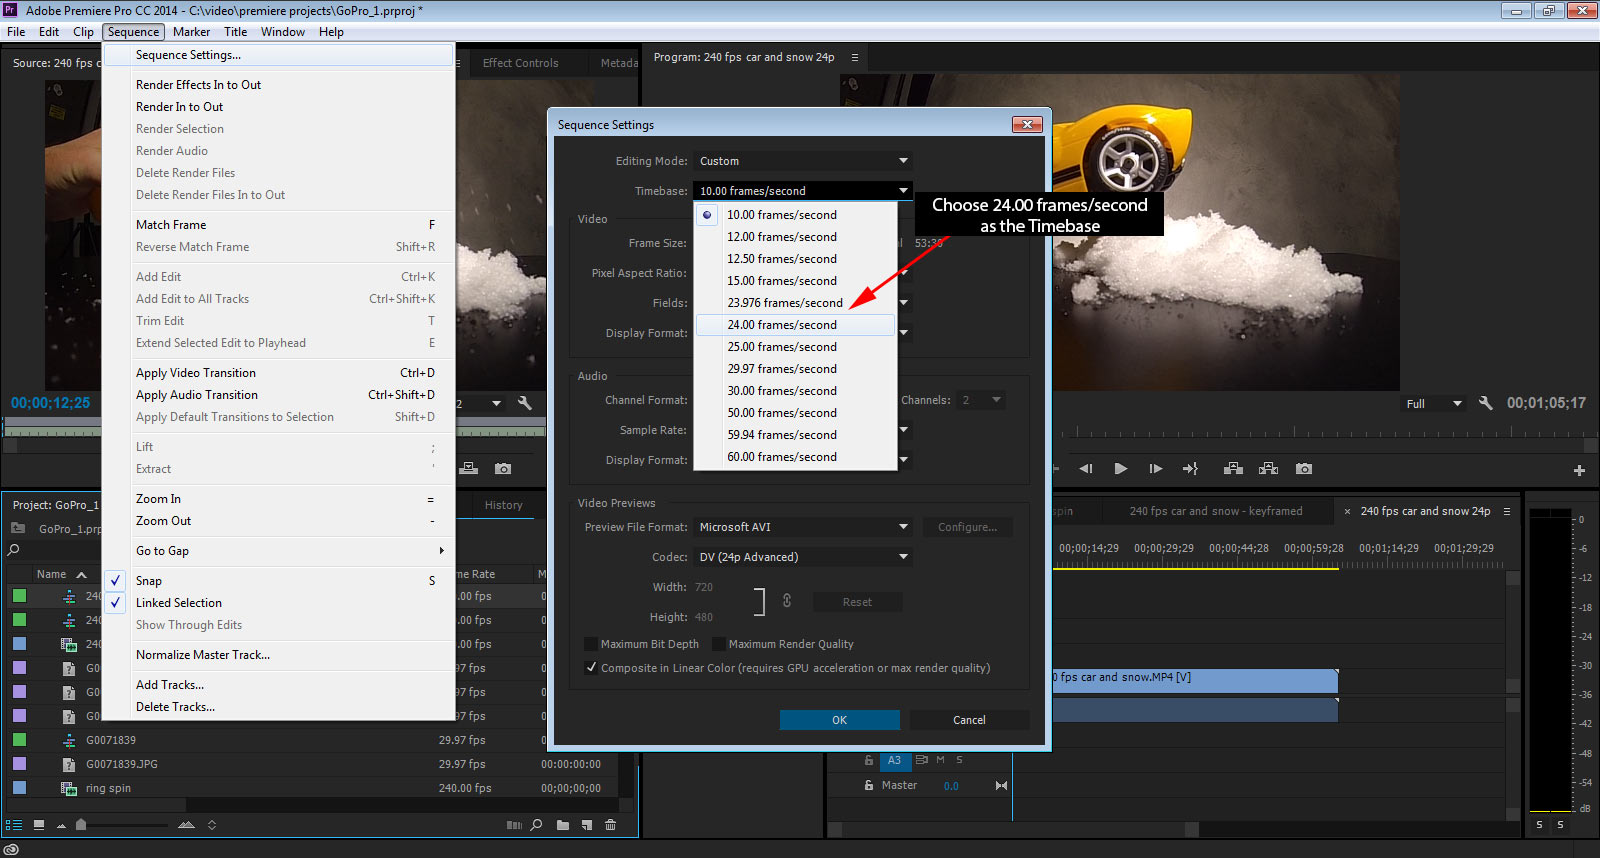
This method requires a bit of math, so we’ll be digging out the calculator. What you’ll do in this method is create a new sequence in the same method as you did in the previous step (drag and drop your clip onto the “New Item” icon). What you’ll do next is change the timebase of the sequence, so highlight your new sequence in your bin, then go to the “Sequence” menu and choose “Sequence Settings”. Now hit the dropdown for “Timebase” and change it to “24.00 frames/second”.
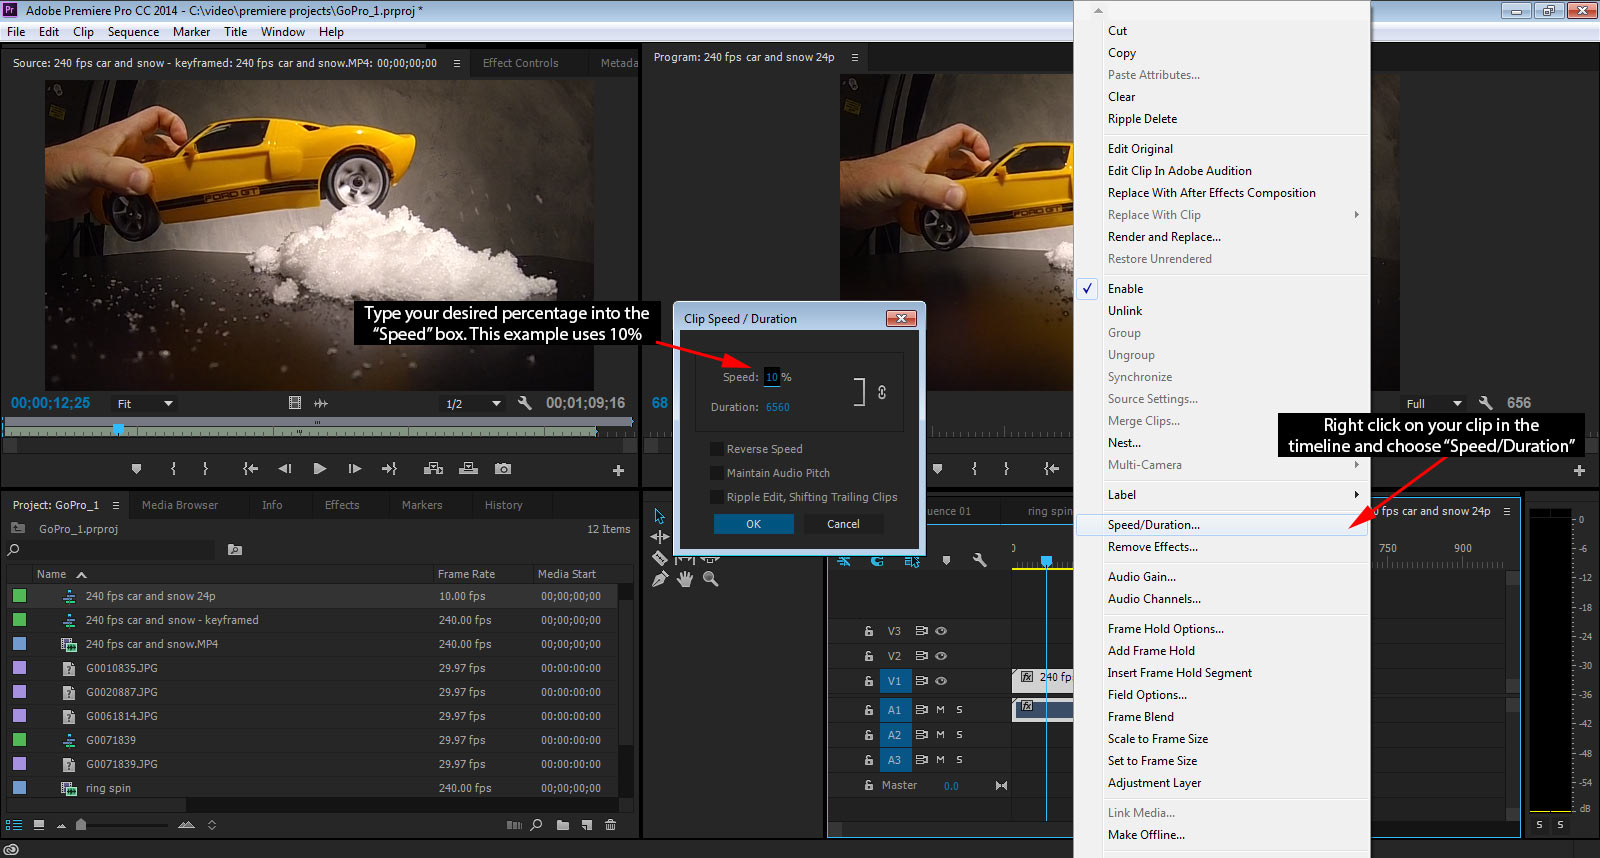
Next, we’ll do a bit of math. Just divide the frame rate of your clip by the frame rate of the sequence. This simple equation results in nice, smooth playback of your footage. So in my example, my footage was shot at 240 frames per second and I placed it in a 24p timeline. So I just need to divide 24 by 240. This equals .1, which equates to 10% speed. So all you need to do at this point is right click on your clip in the timeline and choose “Speed/Duration”. The resulting dialog box allows you to type in a percentage, so in this case we’ll type in 10.
Play your timeline and the footage should look nice and smooth. If you want to play the timeline back at maximum quality, hit “enter” on your keyboard. This will render a preview of your slowed down footage. Note also that using this method slows down your audio along with your video.
Reinterpreting High Frame Rate Footage
This method is similar to the previous method in that it affects your entire clip (vs the keyframing method). Before attempting this method, I’d suggest making a duplicate of any clips that you plan to try this on, then work with those duplicates. To duplicate a clip, right click on it and choose “Duplicate”. You can optionally rename the clip to keep things nice and tidy. Next, right click on your new, duplicated clip and choose “Modify” then click on “Interpret Footage”.
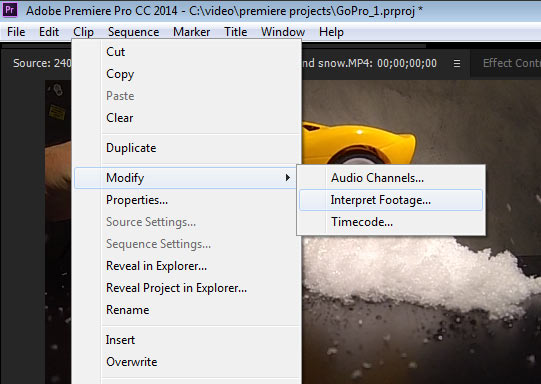
In the resulting dialog box, click on “Assume this frame rate” and change the frame rate to 24.
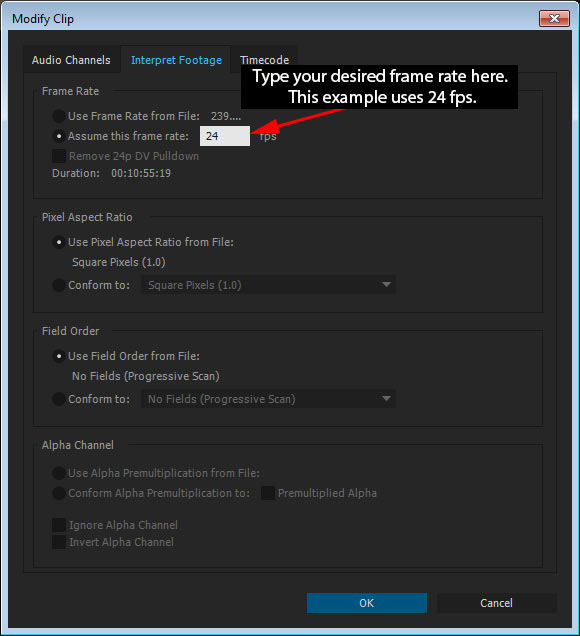
Now double click on your clip and play it. It looks nice and smooth! Notice the audio is slowed down using this method as well.
Frame Blending
GoPro Studio 2.5 has the new feature called “FLUX”, but Adobe has had a similar feature for years. The Adobe version is called “Frame Blending” and you’ll find it in both Adobe Premiere as well as Adobe After Effects. Frame blending is easily enabled in Premiere, although you may or may not find you need it. I’ve noticed that footage shot using 240 fps generally doesn’t benefit from using it. Footage shot using 60 fps is a more likely candidate, especially if you are dramatically slowing your footage down. To enable Frame Blending, just right click on your clip in your timeline and choose “Frame Blend”. To turn it back off, right click and again and click on “Frame Blend”.

Exporting From Premiere Pro CC
Exporting from Premiere Pro is very easy, and this is really where the differences between GoPro Studio and Adobe Premiere are glaring. While GoPro Studio was going to take hours to render my video if I have FLUX enabled, Premiere will take that same footage in a similarly edited timeline and export it in minutes, even with Frame Blending enabled.
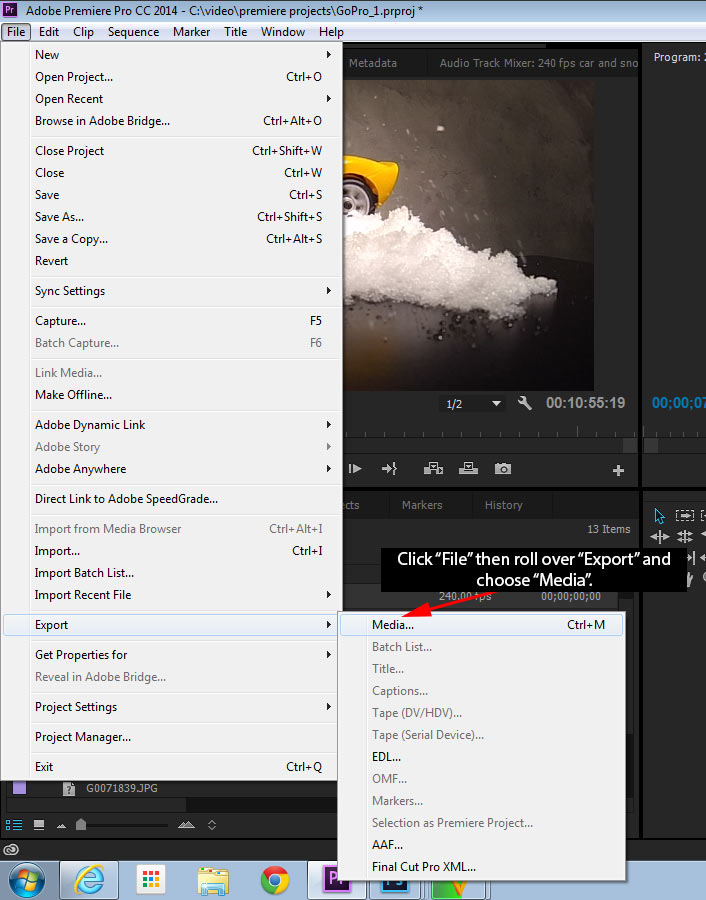
To export your edited sequence, make sure it’s highlighted either in your bin or it’s the sequence you are currently working on in your timeline, then click on “File” and choose “Export”, then choose “Media”.
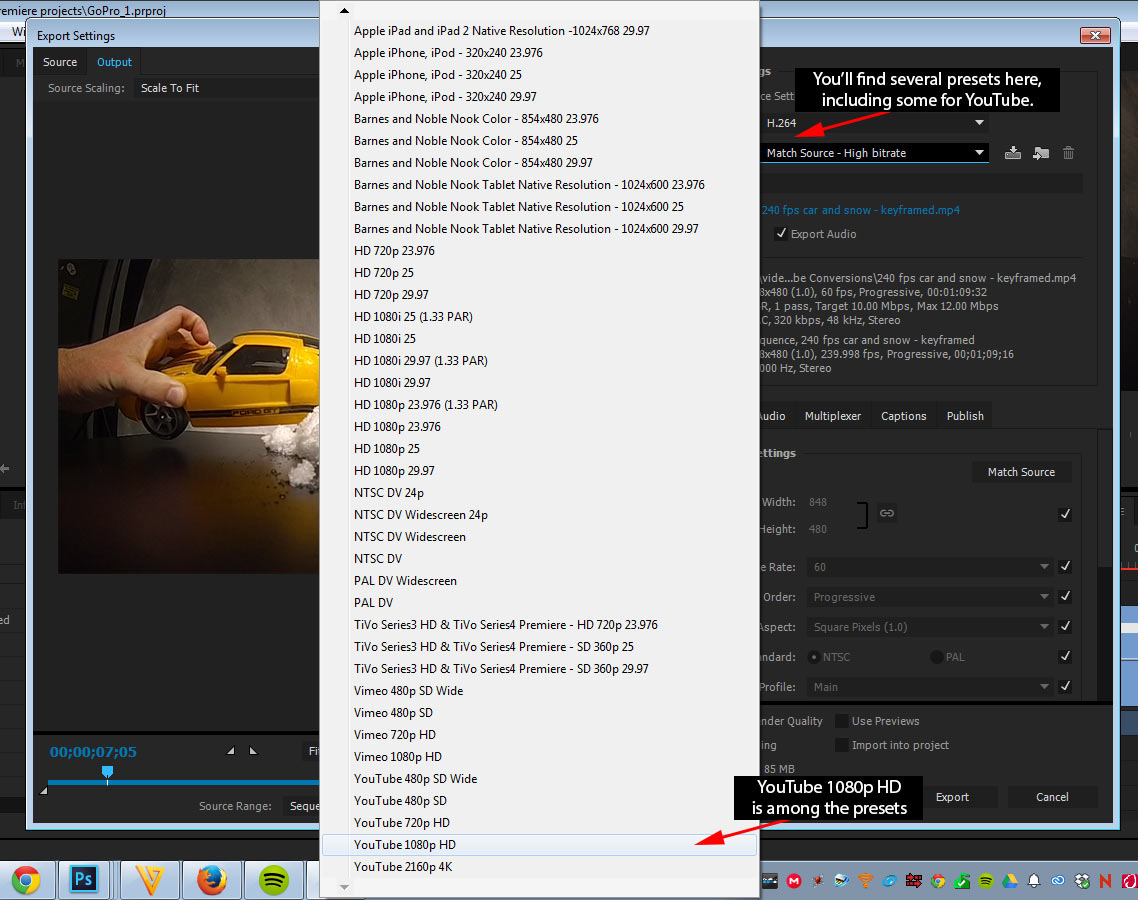
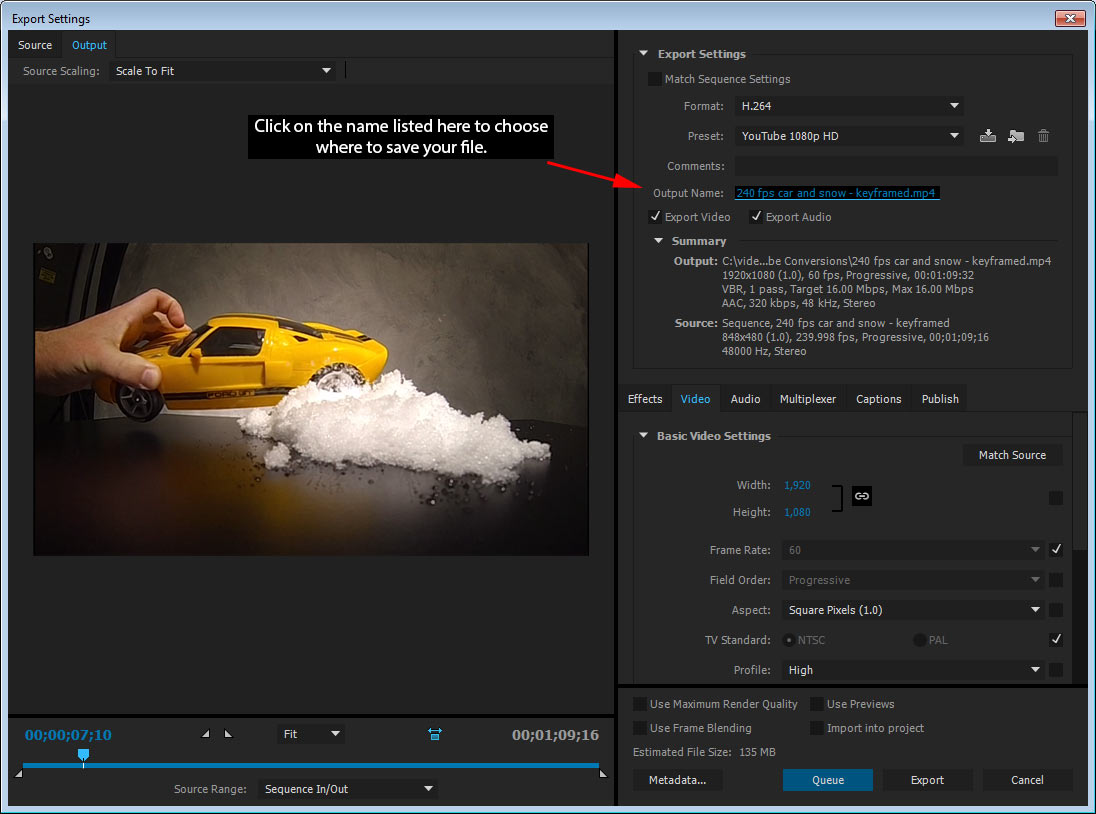
The resulting dialog box might look confusing, but not to worry, Adobe has included various presets to pick from. Similar to GoPro Studio, there are presets for YouTube. In this example, we’ll choose YouTube 1080p HD.
Once that’s chosen, just tell the exporter where to save your file, then hit “Export”. You’ll notice the export process begins right away.
So that’s about every possible way I’ve found to cleanly slow high frame rate GoPro footage down. That was a lot to take in, but I hope this helped! Any questions or comments, feel free to leave them below.


