I recently spent a weekend shooting video (interviews and b-roll) and I exclusively used the Sony A7R that I just purchased. I bought the A7R because it gives me a full frame camera with superb dynamic range for stills, as well as the ability to shoot HD video, all in an easy-to-travel-with form factor. I especially love shooting video with cameras like the A7R, because the full frame sensor along with a good lens gives me a very “cinematic” look. I can essentially shoot video using all of the tools that a still photographer would use. Here’s my first impressions of using the Sony A7R for video.
Equipment List:
Fotodiox Pro EF-NEX Auto adapter
Canon EF 24-70mm f/2.8L USM Standard Zoom Lens
Sound Devices 302 Portable 3 Channel Field Mixer
Sennheiser EW 100 G2 Wireless Microphone/Receiver
Sennheiser ME66/K6 Shotgun Microphone
Auray WSS-2024 Professional Windshield
Sony NPFW50 Rechargeable Battery Pack
Wasabi Power Battery (2-Pack) and Charger
My Setup
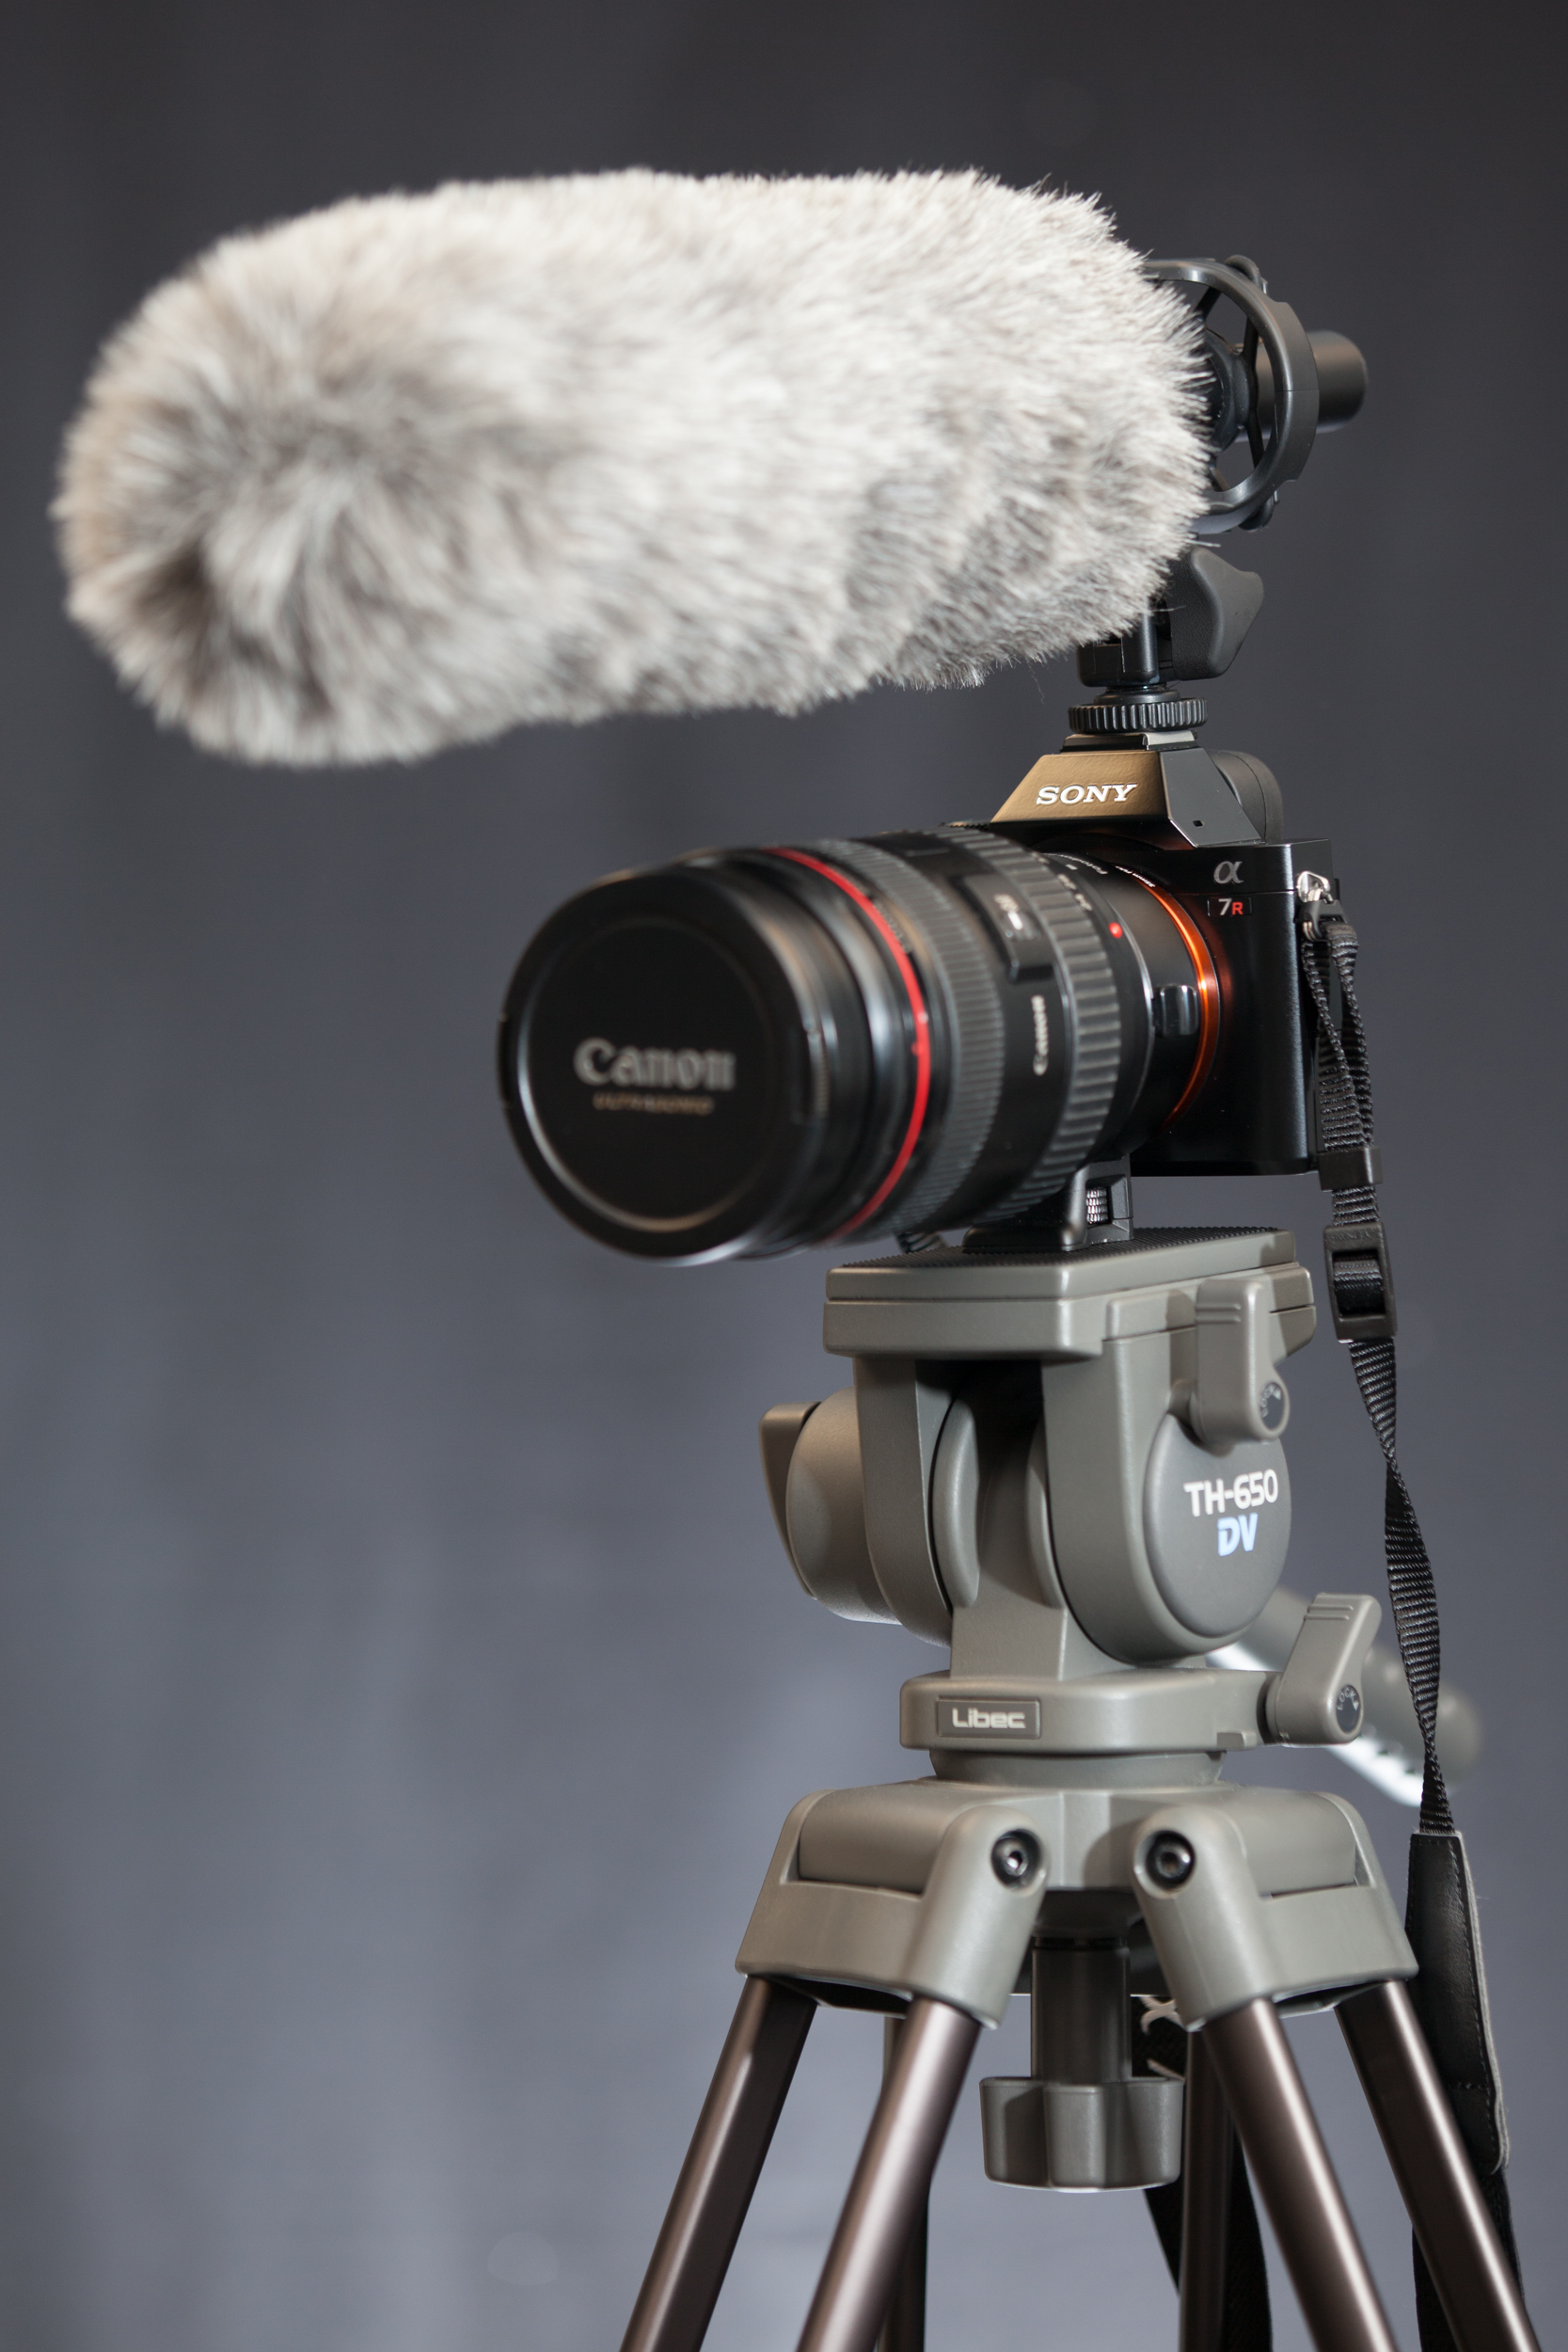 I shot video with the A7R using the AVCHD setting at 60i 24M (FX). I used the Fotodiox Pro EF-NEX Auto adapter so I could use my Canon EF 24-70mm lens. I just bought the A7R and I’m still saving up for a native Sony lens, so my next best choice was to use my Canon lens along with the Fotodiox adapter. One thing to note if you go with a similar setup: the Fotodiox adapter does not give you the ability to use continuous autofocus in video mode. Native Sony lenses do allow for continuous autofocus, and you can even use the LA-EA4 adapter and old Minolta/Sony lenses and have continuous autofocus. But sadly, with the Fotodiox adapter this is not the case. In all honesty though, this was never really an issue. The focus peaking feature on the A7R is so good, I ended up just using manual focus all day long. If you are not familiar with what focus peaking is, the short explanation is that the camera outlines whatever it deems to be in focus in either a red, yellow or blue outline (you choose the color you want – I use yellow). Most of my footage was of stationary objects anyway (interviews with truckers and b-roll footage of their trucks). I also mainly shot at f/8 in order to maximize my depth of field.
Shooting Video
The first thing I noticed as I started shooting was that the A7R uses up batteries at an alarming rate. I already knew that battery life for still shots was an issue, but this was something else entirely. I would start with a battery at 100%, conduct a short (5-7 minute) interview, shoot a little bit of b-roll, and the battery would already be down to 75%. Another interview/b-roll shoot – now I’m at 50%. I was fortunate to have brought 4 extra batteries with me, but even then I needed take every opportunity to use the car charger that came with the Wasabi battery kit that I bought from Amazon. If you plan to use this camera for video, I’d actually suggest you immediately grab the Sony VGC1EM VGC-1EM Digital Camera Battery Grip. That’s what I’m planing on as my next purchase for this camera. The specs for the camera say that it can record up to 30 minutes of continuous video in optimal temperatures (around 70 degrees F). I have my doubts that a single battery even would last that long.
One minor gripe I have about the A7R is that while I can turn off the rear LCD if I’m shooting photos, there is no way to turn it off when shooting video if you are in video mode. I did find a workaround though. If you set the A7R to allow the MOVIE button to always work (page 6 in the gear menu) then you can shoot video in any of the standard photo modes on the camera. Just hit the “record” button on the right side of the camera, and you are shooting video. The LCD does stay on while shooting video though, and you lose your audio meters when doing this, but if you are running low on battery on a video shoot then this might be a good option. Speaking of that “record” button, it’s in a bit of an awkward spot on the camera. It’s on the right upper side of the camera, so hitting “record” feels a little bit unnatural until you get used to it. I wish there was an option to just make the shutter button become the “record” button when in video mode, but as of this writing that’s not an option. I must have tried doing that at least ten times throughout the day though. That’s just what makes sense to me.
Audio
For audio, I used a wireless microphone as well as a shotgun mic with a windscreen attached to the hot shoe on the A7R. I mixed the two sources using the Sound Devices 302 Portable 3 Channel Field Mixer. Having this setup did add a lot of extra hassle as far as more gear to carry and extra wires, but since this was an outdoor shoot on a windy day I figured having the shotgun mic with a windscreen was a must-have. In the past, I shot video using a Canon 5D Mark II, which required the use of the Magic Lantern firmware just to have the ability to use a set of headphones (they fixed this on the 5D Mark III). By comparison, the A7R has a 1/8″ stereo input jack as well as a headphone jack. Having everything right there on the A7R was very nice. Audio levels can be adjusted on the fly on the A7R (I used my custom menu settings to make the center button on the back of the camera bring up the audio levels). The A7R also has Automatic Level Control (ALC) built in, so unless I messed something up on the mixer, I didn’t need to worry too much about having audio levels blown out. Oddly though, there is no setting to turn off ALC on the camera. After playing back the footage, I’m very happy with how the audio turned out.
Rolling Shutter and High ISO
I’ve heard complaints about rolling shutter on the A7R, but because I didn’t do any crazy camera moves I never experienced this issue. That’s not to say it’s not a valid concern, but any panning or zooming I did with the camera was pretty slow. Another issue that I was initially concerned with was video noise when shooting in dark conditions. I’ve shot video using the Sony HXR-NX5U (which also shoots to AVCHD) and the footage really fell apart when I was shooting in dark conditions. I figured the same would happen with the A7R, but I was actually very happy with the footage I ended up with. I had the ISO cranked up to around 10,000 and the camera handled it like a champ. That was definitely a very pleasant surprise.
Other Notes/Takeaways
A couple of other takeaways from my first A7R video shoot – having an articulating LCD is just oh-so-nice when shooting video. If you’ve ever shot with a Canon 5D2 or 5D3 (no articulating LCD), then you know the experience I’m used to. With the A7R, if I wanted to I could put the camera on the ground, tilt the screen up, and see exactly what I was shooting. This is one of those features where once you have it, you never want to use anything else. Also I can verify that the “water resistant” claim about this camera is accurate. There were certain times during the day where the camera got pretty wet, but it never batted an eye.
So, to sum everything up, all-in-all I’m very happy with how the A7R performed as a video camera. Focus peaking works fantastically well and is especially useful in a video shoot (rack focus, anyone?). Video quality was what I was hoping for (and even better than I expected in dark conditions). Audio sounded great. Battery life (when using one battery) is atrocious though, and if you need a camera that can shoot for longer than 30 minutes continuously, you might need to look elsewhere. A workaround for that issue might be purchasing an external recorder such as the Atomos Ninja Star Pocket-Size ProRes Recorder & Deck. I haven’t tried one of those out yet, but based on the specs it should be a valid solution. Once I get my hands on one of those, I’ll update this post with my findings.
Here’s a quick one minute sample video. The clips are all taken straight out of the camera, edited (quickly) in Premiere Pro and encoded using Adobe Media Encoder CC. Watch in HD for the best quality.


