It’s been a busy few weeks, so I haven’t been able to post much. But it’s the weekend and I finally had a free few minutes. This week I wanted to write a post on a topic that comes up a lot with photographers: how much gear should I bring with me when traveling, and what’s the best way to carry it all?
I do want to point out that the scenario behind this post is one in which you would be flying to your destination. Chances are if you were driving instead of flying, you’d just bring as much stuff as you wanted! I also envision that you are traveling to a location that you’d be exploring via bus, walking, driving, etc. and you want to bring home as many great shots as possible. I’m not writing this from the angle of someone going to a specific location with one very specific shot in mind (such as climbing a mountain for some star trail shots).
Luggage
I’ve flown to quite a few cities in the past few years, including Seattle, San Francisco, and Dublin, Ireland. In all of those cases, I didn’t check a single bag. I hate the idea of spending extra money just for the airline to send my luggage wherever I’m going, so I just take advantage of the “two carry on item” rule. The luggage I most recommend (for everything besides your camera gear) is by a company called eBags.
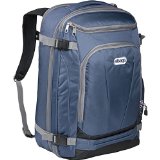 The specific bag I use is the TLS Mother Lode Weekender Convertible Junior. Seriously, this bag rocks. It’s actually a backpack, but it has more compartments and hidden pockets than you’d expect. I spent a week in Ireland and this was all the luggage I needed for my non-photography stuff. If you really want to maximize the potential of the eBag, buy some of the packing cubes for your clothes. Those things really help! The trick with packing so light is to find a hotel that allows you to do laundry. If you bring enough clothes for three or four days, all you need to do is wash your clothes at some point during the week. Also don’t forget to leave a bit of extra room for a souvenir or two.
Camera Bag
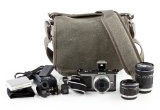 For the camera bag, this is going to be your “small carry-on item”, so I recommend something like the Think Tank Retrospective 5. This type of bag might appear to not hold much gear, but we’ll get into that next, starting with lenses.
Photo Gear – Lenses
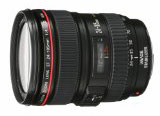 You might have a stable of lenses that you plan to bring with you on your trip, but try to resist the urge to bring too many. If you plan to do a lot of exploring around the city you are visiting (especially if you are on foot!) you are going to want to travel as lightly as possible. If you decide to bring several lenses, that camera bag full of heavy, expensive glass is going to get really old, really fast. A lens that covers a wide range of scenarios is your best bet. That means a zoom lens, and there are several options here. Given the choice, I’d go with the Canon EF 24-105mm f/4 lens or the Nikon 24-120mm f/4 lens. These lenses are not cheap, but they have the perfect combination of versatility and speed. 24mm is plenty wide enough, and 105 (on the Canon) and 120 (on the Nikon) are both a decent amount of zoom. Also, f/4 is fast enough to handle low light situations and both of these lenses have image stabilization. These are both full frame lenses, though they will work on cropped sensor cameras.
Other zoom lenses to consider (for cropped sensor cameras) are the 18-250mm f/3.5-6.3 line that are available for Nikon, Canon, Pentax, Sony and Sigma. These lenses are cheaper alternatives to the Canon and Nikon alternatives I listed above. The downside is the lenses are slower at the further end of the zoom (the f-stop goes higher the further you zoom – up to as high as 6.3, which is pretty slow). But they are much lighter and they do have image stabilization. These lenses will not work correctly on full frame cameras, unfortunately.
If you plan to bring more than one lens, I’d definitely recommend a 50mm prime. These lenses can be picked up for a low price, and they are incredibly fast! The Canon 50mm f/1.8 can be picked up for $125 and the Nikon 50mm f/1.8 is only $113. These are fixed focal length lenses, but that crazy low f-stop can be a life saver in situations where a flash isn’t an option (dark museums, for example).
If you don’t want to buy a lens, why not rent one? Remember what I mentioned about not checking luggage? The money you saved by not checking luggage just about covers the price of renting a nice lens for a week.
Photo Gear – Camera Body
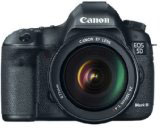 My previous two trips were spent traveling around with a Canon 5D Mark II (the 5D Mark III is the better option). This camera is a popular full frame workhorse, but it is a bit on the heavy side. A fellow photographer friend of mine swears by the Nikon D800 (the D810 just came out). This is also a heavy full frame workhorse of a camera. Either one would absolutely give you stunning results, but they are on the pricey side. Lower priced SLR alternatives that are still full frame would be the Canon 6D or the Nikon D610.
For a cropped sensor camera, I’d go with the Canon 7D Mark II. This camera is a bit smaller and lighter, plus it’s packed with some surprisingly professional grade features. The Nikon equivalent is the D7100.
Photo Gear Alternative – Mirrorless Camera Body
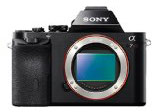 Another angle to consider would be mirrorless full frame cameras. The term “mirrorless” refers to the fact that the camera does not use a mirror to switch the scene between the optical viewfinder and image sensor. Because of that, a common acronym for these cameras is EVIL, which stands for “Electronic Viewfinder, Interchangeable Lens”. That means you could say, “I have an EVIL camera” and really mean it! The Sony A7R comes up a lot in this conversation, and this camera might get you the best bang for your buck in terms of image quality and portability. I’m actually highly considering this as my next camera purchase – UPDATE – I ended up buying this camera for all travel photography. This little camera really packs a wallop! It’s a full frame, 36.4 megapixel, light eating machine with image quality as good as (or rivaling, depending on who you ask) the Nikon D800. The big difference between this camera and the Canon 5D or Nikon D800 is the size and price. The camera is incredibly small (5 x 1.9 x 3.7 inches; 1 pound), which is great for travel, and the price is just over $2000 (the Canon and Nikon cameras hover in the $3000 range). In addition, these mirrorless cameras can be modified to work with any number of lenses via the use of an adapter. The Metabones Adapter allows you to work with lenses from various manufacturers like Canon and Nikon with full functionality (focusing is apparently slower, however). Alternately, you can pick up the less expensive but similarly featured Fotodiox Pro EF-NEX Auto adapter. So you could pick up the Canon 24-105mm f/4 lens and have it up and running on a very portable, full frame camera. Or use the Metabones Adapter or Fotodiox adapter along with a 40mm pancake lens on the A7R and have a ridiculously lightweight and portable powerhouse combo.
Photo Gear – Camera Strap
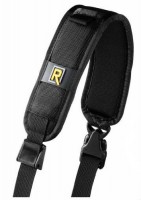 One thing you should absolutely not overlook is replacing your camera strap! The strap that originally came with your camera becomes a medieval torture device after a day of lugging your camera around. I’d recommend replacing that camera strap with something like the Black Rapid RS-7. I have one of these and I absolutely love it. This strap more evenly distributes the weight of the camera, plus it makes grabbing the camera for a quick shot much easier. Once fastened the camera hangs upside down, resting securely at the photographer’s hip, stomach, or at the small of the back. Another added feature is you are replacing your old strap, which probably has a huge, bright CANON or NIKON logo right on the front of it, which might invite theft in a dodgy area if it’s not replaced.
Photo Gear – Other Considerations
Tripod – Unless you know for certain that you must have your tripod, you might consider ditching it. There have been several times when I’ve packed a tripod with every intention of having it available if necessary. But when I got to the airport and saw one more heavy item I’d be lugging around, I changed my mind. I took the risk that if I ran into a situation that called for a tripod, I’d be able to get creative and figure out a solution. And that’s exactly what happened. Running around on tour buses or in public transportation was challenging enough with the small amount of camera gear I took with me. A tripod would have been too much.
Off-Camera Flash – Unless you know for certain you’ll be going somewhere that requires a flash, you might consider leaving it at home. Many museums don’t allow flashes, and nothing says, “there’s a photographer over here” more obviously than a bright speedlite flashing away at night. Instead, consider a fast lens like the 50mm prime (mentioned earlier) along with a full frame camera that allows super high ISO ranges.
One more thing to think about – hide your camera logos! Placing a small piece of electrical tape over the various logos on your camera might help deter theft.
Every photographer has different needs, but these are the travel tips that have worked well for me. Did I miss something, or do you have some other ideas? Share them in the comments below!


